User Menu
Customize for a personalized platform setup.
Companies
Overview
Harness the power of multiple company profiles within your account to navigate between them, ensuring that data remains distinctively segregated and securely stored within the confines of each individual company.
It empowers you with the capability to maintain separate identities for various business ventures while enjoying the ease of accessing and managing them within a singular, centralised account.
Navigating and Switching
To access the companies section, begin by selecting your username, located in the upper right corner. Then, from the ensuing menu, choose "Companies."
Once you've been directed to the companies page, you will find a comprehensive list of all your registered companies, each accompanied by a "Switch" button. Click this button to switch between the various companies configured within your account.

Creating New Companies
To initiate the process, select the "+ Add Company" option located in the upper right corner. This action will trigger the appearance of a popup screen, prompting you to designate a name for your new company.
After entering the desired name and clicking "Save," your newly created company will promptly appear in the list of companies. A confirmation message will then be displayed in the bottom right corner, confirming the successful creation of your company.

Users
Overview
This document serves as your guide to navigating the users page and provides step-by-step instructions for both inviting new users and editing existing ones.
Navigating to the Users Page
To access the users page, begin by selecting your username, located in the upper right corner. Then, from the ensuing menu, choose "Users."

Inviting a New User
To invite a new user to your platform, begin by clicking the "Invite" button located in the top right corner of the users page. This action will redirect you to a new page where you can initiate the invitation process.
On this invitation page, you'll be prompted to enter the email address of the user you wish to invite. Additionally, you'll find a dropdown menu right next to the email field, allowing you to assign a specific role to the user. It's important to note that roles determine the permissions granted to the user. Once you've entered the required information, click the "Save" button to confirm the invitation.
Please visit our dedicated Roles page for detailed information on how to establish and modify user roles.
Upon saving the invitation, you will be taken back to the users page. Here, you'll notice the newly invited user listed in the "Invitations" section.
In the "Actions" field next to the invitation entry, you'll find two buttons. The first button enables you to resend the invitation email if necessary, while the second button, represented by a trash bin icon, allows you to delete the invitation. This action prevents the user from joining your platform.
Following this, an email will be dispatched to the invited user. Inside this email, they should locate and click the "Accept the invitation" button. Clicking this button will redirect the user to your platform, where they will be prompted to set a name and password for their account. It's worth noting that the email field will be filled with the address they were initially invited with.

Editing a New User
To edit a user, you can start by navigating to the users' page and locating the specific user you want to modify. Once you've found the user, click on the pen icon located on the right side of their user entry under the "Actions" tab. This action will take you to the user details.
Within the "Edit User" section, you can change the user's name, email, and role according to your requirements. Please remember to click the "Save" button if you make any changes.
The "Activities" section provides a summary of all actions conducted by this user's account. To view their activities in more detail, click the "All Activities" button.
The "Authentication Transaction Records" section displays a record of this user's successful and unsuccessful login attempts. It includes details such as the date and the associated IP address.
Lastly, the "Page Views" section presents a chronological record of the dates and the specific pages visited by this user during their interactions with the platform.

Roles
Overview
The Roles page is a valuable tool for creating and managing roles that users can assign. It allows you to tailor their access to Channels according to your specific requirements.
This functionality empowers you to establish users with diverse access levels and provides a high degree of customisation to align with your unique needs. Whether you need to grant restricted access or define specific permissions, the Roles page equips you with the flexibility to manage user access effectively.
Accessing the Roles Page
To access the companies section, begin by selecting your username, which is located in the upper right corner. Then, from the ensuing menu, choose "Roles."

Permissions Explained
Permissions Overview
| Permission | Description |
| Create | Allows the creation of new entries or records. |
| Delete | Permits the deletion of entries or records. |
| View | Grants access to view entries or records. |
| Update | Enables updates or modifications to existing entries or records. |
| Fulfillment | Grants permission to fulfil orders. |
| Fulfillment Update | Enables updating the fulfilment status of orders. |
| Data Protection | Ensures that all client-based information will appear randomized to the user. |
| Update Interval | Allows setting the interval at which webhooks are updated. |
Permissions by Page
This table offers a quick reference for understanding the permissions for each page or field in your Channels account. Use this guide to efficiently configure roles and assign appropriate permissions based on job titles and responsibilities.
| Page | Create | Delete | View | Update | Fulfillment | Fulfillment Update | Data Protection | Update Interval |
| General | ✓ | ✓ | ||||||
| Transaction Records | ✓ | |||||||
| Dashboard | ✓ | |||||||
| Channels | ✓ | ✓ | ✓ | ✓ | ||||
| Couriers | ✓ | ✓ | ✓ | ✓ | ||||
| Customers | ✓ | ✓ | ✓ | ✓ | ||||
| Helpdesk | ✓ | |||||||
| Hosted Pages | ✓ | ✓ | ||||||
| Invoice | ✓ | ✓ | ✓ | |||||
| Orders | ✓ | ✓ | ✓ | ✓ | ✓ | ✓ | ||
| Plugins | ✓ | ✓ | ✓ | |||||
| Products | ✓ | ✓ | ✓ | ✓ | ||||
| Roles | ✓ | ✓ | ✓ | ✓ | ||||
| Rule Engines | ✓ | ✓ | ✓ | ✓ | ||||
| Stores | ✓ | ✓ | ✓ | ✓ | ||||
| Users | ✓ | ✓ | ✓ | ✓ | ||||
| Webhook | ✓ | ✓ | ✓ | ✓ | ✓ |
Creating a New Role
To create a new role, start by clicking the "+ Add" button in the Roles page's top right corner. This action will take you to a dedicated page for role creation, where you can set the desired name for the role and choose the permissions you wish to associate with it. The process is user-friendly, allowing you to easily toggle permissions for actions such as "Create," "View," "Update," and "Delete" for various channel functionalities.
Enabling this feature in the "Data Protection" section ensures that all client-based information will appear randomised to any user assigned to this role, enhancing data security.
Once you've configured the role to your specifications, click the "Save" button at the bottom of the page to confirm the role's creation. Upon saving, you'll be directed back to the Roles page, where you'll find the newly created role listed alongside existing ones.

Editing Roles
To edit a role, begin by navigating to the Roles page. Once there, look for the action section next to the role entries on the right side. This section shows two distinct buttons: a pen icon, which signifies editing, and a trash bin icon designed for role deletion.
If you choose to edit a role, click the pen icon. This action will redirect you to a page that mirrors the role creation page, allowing you to modify all aspects of the role.
If you wish to delete a role, click the trash bin icon. It will trigger a popup window atop the page, prompting you to confirm the deletion. If you proceed by clicking "OK," your action will be confirmed, and the role will be permanently removed from the system.

Notifications
Overview
In this document, we will provide instructions for accessing the notifications page and explore its functionality.
Navigating and Viewing the Notifications Page
To access the companies section, begin by selecting your username, located in the upper right corner. Then, from the ensuing menu, choose "Notifications."
On this page, you'll find a comprehensive list of notifications related to all actions and orders you've received. Think of this as a centralised hub for notifications and feedback, where you'll stay informed about automated actions taken on your account. As you read the notifications, they will be automatically cleared.

Settings
Overview
The settings page allows you to perform various essential tasks, including generating an API key, managing IP address whitelisting, and resetting your account password. This document will guide you through the steps required to complete these actions.
Navigating to the Settings Page
To access the companies section, begin by selecting your username, located in the upper right corner. Then, from the ensuing menu, choose "Settings."

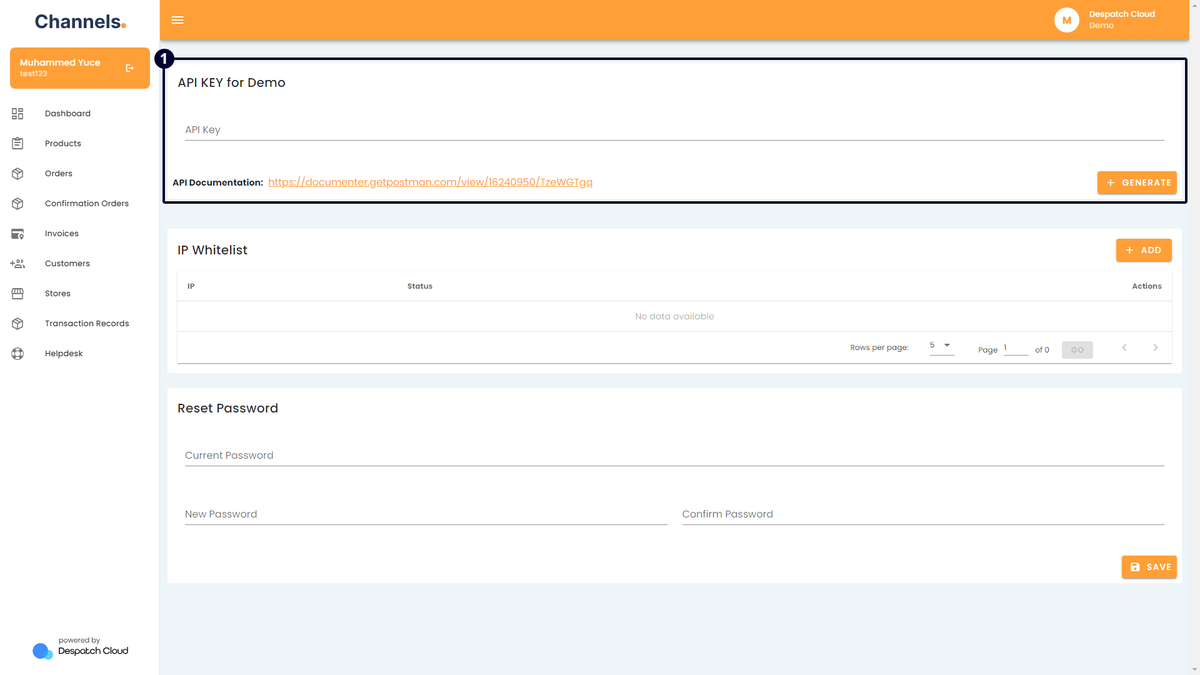
Settings
The first field allows you to create an API Key for your current company profile. By clicking the "+ Generate" button, you can generate an API key that can be utilised in the development of your programs. For comprehensive details on using this API key, consult our dedicated API documentation page.
In the second section, you can manage your IP Whitelist. Click the "+ Add" button to input an IP address. You have the option to either disable, allow, or block this IP address. Allowing an IP address permits access to your account solely from that specified address. Choosing to disable or block an IP means that the entered IP won't have access to your account from that particular device.
The last section, "Reset Password," enables you to update your account password. You can do this by entering a new password alongside your old one.
Hosted Pages
Overview
The elements on this page encompass functionalities typically attainable through API calls. Nevertheless, we've developed this graphical interface tool to expedite your development efforts. This page serves as a comprehensive guide, delineating each element and elucidating the step-by-step potential it offers.
Accessing the Hosted Pages
To access the companies section, begin by selecting your username, located in the upper right corner. Then, from the ensuing menu, choose "Hosted Pages."

Hosted Pages Explained
In the final production stage, you are expected to automatically generate and display the hosted page URL as needed by utilising the following API request: https://documenter.getpostman.com/view/16240950/TzeWGTgq#f24feaa9-b5b8-44b8-a3ba-7be728857ee4 referenced in the documentation.
1/4 - At the top of the page, you will find "Active Links," where you can generate an invitation link for a specified store or stores by clicking the "+ Generate" button. Please note that the generated link is only valid and accessible for one hour. After this time, you must create a new link to share it. Upon clicking this link, users will be directed to a new page where they can either install the channels you've configured or modify the ones they previously installed for this store.
5 - The "Branding & Personalisation" section allows you to customise various aspects. For example, you can upload a custom logo using a URL, display or hide the search bar for the channels, enable dark mode, or adjust the page's overall colour scheme and font size.
6 - In this section, you can also customise your settings using "Custom Stylesheets." You can download a sample of our page style by clicking the highlighted "our page styles" button and working on that CSS file. Once you have prepared your CSS file, you can upload it to your preferred hosting service and provide an accessible link in this field for Channels to fetch and load it. This way, you can apply your personalised customisation using CSS files. You can include multiple CSS files by adding several entries, and they will be loaded in the order they are listed, from top to bottom.
7 - In the "Available Channels" section, you can toggle the checkboxes to make channels available for installation or hide them. This section also lets you modify the visual appearance and filter the available channels.
8/9 - In the "Customise Inputs," you can click the "+New Customisation" button to tailor individual channels and their respective input fields. You can modify several elements, such as the field name, placeholder text (the text that appears when you hover the cursor over the field), the error message displayed when incorrect information is entered, and a default value. Alternatively, you can turn off an input field entirely, preventing it from being displayed when users interact with it. You can create your personalised channel connections using the disable option and match them with your internal infrastructure.
Recommended logo dimensions are 230 pixels in width and 40 pixels in height.
