Sales Channel Setup Guides
Documents about obtaining API credentials of sales channels and adding them to your Channels account.
- Sales Channel Options
- Aero Commerce
- AliExpress
- Amazon
- Amazon Vendor Central
- B2B Wave
- Back Market
- BigCommerce
- BluePark
- Bol.com
- Brightpearl
- C-Discount
- eBay
- EKM
- Etsy
- Fruugo
- Groupon
- Interspire
- Magento 1
- Magento 2
- ManoMano
- Mirakl
- Next
- OnBuy
- OpenCart V2
- OpenCart V3
- OrderWise
- PrestaShop
- QuickBooks (TradeGecko)
- ReCharge
- Shopify
- Shopline
- Shopware
- Squarespace
- TikTok Shop
- Unleashed
- Veeqo
- VendPos
- VirtualStock
- VisualSoft
- Walmart
- Wayfair
- Wish
- Wix
- WooCommerce
- WowCher
- Zoho Commerce
- Not on the High Street
- SFTP Sales Channel
Sales Channel Options
Overview
This document lets you discover the functionality of the options encountered when installing sales channels.
Details of the Sales Channel Options
Kindly note that while Channels support these options, their availability may vary based on the supported features of the respective sales channel platforms.
Fulfilment Management
- Use Custom Fulfilment Status: When you submit fulfilment for an order (indicating that the order has been processed and shipped), you can set a custom status for that specific order. If turned on, the system will prompt you to enter the custom status manually in a textbox. You can write a label or a term that reflects the particular stage of fulfilment that the order has reached.
Location Management
- Select Default Location: This option allows you to set a default location for your orders. When an order doesn't specify a particular location, the default location will be applied.
- Select Warehouse: This dropdown list lets you choose a specific warehouse from which the products will be shipped. It is beneficial if you have multiple warehouses.
- Select Delivery Option: This dropdown list lets you choose a preferred delivery option for your orders. It could include various shipping methods or carriers that you have available.
- Restrict Orders by Location: This feature allows you to restrict orders based on the location. For example, you might want to limit certain products or services to specific regions or countries.
- Restrict Products by Location: This option restricts the availability of specific products based on location. This could be helpful if certain products are only meant for specific markets.
- Use Multiple Fulfillment Tracking: This feature permits you to generate multiple shipments for a single order. By default, the system restricts the creation of more than one fulfilment. If you turn off this option, the system will prohibit partial fulfilment of orders on the designated channel.
Notification Management
- Receive cancelled order notifications: When enabled, it means that you want to receive notifications whenever an order is cancelled within your e-commerce platform.
- Notification Emails: If you turn on the "Receive cancelled order notifications" option, you must enter an email address in the "Notification Emails" box on the right side. This is the email address to which notifications about cancelled orders will be sent.
Order Management
- Automatically Confirm Orders: Enable this feature to simplify your order processing workflow by having Channels automatically confirm incoming orders from your integrated sales channels. When an order is placed, it will be instantly marked as confirmed, allowing for faster processing and fulfilment. This option reduces the need for manual review and confirmation, ensuring that your orders move through the system efficiently and minimizing delays. Ideal for businesses that handle a high volume of orders or those looking to enhance operational efficiency, this feature helps maintain a smooth and rapid order processing cycle.
- Get Unpaid Orders: This option allows you to retrieve or view orders that are marked as unpaid, helping you manage and process outstanding payments.
- Use Partial Fulfillment: Enabling this option allows you to fulfil and ship orders partially. This is useful when some items in an order are ready for shipment while others may be on backorder.
- Add Reference Number to Shipping Address: This feature allows you to include a reference number in the shipping address. It can help cross-reference or organize orders.
- Fetch Shipped Orders: This retrieves and displays orders already shipped. It can help track and manage the fulfilment process.
- Auto Create Invoices: If this option is turned on, the system automatically generates an invoice in the sales channel when an order is downloaded.
- Fetch POS (Point of Sale) Orders: This feature enables the system to fetch orders made through a Point of Sale system.
- Fetch Cancelled Orders: This option retrieves information on orders that have been cancelled.
- Auto Sync Orders: This option automatically marks orders synced when fetched via API (Application Programming Interface).
- Auto Hold Aged Orders: If this option is activated, aged orders over 24 hours old at the time of system import will be automatically put on hold.
- Use Default Get Orders Interval: If turned off, you can set a default interval for retrieving orders. For example, it fetches orders every X seconds. If turned on, it will use the default interval set by us.
- Add Prefix to the Beginning of Order Numbers: If turned on, this option allows you to add a prefix to the order numbers, which can be helpful for organizational purposes.
- Use Default Order Import Delay: This option offers a time delay before orders are imported into the system after being placed. If turned on, it will use the delay interval set by the system; if turned off, you can set an interval yourself.
- Ignore Orders Before: If activated, you will be prompted to select a date, and orders placed before that date will be ignored.
- Notify Customer: Customers are notified when fulfilment information is updated for their orders.
- Use Default Shipping Method: Sets a default shipping method value if the shipping method is empty on an order.
- Use What3Words: If enabled, the system will use What3Words to pinpoint the customer's exact location.
- Get Customer: Retrieves customer information from registered customers.
- Ignore Company Name: When active, the system will ignore the company name field as long as the first and last names have values.
Order Polling
- Order Polling: Order polling is a process where the system regularly checks for new orders on the connected sales channels. If this feature is turned on, you will be prompted to set a "poll time." The poll time refers to the interval between each check for new orders. For example, if you set a poll time of 15 minutes, the system will check for new orders every 15 minutes.
Push All Stocks
- Push all stocks: It implies that you want to synchronize the stock information between your e-commerce system and the connected sales channels for all available products. If this feature is turned on, you will be prompted to set a "time." This refers to a specific time at which the system will automatically initiate the process of pushing or updating stock levels for all products. For example, if you set a time of 2:00 AM, the system automatically updates stock levels every day at 2:00 AM.
Rate Limits
Adjusting the rate limits could lead to system instabilities if you set a limit beyond what the sales channels can handle. We recommend keeping these values unchanged, as we've already optimized them at the maximum rates. However, if you choose to modify them, please review the API rate limits for the specific channel(s) you're integrating before making any adjustments.
- Update Stock Allow: This refers to whether the system allows the update of stock levels.
- Update Stock Every: If enabled, this setting specifies the time interval (in seconds) between stock-level updates. For example, if set to 300 seconds, the system would update stock levels every 5 minutes.
- Update Fulfillment Allow: Similar to "Update Stock Allow," this refers to whether the system allows the update of fulfilment status.
- Update Fulfilment Every: This setting specifies the time interval (seconds) between updates and fulfilment status. For instance, if set to 600 seconds, the system would update the fulfilment status every 10 minutes.
- Products Limit in Each Request: This setting determines the maximum number of products that will be pulled from the sales channel in each data request. For example, if set to 50, the system would retrieve information for 50 products at a time.
Stock Management
- Download Products: This option lets you download products from the sales channel and add them to your inventory or product list.
- Download Product Images: Enables the download of product images associated with the products from the sales channel.
- Download Product Dimensions & Weights: This feature lets you download information about product dimensions and weights from the sales channel.
- Download Product Customs Information: This option downloads additional customs information for products, such as the HS Code (Harmonized System Code) and Country of Origin.
- Add to Products: Add the downloaded products to the list or inventory of your main products.
- Overright Stock Levels: This function sets the initial stock level of products via the channel. It could be helpful for syncing stock levels when setting up your inventory.
- Auto Sync Stock: When enabled, changes in stock levels will be automatically synced with the sales channel, ensuring that both your system and the channel have up-to-date stock information.
- Push Stock Levels: This feature pushes the main product stocks to the channel's product stocks, ensuring consistency between your inventory and the sales channel.
- Auto Deduct Stock For Orders: This feature automatically updates stock levels when an order is received, deducting the sold quantities from the available stock.
- Refetch Products: Initiates a process where all products are fetched immediately from the sales channel.
- Refetch Location Levels: This function retrieves stock levels of all products regardless of their last updated date, ensuring the latest information.
- Fetch Product Metafields: A separate request is made to the sales channel to fetch specific product metafield data. Metafields can hold additional information about products beyond standard attributes.
- Allow Increase/Decrease Stock Levels: This option updates the stock levels based on the increase or decrease option. It could be helpful for manual adjustments.
- Use Default Get Products Interval: This option delays time before fetching products from the sales channel. For example, products may be fetched every X seconds. If turned on, it will use the default interval; if you turn it off, you can set it manually.
- Enable Low Stock Buffer: When turned on, this feature automatically sets stock levels as 0 on channels when your product quantities are below or equal to a specified limit. It helps prevent overselling when stock is low.
Taxes
- Auto Calculate Tax: It allows the system to calculate taxes for orders automatically. Users can input the tax rate as a percentage when this feature is turned on. Additionally, users have the option to set country-based taxes. The example provided indicates that you can specify tax rates for different countries using their ISO codes. For example, "GB:20" means a tax rate of 20% for orders from the United Kingdom, and "IE:20" means a tax rate of 20% for orders from Ireland. If you want to add taxes for each country, you would separate the entries with commas. If the field is blank, the global tax rate is used for all orders.
Couriers and Courier Service Mapping
As most sales channels use different formatting rules and might have different names for their couriers than we do, it is imperative to map couriers or courier services in a way that fits into their system to prevent errors from occurring. Channels allow you to choose the courier/courier service you want to use and send it back to the sales channel with a custom name.
Here's a simplified explanation for these features:
- Couriers: It ensures the correct naming conventions are used when setting up couriers for different sales channels.
- Purpose: You can specify and customize the courier information for different sales channels.
- Function: When setting up a courier like Royal Mail for a specific sales channel, you can give it a custom name that fits the rules or format required by that sales channel. For example, Royal Mail might be entered as "RM" for one platform and "Royal Mail UK" for another, based on the sales channel's requirements. The correct courier codes and names can be obtained from the sales channel's support team.
- Courier Service Mapping: It allows you to manage courier names internally while meeting each sales channel's external requirements.
- Purpose: This feature enables you to customize how courier information is displayed in your system while ensuring it matches the requirements of the sales channel when sending information back.
- Function: If you have configured a courier for a sales channel and labelled it "Courier A," you can give it a custom name like "Courier B" within your system. This way, it appears as "Courier B" internally, but when sending fulfilment information back to the sales channel, it uses the name "Courier A" to fit their requirements.
To learn about how to configure these options, follow the steps below:
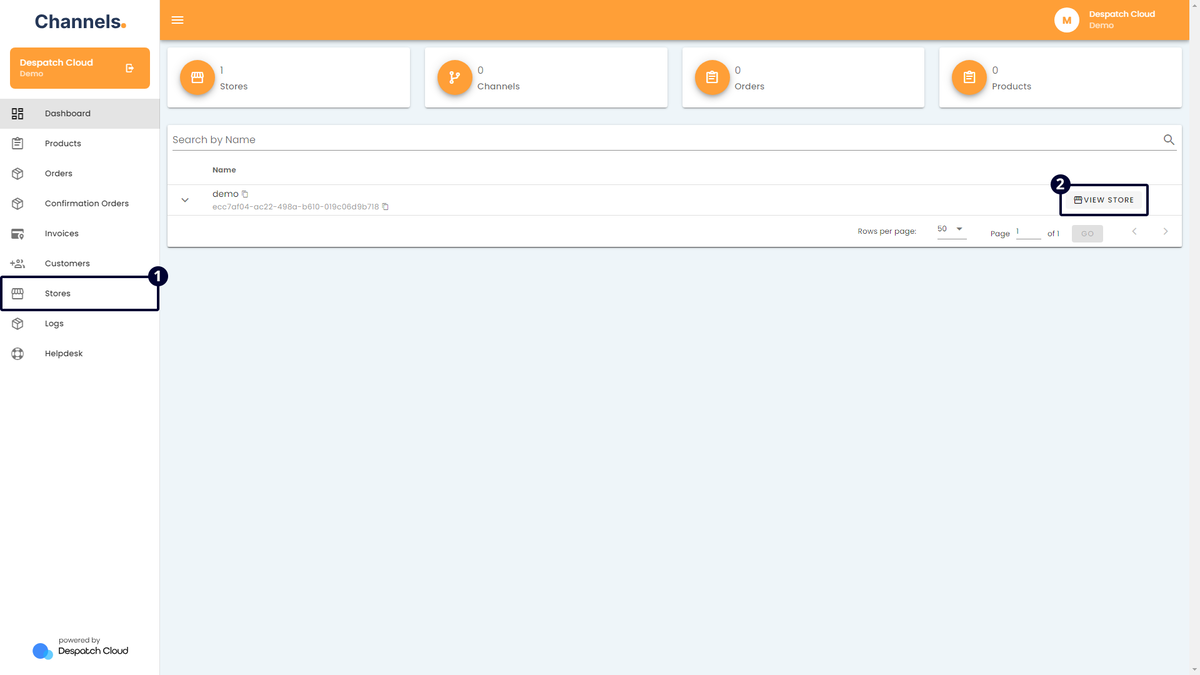
- Access your account and go to the left side of the screen. Click the "Stores" button.
- If you already have a store, click "View Store" on the right side of the screen to access it.
- To edit an existing store, click the edit button on the right side. If you need to create a new store, click "+ ADD" above, name it, and use the edit button to make changes.
- If you don't have the desired sales channel installed, click "+ ADD" in the Channels section to begin the installation. If you already have it installed, use the edit button through the entry list to see its details.
- See the highlighted area to access the couriers and the courier service mapping screen.
- Once you click "Couriers," you will be taken to the page where you can select the courier you sent in the fulfilment creation request. This courier should be the one you want to use with the sales platform. You can enter a custom name for the courier in a way that fits with the rules of the sales platform you're looking to use. This is the name that will be sent to the sales channel. Please contact your sales channel account manager to get the courier codes and names list for the channel in question. Once you modify everything, don't forget to click the "Save" button to finalize the process.
- Once you click "Courier Service Mapping," you will be taken to a page where you can select a courier and configure its custom name. Once you are done configuring, click "Save" to save this entry.

Aero Commerce
Aero Commerce Setup Guide
Obtaining the API keys from Aero Commerce
Visit this page to acquire the credentials to set up your sales channel. Our page provides step-by-step guidance on obtaining these credentials, which are essential for the setup process.
Installing the Aero Commerce Sales Channel
To add the Aero Commerce sales channel to your Channels account, kindly adhere to the following steps:
- Access your account and go to the left side of the screen. Click the "Stores" button.
- If you already have a store, click "View Store" on the right side of the screen to access it.
- To edit an existing store, click the edit button on the right side. If you need to create a new store, click "+ ADD" above, name it, and use the edit button to make changes.
- Click "+ ADD" in the Channels section to begin the installation.
- A window will appear in the centre of the screen. Choose "Aero Commerce" from the list of available channels.
- Provide the required information:
- Channel Name: In the provided field, you can enter any name you desire. However, it is recommended to choose a name that has meaning to you, such as "Aero Commerce", as it will serve as an apparent reference for the source of the order in the future.
- Domain & Access Token: Please enter the information obtained from the Aero Commerce platform, as previously shown. It is essential to ensure that these fields are filled in correctly to access your account.
- After filling out the fields, customize other options, then click "Save" in the bottom-right corner.
- You'll be back in the recently installed channel. Activate it at the top of the screen using the "Is Active" button.
Congratulations! You've successfully set up your Aero Commerce sales channel on Channels. You can now sell products on Aero Commerce and manage orders from your Channels dashboard.

AliExpress
AliExpress Setup Guide
Installing the AliExpress Sales Channel
To add the AliExpress sales channel to your Channels account, kindly adhere to the following steps:
- Access your account and go to the left side of the screen. Click the "Stores" button.
- If you already have a store, click "View Store" on the right side of the screen to access it.
- To edit an existing store, click the edit button on the right side. If you need to create a new store, click "+ ADD" above, name it, and use the edit button to make changes.
- Click "+ ADD" in the Channels section to begin the installation.
- A window will appear in the centre of the screen. Choose "AliExpress" from the available channels list.
- Provide the required information:
- Channel Name: Enter any meaningful name, e.g., "AliExpress."
- Fulfilment Country ISO Code: You must fill in an important field correctly. When a customer chooses a courier company other than the ones accepted by AliExpress, AliExpress requests a distinction between shipments made within the same country and shipments made to a different country. So, you need to use the ISO code of the country where your shipments will be made. For example, if your shipments are made to Italy, you must enter "IT" in this field.
- Notification Emails: The AliExpress channel connection has a lifespan of one month and requires reconnection after this period. When the connection time is close to expiring, a notification will be sent to the email address you have provided.
- After filling out the fields, customise other options, then click "Save" in the bottom-right corner.
- Click "Copy Connect Link" to copy a URL. Paste it into your browser's navigation bar to access the AliExpress connection page.
- Follow the channels connection page instructions and click "Connect".
- If logged in to AliExpress, the connection is automatic. If not, log in.
- Agree to the Authorization Terms and Agreement on the AliExpress page and click "Authorize."
- Once connected, return to channels by clicking "Continue."
- You'll be back in the recently installed channel. Activate it at the top of the screen using the "Is Active" button.
Congratulations! You've successfully set up your AliExpress sales channel on Channels. You can now sell products on AliExpress and manage orders from your Channels dashboard.

Amazon
Amazon Setup Guide
Installing the Amazon Sales Channel
To add the Amazon sales channel to your Channels account, kindly adhere to the following steps:
- Access your account and go to the left side of the screen. Click the "Stores" button.
- If you already have a store, click "View Store" on the right side of the screen to access it.
- To edit an existing store, click the edit button on the right side. If you need to create a new store, click "+ ADD" above, name it, and use the edit button to make changes.
- Click "+ ADD" in the Channels section to begin the installation.
- A window will appear in the centre of the screen. Choose "Amazon" from the available channels list.
- Provide the required information:
- Channel Name: Enter any meaningful name, e.g., "Amazon."
- Marketplace: Please choose the country where your store is registered from the options in the drop-down menu.
- Fulfilment Channels:
- MFN (Merchant Fulfillment Network): This is Amazon's equivalent of the Fulfilled by Merchant (FBM) program. It involves a seller selling their product to Amazon but being responsible for all aspects of warehousing, shipping, and customer support.
- AFN (Amazon Fulfillment Network): It refers to a sales model in which the seller stores their products or part of their inventory in Amazon's warehouse. When an order is placed, Amazon automatically handles the shipping process.
- Order Status: You can choose and import only specific order statuses into the platform.
- After filling out the fields, customize other options, then click "Save" in the bottom-right corner.
- Click "Copy Connect Link" to copy a URL. Paste it in your browser's navigation bar to reach the Amazon connection page.
- Follow the channel connection page instructions:
- Click "Connect."
-
Proceed with the Amazon setup by following the instructions provided in this guide.
- Once connected, return to channels by clicking "Continue."
- You'll be back in the recently installed channel. Activate it at the top of the screen using the "Is Active" button.
Congratulations! You've successfully set up your Amazon sales channel on Channels. You can now sell products on Amazon and manage orders from your Channels dashboard.

Amazon Vendor Central
Amazon Vendor Central Setup Guide
Obtaining the API Keys from Amazon Vendor Central
You can acquire the credentials to set up your sales channel by visiting this page. Our page provides step-by-step guidance on obtaining these credentials, which are essential for the setup process.
Installing the Amazon Vendor Central Channel
To add the Amazon Vendor Central sales channel to your Channels account, kindly adhere to the following steps:
- Access your account and go to the left side of the screen. Click the "Stores" button.
- If you already have a store, click "View Store" on the right side of the screen to access it.
- To edit an existing store, click the edit button on the right side. If you need to create a new store, click "+ ADD" above, name it, and use the edit button to make changes.
- Click "+ ADD" in the Channels section to begin the installation.
- A window will appear in the centre of the screen. Choose "Amazon Vendor Central" from the available channels list.
- Provide the required information:
- Channel Name: Enter any meaningful name, e.g., "Amazon Vendor Central."
- Marketplace: Please choose the country where your store is registered from the options in the drop-down menu.
- Token fields: Please input the credentials you previously acquired from the Amazon Vendor Central platform.
- After filling out the fields, customize other options, then click "Save" in the bottom-right corner.
- You'll be back in the recently installed channel. Activate it at the top of the screen using the "Is Active" button.
Congratulations! You've successfully set up your Amazon Vendor Central sales channel on Channels. You can now sell products on Amazon Vendor Central and manage orders from your Channels dashboard.

B2B Wave
B2B Wave Setup Guide
Obtaining the API keys from B2B Wave
You can acquire the credentials to set up your sales channel by visiting this page. Our page provides step-by-step guidance on obtaining these credentials, which are essential for the setup process.
Installing the B2B Wave Sales Channel
To add the B2B Wave sales channel to your Channels account, kindly adhere to the following steps:
- Access your account and go to the left side of the screen. Click the "Stores" button.
- If you already have a store, click "View Store" on the right side of the screen to access it.
- To edit an existing store, click the edit button on the right side. If you need to create a new store, click "+ ADD" above, name it, and use the edit button to make changes.
- Click "+ ADD" in the Channels section to begin the installation.
- A window will appear in the centre of the screen. Choose "B2B Wave" from the list of available channels.
- Provide the required information:
- Channel Name: In the provided field, you can enter any name you desire. However, it is recommended that you choose a name that has meaning to you, such as "B2B Wave", as it will serve as an apparent reference for the source of the order in the future.
- Hostname: This is where you should enter the name of your store, as it will appear in the URL, such as "https://hostname.b2bwave.com/."
- App Code & Token: Please enter the information obtained from the B2B Wave platform, as previously shown. Ensuring that these fields are filled in correctly to access your account is essential.
- After filling out the fields, customize other options, then click "Save" in the bottom-right corner.
- You'll be back in the recently installed channel. Activate it at the top of the screen using the "Is Active" button.
Congratulations! You've successfully set up your B2B Wave sales channel on Channels. You can now sell products on B2B Wave and manage orders from your Channels dashboard.

Back Market
Back Market Setup Guide
Obtaining the API keys from Back Market
You can acquire the credentials by contacting your Back Market account manager.
Installing the Back Market Sales Channel
To add the Back Market sales channel to your Channels account, kindly adhere to the following steps:
- Access your account and go to the left side of the screen. Click the "Stores" button.
- If you already have a store, click "View Store" on the right side of the screen to access it.
- To edit an existing store, click the edit button on the right side. If you need to create a new store, click "+ ADD" above, name it, and use the edit button to make changes.
- Click "+ ADD" in the Channels section to begin the installation.
- A window will appear in the centre of the screen. Choose "Back Market" from the list of available channels.
- Provide the required information:
- Channel Name: In the provided field, you can enter any name you desire. However, it is recommended to choose a name that has meaning to you, such as "Back Market", as it will serve as an apparent reference for the source of the order in the future.
- Access Token: Please enter the information obtained from the Back Market platform, as previously instructed. This field must be filled in correctly to access your account.
- Country & Language: Please accurately select the country and language code from the dropdown list as configured in your Back Market account.
- Automatically Confirm Orders: Enable this feature to simplify your order processing workflow by having Channels automatically confirm incoming orders from your integrated sales channels. When an order is placed, it will be instantly marked as confirmed, allowing for faster processing and fulfilment. This option reduces the need for manual review and confirmation, ensuring that your orders move through the system efficiently and minimizing delays. Ideal for businesses that handle a high volume of orders or those looking to enhance operational efficiency, this feature helps maintain a smooth and rapid order processing cycle.
- After filling out the fields, customize other options, then click "Save" in the bottom-right corner.
- You'll be back in the recently installed channel. Activate it at the top of the screen using the "Is Active" button.
Congratulations! You've successfully set up your Back Market sales channel on Channels. You can now sell products on Back Market and manage orders from your Channels dashboard.

BigCommerce
BigCommerce Setup Guide
Obtaining the API keys from BigCommerce
Visit this page to acquire the credentials to set up your sales channel. Our page provides step-by-step guidance on obtaining these credentials, which are essential for the setup process.
Installing the BigCommerce Sales Channel
To add the BigCommerce sales channel to your Channels account, kindly adhere to the following steps:
- Access your account and go to the left side of the screen. Click the "Stores" button.
- If you already have a store, click "View Store" on the right side of the screen to access it.
- To edit an existing store, click the edit button on the right side. If you need to create a new store, click "+ ADD" above, name it, and use the edit button to make changes.
- Click "+ ADD" in the Channels section to begin the installation.
- A window will appear in the centre of the screen. Choose "BigCommerce" from the available channels list.
- Provide the required information:
- Channel Name: In the field provided, you can enter any name. However, it is recommended to choose a name that has meaning to you, such as "BigCommerce," as it will serve as an apparent reference for the source of the order in the future.
- Client ID & Secret, Store Hash, Access Token: Please enter the information obtained from the BigCommerce platform, as previously shown. Copy and paste these details into the appropriate fields on the Channels. Ensuring you correctly enter this information is essential, as errors may prevent you from accessing your BigCommerce account through Channels.
- Order Statuses: Specifying the orders you wish to integrate is essential. The selection process allows flexibility, as you can opt for multiple statuses. The various order statuses and their respective explanations are elucidated below:
-
Incomplete: Orders that lack essential information or have not been finalized.
-
Pending: Orders that are awaiting processing or confirmation.
-
Shipped: Orders that have been dispatched and are in transit to the customer.
-
Partially Shipped: Orders where only a portion of the items has been shipped.
-
Refunded: Orders for which a refund has been processed.
-
Cancelled: Orders that have been officially annulled.
-
Declined: Rejected orders, typically due to payment issues or other complications.
-
Awaiting Payment: Orders in which payment is yet to be completed.
-
Awaiting Pickup: Orders that are ready for pickup.
-
Completed: Orders that have been successfully processed and delivered.
-
Awaiting Fulfillment: Orders that are pending fulfilment indicate that they are in the queue to be processed.
-
Manual Verification Required: Orders that necessitate manual verification before further processing.
-
Partially Refunded: Orders where a partial refund has been issued for specific items.
-
- After filling out the fields, customize other options, then click "Save" in the bottom-right corner.
- You'll be back in the recently installed channel. Activate it at the top of the screen using the "Is Active" button.
Congratulations! You've successfully set up your BigCommerce sales channel on Channels. You can now sell products on BigCommerce and manage orders from your Channels dashboard.

BluePark
BluePark Setup Guide
Obtaining the API keys from BluePark
Visit this page to acquire the credentials to set up your sales channel. Our page provides step-by-step guidance on obtaining these credentials, which are essential for the setup process.
If you use our software to manage your stock, you must deactivate the "Manage Stock" option in BluePark by going to the "Configuration/e-Commerce Options" page.
Installing the BluePark Sales Channel
To add the BluePark sales channel to your Channels account, kindly adhere to the following steps:
- Access your account and go to the left side of the screen. Click the "Stores" button.
- If you already have a store, click "View Store" on the right side of the screen to access it.
- To edit an existing store, click the edit button on the right side. If you need to create a new store, click "+ ADD" above, name it, and use the edit button to make changes.
- Click "+ ADD" in the Channels section to begin the installation.
- A window will appear in the centre of the screen. Choose "BluePark" from the available channels list.
- Provide the required information:
- Channel Name: In the field provided, you can enter any name. However, it is recommended to choose a name that has meaning to you, such as "BluePark," as it will serve as an apparent reference for the source of the order in the future.
- Domain URL, Username, API Key: Please enter the information obtained from the BluePark platform, as previously shown. Copy and paste these details into the appropriate fields. Ensuring you correctly enter this information is essential, as errors may prevent you from accessing your BluePark account through Channels.
- After filling out the fields, customize other options, then click "Save" in the bottom-right corner.
- You'll be back in the recently installed channel. Activate it at the top of the screen using the "Is Active" button.
Congratulations! You've successfully set up your BluePark sales channel on Channels. You can now sell products on BluePark and manage orders from your Channels dashboard.
Bol.com
Bol.com Setup Guide
Obtaining the API keys from Bol.com
You can acquire the credentials to set up your sales channel by visiting this page. Our page provides step-by-step guidance on obtaining these credentials, which are essential for the setup process.
Installing the Bol.com Sales Channel
To add the Bol.com sales channel to your Channels account, kindly adhere to the following steps:
- Access your account and go to the left side of the screen. Click the "Stores" button.
- If you already have a store, click "View Store" on the right side of the screen to access it.
- To edit an existing store, click the edit button on the right side. If you need to create a new store, click "+ ADD" above, name it, and use the edit button to make changes.
- Click "+ ADD" in the Channels section to begin the installation.
- A window will appear in the centre of the screen. Choose "Bol.com" from the available channels list.
- Provide the required information:
- Channel Name: In the field provided, you can enter any name. However, it is recommended to choose a name that has meaning to you, such as "Bol.com," as it will serve as an apparent reference for the source of the order in the future.
- Client ID & Secret: Please enter the information obtained from the Bol.com platform, as previously shown. Copy and paste these details into the appropriate fields. Ensuring you correctly enter this information is essential, as errors may prevent you from accessing your Bol.com account through Channels.
- After filling out the fields, customize other options, then click "Save" in the bottom-right corner.
- You'll be back in the recently installed channel. Activate it at the top of the screen using the "Is Active" button.
Congratulations! You've successfully set up your Bol.com sales channel on Channels. You can now sell products on Bol.com and manage orders from your Channels dashboard.

Brightpearl
Brightpearl Setup Guide
Installing the Brightpearl Sales Channel
To add the Brightpearl sales channel to your Channels account, kindly adhere to the following steps:
- Access your account and go to the left side of the screen. Click the "Stores" button.
- If you already have a store, click "View Store" on the right side of the screen to access it.
- To edit an existing store, click the edit button on the right side. If you need to create a new store, click "+ ADD" above, name it, and use the edit button to make changes.
- Click "+ ADD" in the Channels section to begin the installation.
- A window will appear in the centre of the screen. Choose "Brightpearl" from the available channels list.
- Provide the required information:
- Channel Name: In the provided field, you can enter any name you desire. It is recommended that you choose a name that has meaning to you, such as "Brightpearl", as it will serve as a clear reference for the source of the order in the future.
- Account Code: You can obtain it from the bottom-right corner of your panel upon logging into your Brightpearl account, as shown in the picture below.
- After filling out the fields, customize other options, then click "Save" in the bottom-right corner.
- Click "Copy Connect Link" to copy a URL. Paste it in your browser's navigation bar to reach the Brightpearl connection page.
- Follow the channels connection page instructions:
- Click "Connect."
-
Proceed with the Brightpearl setup by following the instructions provided in this guide.
- Once connected, return to channels by clicking "Continue."
- You'll be back in the recently installed channel. Activate it at the top of the screen using the "Is Active" button.

Congratulations! You've successfully set up your Brightpearl sales channel on Channels. You can now sell products on Brightpearl and manage orders from your Channels dashboard.

C-Discount
C-Discount Setup Guide
Obtaining the API keys from C-Discount
Visit this page to acquire the credentials to set up your sales channel. Our page provides step-by-step guidance on obtaining these credentials, which are essential for the setup process.
Installing the C-Discount Sales Channel
To add the C-Discount sales channel to your Channels account, kindly adhere to the following steps:
- Access your account and go to the left side of the screen. Click the "Stores" button.
- If you already have a store, click "View Store" on the right side of the screen to access it.
- To edit an existing store, click the edit button on the right side. If you need to create a new store, click "+ ADD" above, name it, and use the edit button to make changes.
- Click "+ ADD" in the Channels section to begin the installation.
- A window will appear in the centre of the screen. Choose "C-Discount" from the available channels list.
- Provide the required information:
- Channel Name: You can input any desired name into the designated field. Nonetheless, it is advisable to select a name that holds significance to you, such as "C-Discount," as it will serve as an apparent reference to the source of the order in the future.
- Client ID & Secret, Seller ID: To access your account, you must fill in these fields with the information you previously obtained from the C-Discount platform, following the instructions. It is crucial to ensure that these fields are accurately completed.
- After filling out the fields, customize other options, then click "Save" in the bottom-right corner.
- You'll be back in the recently installed channel. Activate it at the top of the screen using the "Is Active" button.
Congratulations! You've successfully set up your C-Discount sales channel on Channels. You can now sell products on C-Discount and manage orders from your Channels dashboard.

eBay
eBay Setup Guide
Installing the eBay Sales Channel
To add the eBay sales channel to your Channels account, kindly adhere to the following steps:
- Access your account and go to the left side of the screen. Click the "Stores" button.
- If you already have a store, click "View Store" on the right side of the screen to access it.
- To edit an existing store, click the edit button on the right side. If you need to create a new store, click "+ ADD" above, name it, and use the edit button to make changes.
- Click "+ ADD" in the Channels section to begin the installation.
- A window will appear in the centre of the screen. Choose "eBay" from the available channels list.
- Provide the required information:
- Channel Name: You can enter any name. However, it is recommended that you choose a name that has meaning to you, such as "eBay," as it will serve as an apparent reference for the source of the order in the future.
- Site ID: Choose the country where your eBay account is registered and where you are vending your product.
- After filling out the fields, customize other options, then click "Save" in the bottom-right corner.
- Click "Copy Connect Link" to copy a URL. Paste it in your browser's navigation bar to reach the eBay connection page.
- Follow the channel connection page instructions:
- Click "Connect."
-
Proceed with the eBay setup by following the instructions provided in this guide.
- Once connected, return to channels by clicking "Continue."
- You'll be back in the recently installed channel. Activate it at the top of the screen using the "Is Active" button.
Congratulations! You've successfully set up your eBay sales channel on Channels. You can now sell products on eBay and manage orders from your Channels dashboard.

EKM
EKM Setup Guide
Installing the EKM Sales Channel
To add the EKM sales channel to your Channels account, kindly adhere to the following steps:
- Access your account and go to the left side of the screen. Click the "Stores" button.
- If you already have a store, click "View Store" on the right side of the screen to access it.
- To edit an existing store, click the edit button on the right side. If you need to create a new store, click "+ ADD" above, name it, and use the edit button to make changes.
- Click "+ ADD" in the Channels section to begin the installation.
- A window will appear in the centre of the screen. Choose "EKM" from the available channels list.
- Provide the required information:
- Channel Name: You can enter any name. However, it is recommended that you choose a name that has meaning to you, such as "EKM," as it will serve as an apparent reference for the source of the order in the future.
- After filling out the fields, customize other options, then click "Save" in the bottom-right corner.
- Click "Copy Connect Link" to copy a URL. Paste it in your browser's navigation bar to reach the EKM connection page.
- Follow the channel connection page instructions:
- Click "Connect."
-
Proceed with the EKM setup by following the instructions provided in this guide.
- Once connected, return to channels by clicking "Continue."
- You'll be back in the recently installed channel. Activate it at the top of the screen using the "Is Active" button.
Congratulations! You've successfully set up your EKM sales channel on Channels. You can now sell products on EKM and manage orders from your Channels dashboard.

Etsy
Etsy Setup Guide
Installing the Etsy Sales Channel
To add the Etsy sales channel to your Channels account, kindly adhere to the following steps:
- Access your account and go to the left side of the screen. Click the "Stores" button.
- If you already have a store, click "View Store" on the right side of the screen to access it.
- To edit an existing store, click the edit button on the right side. If you need to create a new store, click "+ ADD" above, name it, and use the edit button to make changes.
- Click "+ ADD" in the Channels section to begin the installation.
- A window will appear in the centre of the screen. Choose "Etsy" from the available channels list.
- Provide the required information:
- Channel Name: You can enter any name. However, it is recommended to choose a name that has meaning to you, such as "Etsy," as it will serve as an apparent reference for the source of the order in the future.
- After filling out the fields, customize other options, then click "Save" in the bottom-right corner.
- Click "Copy Connect Link" to copy a URL. Paste it in your browser's navigation bar to reach the Etsy connection page.
- Follow the channel connection page instructions:
- Click "Connect."
-
Proceed with the Etsy setup by following the instructions provided in this guide.
- Once connected, return to channels by clicking "Continue."
- You'll be back in the recently installed channel. Activate it at the top of the screen using the "Is Active" button.
Congratulations! You've successfully set up your Etsy sales channel on Channels. You can now sell products on Etsy and manage orders from your Channels dashboard.

Migrating the Existing Channel
There is a new version available for the Etsy connection that we have released. If you have already established an Etsy connection, updating it to the latest version is important. To complete the migration process, please follow the steps below:

2. You will be directed to a Channels screen that prompts you to proceed forward. This step is similar to the last one. Please confirm and continue.
3. After completing the previous step, your Etsy channel should appear unconnected. This indicates that the connection has been upgraded and is now ready to be reconnected with Etsy.

Fruugo
Fruugo Setup Guide
Installing the Fruugo Sales Channel
To add the Fruugo sales channel to your Channels account, kindly adhere to the following steps:
- Access your account and go to the left side of the screen. Click the "Stores" button.
- If you already have a store, click "View Store" on the right side of the screen to access it.
- To edit an existing store, click the edit button on the right side. If you need to create a new store, click "+ ADD" above, name it, and use the edit button to make changes.
- Click "+ ADD" in the Channels section to begin the installation.
- A window will appear in the centre of the screen. Choose "Fruugo" from the available channels list.
- Provide the required information:
- Channel Name: In the field provided, you can enter any name. However, it is recommended to choose a name that has meaning to you, such as "Fruugo," as it will serve as an apparent reference for the source of the order in the future.
- Username, Password: Please enter the login credentials of your Fruugo account here.
- After filling out the fields, customize other options, then click "Save" in the bottom-right corner.
- You'll be back in the recently installed channel. Activate it at the top of the screen using the "Is Active" button.
Congratulations! You've successfully set up your Fruugo sales channel on Channels. You can now sell products on Fruugo and manage orders from your Channels dashboard.

Groupon
Groupon Setup Guide
Obtaining the API keys from Groupon
You can acquire the credentials to set up your sales channel by visiting this page. Our page provides step-by-step guidance on obtaining these credentials, which are essential for the setup process.
Installing the Groupon Sales Channel
To add the Groupon sales channel to your Channels account, kindly adhere to the following steps:
- Access your account and go to the left side of the screen. Click the "Stores" button.
- If you already have a store, click "View Store" on the right side of the screen to access it.
- To edit an existing store, click the edit button on the right side. If you need to create a new store, click "+ ADD" above, name it, and use the edit button to make changes.
- Click "+ ADD" in the Channels section to begin the installation.
- A window will appear in the centre of the screen. Choose "Groupon" from the list of available channels.
- Provide the required information:
- Channel Name: In the provided field, you can enter any name you desire. However, it is recommended to choose a name that has meaning to you, such as "Groupon", as it will serve as an apparent reference for the source of the order in the future.
- Supplier ID & Access Token: Please enter the information obtained from the Groupon platform, as previously shown. It is essential to ensure that these fields are filled in correctly to access your account.
- After filling out the fields, customize other options, then click "Save" in the bottom-right corner.
- You'll be back in the recently installed channel. Activate it at the top of the screen using the "Is Active" button.
Congratulations! You've successfully set up your Groupon sales channel on Channels. You can now sell products on Groupon and manage orders from your Channels dashboard.

Interspire
Interspire Setup Guide
Installing the Interspire Extension
You can acquire the credentials to set up your sales channel by visiting this page. Our page provides step-by-step guidance on obtaining these credentials, which are essential for the setup process.
Installing the Interspire Sales Channel
To add the Interspire sales channel to your Channels account, kindly adhere to the following steps:
- Access your account and go to the left side of the screen. Click the "Stores" button.
- If you already have a store, click "View Store" on the right side of the screen to access it.
- To edit an existing store, click the edit button on the right side. If you need to create a new store, click "+ ADD" above, name it, and use the edit button to make changes.
- Click "+ ADD" in the Channels section to begin the installation.
- A window will appear in the centre of the screen. Choose "Interspire" from the available channels list.
- Provide the required information:
- Channel Name: In the field provided, you can enter any name. However, it is recommended that you choose a name that has meaning to you, such as "Interspire," as it will serve as an apparent reference for the source of the order in the future.
- Store URL: The URL should be the website address you entered earlier in the "dbhost" value.
- API Key: Please enter the identical phrase you wrote in the "api_key" value earlier.
- After filling out the fields, customize other options, then click "Save" in the bottom-right corner.
- You'll be back in the recently installed channel. Activate it at the top of the screen using the "Is Active" button.
Congratulations! You've successfully set up your Interspire sales channel on Channels. You can now sell products on Interspire and manage orders from your Channels dashboard.

Magento 1
Magento 1 Setup Guide
Obtaining the Access Token from Magento 1
You can acquire the credentials to set up your sales channel by visiting this page. Our page provides step-by-step guidance on obtaining these credentials, which are essential for the setup process.
Installing the Magento 1 Sales Channel
To add the Magento 1 sales channel to your Channels account, kindly adhere to the following steps:
- Access your account and go to the left side of the screen. Click the "Stores" button.
- If you already have a store, click "View Store" on the right side of the screen to access it.
- To edit an existing store, click the edit button on the right side. If you need to create a new store, click "+ ADD" above, name it, and use the edit button to make changes.
- Click "+ ADD" in the Channels section to begin the installation.
- A window will appear in the centre of the screen. Choose "Magento 1" from the available channels list.
- Provide the required information:
- Channel Name: In the field provided, you can enter any name. However, it is recommended that you choose a name that has meaning to you, such as "Magento 1," as it will serve as an apparent reference for the source of the order in the future.
- Domain URL: In this field, input the URL you use to access your Magento platform, also known as the domain.
- SOAP API Username & Key: Enter the tokens you've set on the Magento platform earlier.
- After filling out the fields, customize other options, then click "Save" in the bottom-right corner.
- You'll be back in the recently installed channel. Activate it at the top of the screen using the "Is Active" button.
Congratulations! You've successfully set up your Magento 1 sales channel on Channels. You can now sell products on Magento 1 and manage orders from your Channels dashboard.

Magento 2
Magento 2 Setup Guide
During the channel installation process, there are two ways to log in:
- By providing your email and password, the same credentials used to access your Magento Dashboard.
- Select the "Use Access Token" option and enter the access token obtained from your Magento store.
If you log in using the first method, you can skip the following section and proceed directly to the "Installing the Magento 2 Sales Channel" section.
Obtaining the Access Token from Magento 2
You can acquire the credentials to set up your sales channel by visiting this page. Our page provides step-by-step guidance on obtaining these credentials, which are essential for the setup process.
Installing the Magento 2 Sales Channel
To add the Magento 2 sales channel to your Channels account, kindly adhere to the following steps:
- Access your account and go to the left side of the screen. Click the "Stores" button.
- If you already have a store, click "View Store" on the right side of the screen to access it.
- To edit an existing store, click the edit button on the right side. If you need to create a new store, click "+ ADD" above, name it, and use the edit button to make changes.
- Click "+ ADD" in the Channels section to begin the installation.
- A window will appear in the centre of the screen. Choose "Magento 2" from the available channels list.
- Provide the required information:
- Channel Name: In the field provided, you can enter any name. However, it is recommended to choose a name that has meaning to you, such as "Magento 2," as it will serve as an apparent reference for the source of the order in the future.
- Magento Domain URL: In this field, input the URL you use to access your Magento platform, also known as the domain.
- Username, Password, Access Token: Fill in these fields depending on your preferred connection method.
- After filling out the fields, customize other options, then click "Save" in the bottom-right corner.
- You'll be back in the recently installed channel. Activate it at the top of the screen using the "Is Active" button.
Congratulations! You've successfully set up your Magento 2 sales channel on Channels. You can now sell products on Magento 2 and manage orders from your Channels dashboard.

ManoMano
ManoMano Setup Guide
Obtaining the API Key from ManoMano
You can acquire the credentials to set up your sales channel by visiting this page. Our page provides step-by-step guidance on obtaining these credentials, which are essential for the setup process.
Installing the ManoMano Sales Channel
To add the ManoMano sales channel to your Channels account, kindly adhere to the following steps:
- Access your account and go to the left side of the screen. Click the "Stores" button.
- If you already have a store, click "View Store" on the right side of the screen to access it.
- To edit an existing store, click the edit button on the right side. If you need to create a new store, click "+ ADD" above, name it, and use the edit button to make changes.
- Click "+ ADD" in the Channels section to begin the installation.
- A window will appear in the centre of the screen. Choose "ManoMano" from the available channels list.
- Provide the required information:
- Channel Name: In the field provided, you can enter any name. However, it is recommended that you choose a name that has meaning to you, such as "ManoMano," as it will serve as an apparent reference for the source of the order in the future.
- API Login & Password & Key, Contract ID: Please input the credentials you previously acquired from the ManoMano platform.
- After filling out the fields, customize other options, then click "Save" in the bottom-right corner.
- You'll be back in the recently installed channel. Activate it at the top of the screen using the "Is Active" button.
Congratulations! You've successfully set up your ManoMano sales channel on Channels. You can now sell products on ManoMano and manage orders from your Channels dashboard.

Mirakl
Mirakl Setup Guide
Obtaining the API keys from Mirakl
Visit this page to acquire the credentials to set up your sales channel. Our page provides step-by-step guidance on obtaining these credentials, which are essential for the setup process.
Installing the Mirakl Sales Channel
To add the Mirakl sales channel to your Channels account, kindly adhere to the following steps:
- Access your account and go to the left side of the screen. Click the "Stores" button.
- If you already have a store, click "View Store" on the right side of the screen to access it.
- To edit an existing store, click the edit button on the right side. If you need to create a new store, click "+ ADD" above, name it, and use the edit button to make changes.
- Click "+ ADD" in the Channels section to begin the installation.
- A window will appear in the centre of the screen. To continue with the installation process, select the "Mirakl" connection you need from the list of available channels.
- Provide the required information:
- Channel Name: In the provided field, you can enter any name you desire. However, it is recommended to choose a name that has meaning to you, such as "Mirakl", as it will serve as an apparent reference for the source of the order in the future.
- API URL & Key: Please enter the information obtained from the Mirakl platform, as previously shown. It is essential to ensure that these fields are filled in correctly to access your account.
- After filling out the fields, customize other options, then click "Save" in the bottom-right corner.
- You'll be back in the recently installed channel. Activate it at the top of the screen using the "Is Active" button.
Congratulations! You've successfully set up your Mirakl sales channel on Channels. You can now sell products on Mirakl and manage orders from your Channels dashboard.

Next
Next Setup Guide
Obtaining the API Keys from Next
Visit this page to acquire the credentials to set up your sales channel. Our page provides step-by-step guidance on obtaining these credentials, which are essential for the setup process.
Installing the Next Sales Channel
To add the Next sales channel to your Channels account, kindly adhere to the following steps:
- Access your account and go to the left side of the screen. Click the "Stores" button.
- If you already have a store, click "View Store" on the right side of the screen to access it.
- To edit an existing store, click the edit button on the right side. If you need to create a new store, click "+ ADD" above, name it, and use the edit button to make changes.
- Click "+ ADD" in the Channels section to begin the installation.
- A window will appear in the centre of the screen. Choose "Next" from the available channels list.
- Provide the required information:
- Channel Name: In the field provided, you can enter any name. However, it is recommended to choose a name that has meaning to you, such as "Next," as it will serve as an apparent reference for the source of the order in the future.
- Channel Username & Password: Please create a username and password in the corresponding fields for basic authentication purposes in the "create order" endpoint.
- API User & Key: For these fields, please insert the credentials provided by Next.
- After filling out the fields, customize other options, then click "Save" in the bottom-right corner.
- You'll be back in the recently installed channel. Activate it at the top of the screen using the "Is Active" button.
Congratulations! You've successfully set up your Next sales channel on Channels. You can now sell products on Next and manage orders from your Channels dashboard.

OnBuy
OnBuy Setup Guide
Obtaining the API Key from OnBuy
You can acquire the credentials to set up your sales channel by visiting this page. Our page provides step-by-step guidance on obtaining these credentials, which are essential for the setup process.
Installing the OnBuy Sales Channel
To add the OnBuy sales channel to your Channels account, kindly adhere to the following steps:
- Access your account and go to the left side of the screen. Click the "Stores" button.
- If you already have a store, click "View Store" on the right side of the screen to access it.
- To edit an existing store, click the edit button on the right side. If you need to create a new store, click "+ ADD" above, name it, and use the edit button to make changes.
- Click "+ ADD" in the Channels section to begin the installation.
- A window will appear in the centre of the screen. Choose "OnBuy" from the available channels list.
- Provide the required information:
- Channel Name: In the field provided, you can enter any name. However, it is recommended to choose a name that has meaning to you, such as "OnBuy," as it will serve as an apparent reference for the source of the order in the future.
- Consumer & Secret Key: Please input the credentials you previously acquired from the OnBuy platform.
- After filling out the fields, customize other options, then click "Save" in the bottom-right corner.
- You'll be back in the recently installed channel. Activate it at the top of the screen using the "Is Active" button.
Congratulations! You've successfully set up your OnBuy sales channel on Channels. You can now sell products on OnBuy and manage orders from your Channels dashboard.

OpenCart V2
OpenCart V2 Setup Guide
Obtaining the API Key
Visit this page to acquire the credentials to set up your sales channel. Our page provides step-by-step guidance on obtaining these credentials, which are essential for the setup process.
Installing the OpenCart Sales Channel
To add the OpenCart V2 sales channel to your Channels account, kindly adhere to the following steps:
- Access your account and go to the left side of the screen. Click the "Stores" button.
- If you already have a store, click "View Store" on the right side of the screen to access it.
- To edit an existing store, click the edit button on the right side. If you need to create a new store, click "+ ADD" above, name it, and use the edit button to make changes.
- Click "+ ADD" in the Channels section to begin the installation.
- A window will appear in the centre of the screen. Choose "OpenCart V2" from the available channels list.
- Provide the required information:
- Name: In the field provided, you can enter any name. However, it is recommended to choose a name that has meaning to you, such as "OpenCart V2," as it will serve as an apparent reference for the source of the order in the future.
- Domain URL: This is where you should enter the name of your store, as it will appear in the URL, such as "https://opencart.com/."
- API Key: Please input the credentials you previously acquired from the OpenCart V2 platform.
- After filling out the fields, customize other options, then click "Save" in the bottom-right corner.
- You'll be back in the recently installed channel. Activate it at the top of the screen using the "Is Active" button.
Congratulations! You've successfully set up your OpenCart V2 sales channel on Channels. You can now sell products on OpenCart V2 and manage orders from your Channels dashboard.

OpenCart V3
OpenCart V3 Setup Guide
Obtaining the API Key
Visit this page to acquire the credentials to set up your sales channel. Our page provides step-by-step guidance on obtaining these credentials, which are essential for the setup process.
Installing the OpenCart Sales Channel
To add the OpenCart V3 sales channel to your Channels account, kindly adhere to the following steps:
- Access your account and go to the left side of the screen. Click the "Stores" button.
- If you already have a store, click "View Store" on the right side of the screen to access it.
- To edit an existing store, click the edit button on the right side. If you need to create a new store, click "+ ADD" above, name it, and use the edit button to make changes.
- Click "+ ADD" in the Channels section to begin the installation.
- A window will appear in the centre of the screen. Choose "OpenCart V3" from the available channels list.
- Provide the required information:
- Name: In the field provided, you can enter any name. However, it is recommended that you choose a name that has meaning to you, such as "OpenCart V3," as it will serve as an apparent reference for the source of the order in the future.
- Domain URL: This is where you should enter the name of your store, as it will appear in the URL, such as "https://opencart.com/."
- API Key: Please input the credentials you previously acquired from the OpenCart V3 platform.
- After filling out the fields, customize other options, then click "Save" in the bottom-right corner.
- You'll be back in the recently installed channel. Activate it at the top of the screen using the "Is Active" button.
Congratulations! You've successfully set up your OpenCart V3 sales channel on Channels. You can now sell products on OpenCart V3 and manage orders from your Channels dashboard.
OrderWise
OrderWise Setup Guide
Installing the OrderWise Sales Channel
To add the OrderWise sales channel to your Channels account, kindly adhere to the following steps:
- Access your account and go to the left side of the screen. Click the "Stores" button.
- If you already have a store, click "View Store" on the right side of the screen to access it.
- To edit an existing store, click the edit button on the right side. If you need to create a new store, click "+ ADD" above, name it, and use the edit button to make changes.
- Click "+ ADD" in the Channels section to begin the installation.
- A window will appear in the centre of the screen. Choose "OrderWise" from the available channels list.
- Provide the required information:
- Channel Name: In the field provided, you can enter any name. However, it is recommended that you choose a name that has meaning to you, such as "OrderWise," as it will serve as an apparent reference for the source of the order in the future.
- Service URL: This is where you should enter the name of your store, as it will appear in the URL. For example, if your store name is "ABC Company," you should enter "https://abccompany.orderwise.com/."
- Username and Password: Please enter the information you use to log in to your OrderWise platform.
- After filling out the fields, customize other options, then click "Save" in the bottom-right corner.
- You'll be back in the recently installed channel. Activate it at the top of the screen using the "Is Active" button.
Congratulations! You've successfully set up your OrderWise sales channel on Channels. You can now sell products on OrderWise and manage orders from your Channels dashboard.

PrestaShop
PrestaShop Setup Guide
Obtaining the API keys from PrestaShop
Visit this page to acquire the credentials to set up your sales channel. Our page provides step-by-step guidance on obtaining these credentials, which are essential for the setup process.
Installing the PrestaShop Sales Channel
To add the PrestaShop sales channel to your Channels account, kindly adhere to the following steps:
- Access your account and go to the left side of the screen. Click the "Stores" button.
- If you already have a store, click "View Store" on the right side of the screen to access it.
- To edit an existing store, click the edit button on the right side. If you need to create a new store, click "+ ADD" above, name it, and use the edit button to make changes.
- Click "+ ADD" in the Channels section to begin the installation.
- A window will appear in the centre of the screen. Choose "PrestaShop" from the available channels list.
- Provide the required information:
- Channel Name: In the field provided, you can enter any name. However, it is recommended that you choose a name that has meaning to you, such as "PrestaShop," as it will serve as an apparent reference for the source of the order in the future.
- Domain: This is where you should enter the name of your store, as it will appear in the URL. For example, if your store name is "ABC Company," you should enter "https://abccompany.prestashop.com/."
- Web Service Key: Please enter the key obtained through your PrestaShop earlier.
- After filling out the fields, customize other options, then click "Save" in the bottom-right corner.
- You'll be back in the recently installed channel. Activate it at the top of the screen using the "Is Active" button.
Congratulations! You've successfully set up your PrestaShop sales channel on Channels. You can now sell products on PrestaShop and manage orders from your Channels dashboard.

QuickBooks (TradeGecko)
QuickBooks Setup Guide
Obtaining the API keys from QuickBooks
Visit this page to acquire the credentials to set up your sales channel. Our page provides step-by-step guidance on obtaining these credentials, which are essential for the setup process.
Installing the QuickBooks Sales Channel
To add the QuickBooks sales channel to your Channels account, kindly adhere to the following steps:
- Access your account and go to the left side of the screen. Click the "Stores" button.
- If you already have a store, click "View Store" on the right side of the screen to access it.
- To edit an existing store, click the edit button on the right side. If you need to create a new store, click "+ ADD" above, name it, and use the edit button to make changes.
- Click "+ ADD" in the Channels section to begin the installation.
- A window will appear in the centre of the screen. Choose "QuickBooks" from the available channels list.
- Provide the required information:
- Channel Name: In the field provided, you can enter any name. However, it is recommended that you choose a name that has meaning to you, such as "QuickBooks," as it will serve as an apparent reference for the source of the order in the future.
- App ID & Secret: Please enter the information you obtained through your QuickBooks platform earlier.
- Order & Fulfilment & Payment Statuses: Select the type of orders you want to integrate this channel with.
- After filling out the fields, customize other options, then click "Save" in the bottom-right corner.
- Click the "Connect" button and authorize the connection by following the instructions.
- You'll be back in the recently installed channel. Activate it at the top of the screen using the "Is Active" button.
Congratulations! You've successfully set up your QuickBooks sales channel on Channels. You can now sell products on QuickBooks and manage orders from your Channels dashboard.

ReCharge
ReCharge Setup Guide
Obtaining the API keys from ReCharge
Visit this page to acquire the credentials to set up your sales channel. Our page provides step-by-step guidance on obtaining these credentials, which are essential for the setup process.
Installing the ReCharge Sales Channel
To add the ReCharge sales channel to your Channels account, kindly adhere to the following steps:
- Access your account and go to the left side of the screen. Click the "Stores" button.
- If you already have a store, click "View Store" on the right side of the screen to access it.
- To edit an existing store, click the edit button on the right side. If you need to create a new store, click "+ ADD" above, name it, and use the edit button to make changes.
- Click "+ ADD" in the Channels section to begin the installation.
- A window will appear in the centre of the screen. Choose "ReCharge" from the available channels list.
- Provide the required information:
- Channel Name: In the field provided, you can enter any name. However, it is recommended that you choose a name that has meaning to you, such as "ReCharge," as it will serve as an apparent reference for the source of the order in the future.
- Access Token: Please enter the information obtained through your ReCharge platform earlier.
- After filling out the fields, customize other options, then click "Save" in the bottom-right corner.
- You'll be back in the recently installed channel. Activate it at the top of the screen using the "Is Active" button.
Congratulations! You've successfully set up your ReCharge sales channel on Channels. You can now sell products on ReCharge and manage orders from your Channels dashboard.

Shopify
Shopify Setup Guide
Installing the Shopify Sales Channel
To add the Shopify sales channel to your Channels account, kindly adhere to the following steps:
- Access your account and go to the left side of the screen. Click the "Stores" button.
- If you already have a store, click "View Store" on the right side of the screen to access it.
- To edit an existing store, click the edit button on the right side. If you need to create a new store, click "+ ADD" above, name it, and use the edit button to make changes.
- Click "+ ADD" in the Channels section to begin the installation.
- A window will appear in the centre of the screen. Choose "Shopify" from the available channels list.
- Provide the required information:
- Channel Name: Enter any meaningful name, e.g., "Shopify."
- Hostname: Use your Shopify platform's hostname from the URL, like "hostname.myshopify.com."
- After filling out the fields, customize other options, then click "Save" in the bottom-right corner.
- Click "Copy Connect Link" to copy a URL. Paste it in your browser's navigation bar to reach the Shopify connection page.
- Follow the channel connection page instructions:
- Click "Connect."
- If logged in to Shopify, it connects automatically. If not, log in.
- Once connected, return to channels by clicking "Continue."
- You'll be back in the recently installed channel. Activate it at the top of the screen using the "Is Active" button.
Congratulations! You've successfully set up your Shopify sales channel on Channels. You can now sell products on Shopify and manage orders from your Channels dashboard.

Installing Shopify in Hosted Pages
When you install this sales channel via hosted pages, you will need to provide the same required information as above. Once you've saved this information, the channel will establish an automatic connection to the platform on its own.
For a comprehensive guide on setting up your hosted page, please refer to our dedicated documentation page available here.
Shopline
Shopline Setup Guide
Obtaining the API keys from Shopline
Visit this page to acquire the credentials to set up your sales channel. Our page provides step-by-step guidance on obtaining these credentials, which are essential for the setup process.
Installing the Shopline Sales Channel
To add the Shopline sales channel to your Channels account, kindly adhere to the following steps:
- Access your account and go to the left side of the screen. Click the "Stores" button.
- If you already have a store, click "View Store" on the right side of the screen to access it.
- To edit an existing store, click the edit button on the right side. If you need to create a new store, click "+ ADD" above, name it, and use the edit button to make changes.
- Click "+ ADD" in the Channels section to begin the installation.
- A window will appear in the centre of the screen. Choose "Shopline" from the list of available channels.
- Provide the required information:
- Channel Name: In the provided field, you can enter any name you desire. However, it is recommended that you choose a name that has meaning to you, such as "Shopline", as it will serve as an apparent reference for the source of the order in the future.
- Subdomain: This is where you should enter the name of your store, as it will appear in the URL, such as "https://your-sub-domain.myshopline.com."
- Access Token: Please enter the information obtained from the Shopline platform, as previously shown. Ensuring that these fields are filled in correctly to access your account is essential.
- After filling out the fields, customize other options, then click "Save" in the bottom-right corner.
- You'll be back in the recently installed channel. Activate it at the top of the screen using the "Is Active" button.
Congratulations! You've successfully set up your Shopline sales channel on Channels. You can now sell products on Shopline and manage orders from your Channels dashboard.

Shopware
Shopware Setup Guide
Obtaining the API keys from Shopware
Visit this page to acquire the credentials to set up your sales channel. Our page provides step-by-step guidance on obtaining these credentials, which are essential for the setup process.
Installing the Shopware Sales Channel
To add the Shopware sales channel to your Channels account, kindly adhere to the following steps:
- Access your account and go to the left side of the screen. Click the "Stores" button.
- If you already have a store, click "View Store" on the right side of the screen to access it.
- To edit an existing store, click the edit button on the right side. If you need to create a new store, click "+ ADD" above, name it, and use the edit button to make changes.
- Click "+ ADD" in the Channels section to begin the installation.
- A window will appear in the centre of the screen. Choose "Shopware" from the list of available channels.
- Provide the required information:
- Channel Name: In the field provided, you can enter any name. However, it is recommended that you choose a name that has meaning to you, such as "Shopware," as it will serve as an apparent reference for the source of the order in the future.
- Service URL: This is where you should enter the URL of your store, as it will appear in the navigation bar. Such as "https://hostname.shopware.com/".
- Username and API Key: Please enter the information obtained from the Shopware platform, as previously shown. Ensuring that these fields are filled in correctly to access your account is essential.
- After filling out the fields, customize other options, then click "Save" in the bottom-right corner.
- You'll be back in the recently installed channel. Activate it at the top of the screen using the "Is Active" button.
Congratulations! You've successfully set up your Shopware sales channel on Channels. You can now sell products on Shopware and manage orders from your Channels dashboard.

Squarespace
Squarespace Setup Guide
Obtaining the API keys from Squarespace
Visit this page to acquire the credentials to set up your sales channel. Our page provides step-by-step guidance on obtaining these credentials, which are essential for the setup process.
Installing the Squarespace Sales Channel
To add the Squarespace sales channel to your Channels account, kindly adhere to the following steps:
- Access your account and go to the left side of the screen. Click the "Stores" button.
- If you already have a store, click "View Store" on the right side of the screen to access it.
- To edit an existing store, click the edit button on the right side. If you need to create a new store, click "+ ADD" above, name it, and use the edit button to make changes.
- Click "+ ADD" in the Channels section to begin the installation.
- A window will appear in the centre of the screen. Choose "Squarespace" from the list of available channels.
- Provide the required information:
- Channel Name: In the field provided, you can enter any name. However, it is recommended that you choose a name that has meaning to you, such as "Squarespace," as it will serve as an apparent reference for the source of the order in the future.
- API Key: Please enter the information obtained through your Squarespace platform earlier.
- After filling out the fields, customize other options, then click "Save" in the bottom-right corner.
- You'll be back in the recently installed channel. Activate it at the top of the screen using the "Is Active" button.
Congratulations! You've successfully set up your Squarespace sales channel on Channels. You can now sell products on Squarespace and manage orders from your Channels dashboard.

TikTok Shop
TikTok Shop Setup Guide
Installing the TikTok Shop Sales Channel
To add the TikTok Shop sales channel to your Channels account, kindly adhere to the following steps:
- Access your account and go to the left side of the screen. Click the "Stores" button.
- If you already have a store, click "View Store" on the right side of the screen to access it.
- To edit an existing store, click the edit button on the right side. If you need to create a new store, click "+ ADD" above, name it, and use the edit button to make changes.
- Click "+ ADD" in the Channels section to begin the installation.
- A window will appear in the centre of the screen. Choose "TikTok Shop" from the available channels list.
- Provide the required information:
- Channel Name: In the field provided, you can enter any name. However, it is recommended that you choose a name that has meaning to you, such as "TikTok Shop," as it will serve as an apparent reference for the source of the order in the future.
- After filling out the fields, customize other options, then click "Save" in the bottom-right corner.
- Click "Copy Connect Link" to copy a URL. Paste it in your browser's navigation bar to reach the TikTok Shop connection page.
- Follow the channel connection page instructions:
- Click "Connect."
-
Proceed with the TikTok Shop setup by following the instructions provided in this guide.
- Once connected, return to channels by clicking "Continue."
- You'll be back in the recently installed channel. Activate it at the top of the screen using the "Is Active" button.
Congratulations! You've successfully set up your TikTok Shop sales channel on Channels. You can now sell products on TikTok Shop and manage orders from your Channels dashboard.

Unleashed
Unleashed Setup Guide
Obtaining the API keys from Unleashed
You can acquire the credentials by contacting your Unleashed account manager.
Installing the Unleashed Sales Channel
To add the Unleashed sales channel to your Channels account, kindly adhere to the following steps:
- Access your account and go to the left side of the screen. Click the "Stores" button.
- If you already have a store, click "View Store" on the right side of the screen to access it.
- To edit an existing store, click the edit button on the right side. If you need to create a new store, click "+ ADD" above, name it, and use the edit button to make changes.
- Click "+ ADD" in the Channels section to begin the installation.
- A window will appear in the centre of the screen. Choose "Unleashed" from the list of available channels.
- Provide the required information:
- Channel Name: In the provided field, you can enter any name you desire. However, it is recommended to choose a name that has meaning to you, such as "Unleashed", as it will serve as an apparent reference for the source of the order in the future.
- App ID & Key: Please enter the information obtained from the Unleashed platform, as previously instructed. These fields must be filled out correctly to access your account.
- Order Statuses: Only the chosen statuses will be fetched into Channels. For example, if you select "Placed" and "Completed," only orders with those statuses will be integrated into your account, while others like "Parked" or "Backordered" will be excluded. This allows you to control which stages of the order process are imported. Here are the available statuses explained below:
- Parked: The order has been created but has not yet been fully processed. It may require further review or action before it can proceed.
- Placed: The order has been officially placed by the customer and is ready to be processed.
- Backordered: The order contains items that are currently out of stock. The order will be fulfilled once the items are back in stock.
- Completed: The order has been fully processed, fulfilled, and completed. No further action is needed.
- Deleted: The order has been removed from the system because it was cancelled or invalid.
- After filling out the fields, customize other options, then click "Save" in the bottom-right corner.
- You'll be back in the recently installed channel. Activate it at the top of the screen using the "Is Active" button.
Congratulations! You've successfully set up your Unleashed sales channel on Channels. You can now sell products on Unleashed and manage orders from your Channels dashboard.

Veeqo
Veeqo Setup Guide
Obtaining the API Key from Veeqo
Visit this page to acquire the credentials to set up your sales channel. Our page provides step-by-step guidance on obtaining these credentials, which are essential for the setup process.
Installing the Veeqo Sales Channel
To add the Veeko sales channel to your Channels account, kindly adhere to the following steps:
- Access your account and go to the left side of the screen. Click the "Stores" button.
- If you already have a store, click "View Store" on the right side of the screen to access it.
- To edit an existing store, click the edit button on the right side. If you need to create a new store, click "+ ADD" above, name it, and use the edit button to make changes.
- Click "+ ADD" in the Channels section to begin the installation.
- A window will appear in the centre of the screen. Choose "Veeko" from the list of available channels.
- Provide the required information:
- Channel Name: In the field provided, you can enter any name. However, it is recommended that you choose a name that has meaning to you, such as "Veeqo," as it will serve as an apparent reference for the source of the order in the future.
- API Key: Please enter the information you obtained through your Veeqo platform earlier.
- After filling out the fields, customize other options, then click "Save" in the bottom-right corner.
- You'll be back in the recently installed channel. Activate it at the top of the screen using the "Is Active" button.
Congratulations! You've successfully set up your Veeko sales channel on Channels. You can now sell products on Veeko and manage orders from your Channels dashboard.

VendPos
VendPos Setup Guide
Installing the VendPos Sales Channel
To add the VendPos sales channel to your Channels account, kindly adhere to the following steps:
- Access your account and go to the left side of the screen. Click the "Stores" button.
- If you already have a store, click "View Store" on the right side of the screen to access it.
- To edit an existing store, click the edit button on the right side. If you need to create a new store, click "+ ADD" above, name it, and use the edit button to make changes.
- Click "+ ADD" in the Channels section to begin the installation.
- A window will appear in the centre of the screen. Choose "VendPos" from the available channels list.
- Provide the required information:
- Channel Name: In the field provided, you can enter any name. However, it is recommended that you choose a name that has meaning to you, such as "VendPos," as it will serve as an apparent reference for the source of the order in the future.
- Hostname: This is where you should enter the name of your store, as it will appear in the URL, such as "https://hostname.vendhq.com/."
- After filling out the fields, customize other options, then click "Save" in the bottom-right corner.
- Click "Copy Connect Link" to copy a URL. Paste it in your browser's navigation bar to reach the VendPos connection page.
- Follow the channel connection page instructions:
- Click "Connect."
-
Proceed with the VendPos setup by following the instructions provided in this guide.
- Once connected, return to channels by clicking "Continue."
- You'll be back in the recently installed channel. Activate it at the top of the screen using the "Is Active" button.
Congratulations! You've successfully set up your VendPos sales channel on Channels. You can now sell products on VendPos and manage orders from your Channels dashboard.

VirtualStock
VirtualStock Setup Guide
Obtaining the API keys from VirtualStock
You can acquire the credentials by contacting your VirtualStock account manager.
Installing the VirtualStock Sales Channel
To add the VirtualStock sales channel to your Channels account, kindly adhere to the following steps:
- Access your account and go to the left side of the screen. Click the "Stores" button.
- If you already have a store, click "View Store" on the right side of the screen to access it.
- To edit an existing store, click the edit button on the right side. If you need to create a new store, click "+ ADD" above, name it, and use the edit button to make changes.
- Click "+ ADD" in the Channels section to begin the installation.
- A window will appear in the centre of the screen. Choose "VirtualStock" from the list of available channels.
- Provide the required information:
- Channel Name: In the provided field, you can enter any name you desire. However, it is recommended to choose a name that has meaning to you, such as "VirtualStock", as it will serve as an apparent reference for the source of the order in the future.
- Username, Password, Supplier, FTP Username & Password: Please enter the information obtained from the VirtualStock platform, as previously instructed. Ensuring that these fields are filled in correctly to access your account is essential.
- Automatically Confirm Orders: Enable this feature to simplify your order processing workflow by having Channels automatically confirm incoming orders from your integrated sales channels. When an order is placed, it will be instantly marked as confirmed, allowing for faster processing and fulfilment. This option reduces the need for manual review and confirmation, ensuring that your orders move through the system efficiently and minimizing delays. Ideal for businesses that handle a high volume of orders or those looking to enhance operational efficiency, this feature helps maintain a smooth and rapid order processing cycle.
- Automatically Create Invoice: Activate this feature to automate your invoicing process. With this option enabled, an invoice will be automatically generated for each confirmed order. This helps expedite the billing process, reduce the administrative burden on your team, and ensure that customers receive their invoices without delay.
- After filling out the fields, customize other options, then click "Save" in the bottom-right corner.
- You'll be back in the recently installed channel. Activate it at the top of the screen using the "Is Active" button.
Congratulations! You've successfully set up your VirtualStock sales channel on Channels. You can now sell products on VirtualStock and manage orders from your Channels dashboard.

VisualSoft
VisualSoft Setup Guide
Obtaining the API Key from VisualSoft
Visit this page to acquire the credentials to set up your sales channel. Our page provides step-by-step guidance on obtaining these credentials, which are essential for the setup process.
Installing the VisualSoft Sales Channel
To add the Visualsoft sales channel to your Channels account, kindly adhere to the following steps:
- Access your account and go to the left side of the screen. Click the "Stores" button.
- If you already have a store, click "View Store" on the right side of the screen to access it.
- To edit an existing store, click the edit button on the right side. If you need to create a new store, click "+ ADD" above, name it, and use the edit button to make changes.
- Click "+ ADD" in the Channels section to begin the installation.
- A window will appear in the centre of the screen. Choose "Visualsoft" from the list of available channels.
- Provide the required information:
- Channel Name: In the field provided, you can enter any name. However, it is recommended that you choose a name that has meaning to you, such as "VisualSoft," as it will serve as an apparent reference for the source of the order in the future.
- Domain, Client ID, Username, Password: Please enter the information you obtained through your VisualSoft platform earlier.
- After filling out the fields, customize other options, then click "Save" in the bottom-right corner.
- You'll be back in the recently installed channel. Activate it at the top of the screen using the "Is Active" button.
Congratulations! You've successfully set up your Visualsoft sales channel on Channels. You can now sell products on Visualsoft and manage orders from your Channels dashboard.

Walmart
Walmart Setup Guide
Obtaining the API keys from Walmart
You can acquire the credentials by contacting your Walmart account manager.
Installing the Walmart Sales Channel
To add the Walmart sales channel to your Channels account, kindly adhere to the following steps:
- Access your account and go to the left side of the screen. Click the "Stores" button.
- If you already have a store, click "View Store" on the right side of the screen to access it.
- To edit an existing store, click the edit button on the right side. If you need to create a new store, click "+ ADD" above, name it, and use the edit button to make changes.
- Click "+ ADD" in the Channels section to begin the installation.
- A window will appear in the centre of the screen. Choose "Walmart" from the list of available channels.
- Provide the required information:
- Channel Name: In the provided field, you can enter any name you desire. However, it is recommended to choose a name that has meaning to you, such as "Walmart", as it will serve as an apparent reference for the source of the order in the future.
- Service Name, Client ID & Secret: Please enter the information obtained from the Walmart platform, as previously instructed. Ensuring that these fields are filled in correctly to access your account is essential.
- Automatically Confirm Orders: Enable this feature to simplify your order processing workflow by having Channels automatically confirm incoming orders from your integrated sales channels. When an order is placed, it will be instantly marked as confirmed, allowing for faster processing and fulfilment. This option reduces the need for manual review and confirmation, ensuring that your orders move through the system efficiently and minimizing delays. Ideal for businesses that handle a high volume of orders or those looking to enhance operational efficiency, this feature helps maintain a smooth and rapid order processing cycle.
- After filling out the fields, customize other options, then click "Save" in the bottom-right corner.
- You'll be back in the recently installed channel. Activate it at the top of the screen using the "Is Active" button.
Congratulations! You've successfully set up your Walmart sales channel on Channels. You can now sell products on Walmart and manage orders from your Channels dashboard.

Wayfair
Wayfair Setup Guide
Obtaining the API keys from Wayfair
Visit this page to acquire the credentials to set up your sales channel. Our page provides step-by-step guidance on obtaining these credentials, which are essential for the setup process.
Installing the Wayfair Sales Channel
To add the Wayfair sales channel to your Channels account, kindly adhere to the following steps:
- Access your account and go to the left side of the screen. Click the "Stores" button.
- If you already have a store, click "View Store" on the right side of the screen to access it.
- To edit an existing store, click the edit button on the right side. If you need to create a new store, click "+ ADD" above, name it, and use the edit button to make changes.
- Click "+ ADD" in the Channels section to begin the installation.
- A window will appear in the centre of the screen. Choose "Wayfair" from the list of available channels.
- Provide the required information:
- Name: In the provided field, you can enter any name you desire. However, it is recommended to choose a name that has meaning to you, such as "Wayfair", as it will serve as an apparent reference for the source of the order in the future.
- Client ID & Secret: Please enter the information obtained from the Wayfair platform, as previously shown. Ensuring that these fields are filled in correctly to access your account is essential.
- After filling out the fields, customize other options, then click "Save" in the bottom-right corner.
- You'll be back in the recently installed channel. Activate it at the top of the screen using the "Is Active" button.
Congratulations! You've successfully set up your Wayfair sales channel on Channels. You can now sell products on Wayfair and manage orders from your Channels dashboard.

Wish
Wish Setup Guide
Obtaining the API Keys from Wish
Visit this page to acquire the credentials to set up your sales channel. Our page provides step-by-step guidance on obtaining these credentials, which are essential for the setup process.
Installing the Wish Sales Channel
To add the Wish sales channel to your Channels account, kindly adhere to the following steps:
- Access your account and go to the left side of the screen. Click the "Stores" button.
- If you already have a store, click "View Store" on the right side of the screen to access it.
- To edit an existing store, click the edit button on the right side. If you need to create a new store, click "+ ADD" above, name it, and use the edit button to make changes.
- Click "+ ADD" in the Channels section to begin the installation.
- A window will appear in the centre of the screen. Choose "Wish" from the available channels list.
- Provide the required information:
- Channel Name: In the field provided, you can enter any name. However, it is recommended to choose a name that has to mean to you, such as "Wish," as it will serve as an apparent reference for the source of the order in the future.
- Client Key & Secret: Please enter the information you obtained through your Wish platform earlier.
- Fulfilment Origin Country: You must fill in an important field correctly. When a customer chooses a courier company other than the ones Wish accepts, Wish requests a distinction between shipments made within the same country and shipments made to a different country. So, you need to use the ISO code of the country where your shipments will be made. For example, if your shipments are made to Italy, you must enter "IT" in this field.
- After filling out the fields, customize other options, then click "Save" in the bottom-right corner.
- Click "Copy Connect Link" to copy a URL. Paste it in your browser's navigation bar to reach the Wish connection page.
- Follow the channel connection page instructions:
- Click "Connect."
-
Proceed with the Wish integration by following the instructions.
- Once connected, return to channels by clicking "Continue."
- You'll be back in the recently installed channel. Activate it at the top of the screen using the "Is Active" button.
Congratulations! You've successfully set up your Wish sales channel on Channels. You can now sell products on Wish and manage orders from your Channels dashboard.

Wix
Wix Setup Guide
Creating a Custom App in Wix
As the first thing, please log in and access the custom apps page through the Wix Custom Apps page.
-
Start a New App:
-
Click the "Create a New App" button at the top right of the "Custom Apps" page.
-
-
Select a Build Option:
-
Choose "Build from scratch" from the available options. If you see "Blocks blank canvas," you can select that instead.
-
-
Choose Wix Blocks:
-
If you select "Build from scratch," a popup will appear. Click on "Wix Blocks."
-
-
Initiate the Build Process:
-
After the app builder loads, click the "Build" button at the top right of the page.
-
-
Name Your App:
-
When prompted, give your app a descriptive name and click "Save & Continue."
-
-
Set the App Version:
-
Wait a few seconds for the version screen to load. Then, select "Major version (1.0)" and click "Build" at the bottom right of the window.
-
-
Completion:
-
Your app is now created, and you’ve completed this process.
-

Managing App Permissions and Obtaining Credentials
Once you've completed the app creation, return to the Wix Custom Apps page again.
-
Access the App Dashboard:
-
Find your newly created app in the list, and click the three dots on the right.
-
-
Select From the Popup Window:
-
Select "Go to app dashboard."
-
-
Open Permissions:
-
From the left-hand menu, click on the "Permissions" tab.
-
-
Add Necessary Permissions:
-
Click "+ Add Permissions" at the top right in the permissions tab.
-
-
Select Permissions:
-
In the "Search by name or ID" section, search for and select the following permissions:
- Store Management:
- Manage Stores - all permissions
- Read Stores - all read permissions
- Manage Products
- Read Products
- Manage Orders
- Read Orders
- eCommerce Management:
- Manage eCommerce - all permissions
- Read eCommerce - all read permissions
- Catalog Management (v3):
- Read v3 catalog
- Manage v3 catalog
- Read products in v3 catalog
- Product v3 read admin
- Store Management:
-
-
Save Permissions:
-
After selecting the required permissions, click "Save" at the top right.
-
-
Verify Permissions:
-
Obtain OAuth Credentials:
-
Navigate to the "OAuth" tab in the left-hand menu.
-
-
Copy App ID and Secret Key:
-
Copy your "App ID" and "App Secret Key" on the OAuth page and note them down for integration with Channels.
-
Then, expand the "Advanced OAuth (optional)" section.
-
Enter the below URL in the App URL" and "Redirect URL" fields:
-
https://production.channelapi.co.uk/authorization/wix
-
-
-
Save OAuth Settings:
-
Once the URLs are entered, click "Save" at the top right of the page.
-

Installing the Wix Sales Channel
To add the Wix sales channel to your Channels account, follow these steps:
-
Access Your Account:
Log in to your Channels account. From the left side menu, click "Stores." -
View or Edit Your Store:
- If you already have an existing store, click the "View Store" button from the dashboard upon logging in.
- If You've Clicked Store From the Left-Hand Menu:
- This page allows you to edit one of your existing stores or create a new one by clicking the "+ Add" button at the top.
-
Edit Store Details:
Once you're in the store's details for editing, navigate to the "Channels" tab and click the "+ Add" button to select the integration you want to install. -
Select Wix:
A window will appear in the centre of the screen. From the list of available channels, choose "Wix." -
Enter Required Information:
- Channel Name: Enter a name in the provided field. It’s recommended to use a meaningful name like "Wix" for easy reference in the future.
- API Key, App Secret Key: Input the information you obtained from Wix earlier.
-
Customize and Save:
After filling in the necessary details, customize any additional options, then click "Save" in the bottom-right corner. -
Connect Your Wix Account:
Once saved, the "Connect" button will appear next to the save button. Click it to initiate the process of connecting your Wix account with Channels. -
Select Your Site:
If you have more than one site, choose the site from which you want to receive orders. -
Agree to Terms:
Click the "By installing this third-party app, I agree to all of the above" checkbox then click the "Agree & Add" button. -
Confirm Connection:
You'll receive a confirmation message that your channel has been successfully connected. Click "Continue" to return to the Wix integration page. -
Activate the Channel:
Once you're back on the integration page, activate the channel using the "Is Active" button at the top of the screen.
Congratulations! You've successfully set up your Wix sales channel on Channels. You can now sell products on Wix and manage orders directly from your Channels dashboard.

WooCommerce
WooCommerce Setup Guide
Obtaining the API Key from WooCommerce
Installing the WooCommerce Sales Channel
To add the WooCommerce sales channel to your Channels account, kindly adhere to the following steps:
- Access your account and go to the left side of the screen. Click the "Stores" button.
- If you already have a store, click "View Store" on the right side of the screen to access it.
- To edit an existing store, click the edit button on the right side. If you need to create a new store, click "+ ADD" above, name it, and use the edit button to make changes.
- Click "+ ADD" in the Channels section to begin the installation.
- A window will appear in the centre of the screen. Choose "WooCommerce" from the list of available channels.
- Provide the required information:
- Channel Name: In the field provided, you can enter any name. However, it is recommended that you choose a name that has meaning to you, such as "WooCommerce," as it will serve as an apparent reference for the source of the order in the future.
- Store URL: Please input the URL you use to access your platform.
- Timezone: Please enter the timezone your store is located at.
- Consumer Key & Secret: Please enter the information obtained through your WooCommerce platform earlier.
- After filling out the fields, customize other options, then click "Save" in the bottom-right corner.
- You'll be back in the recently installed channel. Activate it at the top of the screen using the "Is Active" button.
Congratulations! You've successfully set up your WooCommerce sales channel on Channels. You can now sell products on WooCommerce and manage orders from your Channels dashboard.

WowCher
WowCher Setup Guide
Obtaining the API keys from WowCher
Visit this page to acquire the credentials to set up your sales channel. Our page provides step-by-step guidance on obtaining these credentials, which are essential for the setup process.
Installing the WowCher Sales Channel
To add the WowCher sales channel to your Channels account, kindly adhere to the following steps:
- Access your account and go to the left side of the screen. Click the "Stores" button.
- If you already have a store, click "View Store" on the right side of the screen to access it.
- To edit an existing store, click the edit button on the right side. If you need to create a new store, click "+ ADD" above, name it, and use the edit button to make changes.
- Click "+ ADD" in the Channels section to begin the installation.
- A window will appear in the centre of the screen. Choose "WowCher" from the list of available channels.
- Provide the required information:
- Channel Name: In the field provided, you can enter any name. However, it is recommended to choose a name that has meaning to you, such as "WowCher," as it will serve as an apparent reference for the source of the order in the future.
- App Key & Secret: Please enter the information you obtained through your WowCher platform earlier.
- After filling out the fields, customize other options, then click "Save" in the bottom-right corner.
- You'll be back in the recently installed channel. Activate it at the top of the screen using the "Is Active" button.
Congratulations! You've successfully set up your WowCher sales channel on Channels. You can now sell products on WowCher and manage orders from your Channels dashboard.

Zoho Commerce
Zoho Commerce Setup Guide
Obtaining the API Key from Zoho Commerce
Visit this page to acquire the credentials to set up your sales channel. Our page provides step-by-step guidance on obtaining these credentials, which are essential for the setup process.
Installing the Zoho Commerce Sales Channel
To add the Zoho Commerce sales channel to your Channels account, kindly adhere to the following steps:
- Access your account and go to the left side of the screen. Click the "Stores" button.
- If you already have a store, click "View Store" on the right side of the screen to access it.
- To edit an existing store, click the edit button on the right side. If you need to create a new store, click "+ ADD" above, name it, and use the edit button to make changes.
- Click "+ ADD" in the Channels section to begin the installation.
- A window will appear in the centre of the screen. Choose "Zoho Commerce" from the list of available channels.
- Provide the required information:
- Channel Name: In the field provided, you can enter any name. However, it is recommended that you choose a name that has meaning to you, such as "Zoho Commerce," as it will serve as an apparent reference for the source of the order in the future.
- Data Center: Please select your marketplace region in this drop-down menu.
- Client Key & Secret: Please enter the information obtained through your Zoho Commerce platform earlier.
- After filling out the fields, customize other options, then click "Save" in the bottom-right corner.
- You'll be back in the recently installed channel. Activate it at the top of the screen using the "Is Active" button.
Congratulations! You've successfully set up your Zoho Commerce sales channel on Channels. You can now sell products on Zoho Commerce and manage orders from your Channels dashboard.

Not on the High Street
Obtaining the API Token for Not on the High Street You can obtain the API Token by contacting your Not on the High Street account manager. Ensure you have the necessary permissions and credentials to integrate the channel into your account.
Installing the Not on the High Street Sales Channel
To add the Not on the High Street sales channel to your Channels account, follow these steps:
-
Access Your Account
-
Log in to your Channels account.
-
Navigate to the left side of the screen and click the "Stores" button.
-
-
Add or Edit a Store
-
If you already have a store, click "View Store" on the right side of the screen to access it.
-
To create a new store, click the "+ ADD" button above. Name the store and click the edit button to proceed.
-
-
Add the Sales Channel
-
In the Channels section, click the "+ ADD" button.
-
A window will appear. Select "Not on the High Street" from the list of available sales channels.
-
-
Provide Required Information Fill in the following fields to complete the setup:
-
Channel Name: Enter a name for the channel. It is recommended to use a meaningful name like "Not on the High Street" for easy identification in the future.
-
Account Nominal Code: Enter the nominal code associated with your Not on the High Street account for accounting purposes.
-
API Token: Input the API Token obtained from your Not on the High Street account manager. Ensure this field is filled in accurately to establish a connection.
-
Estimated Dispatch Days: Specify the number of days after order acceptance to calculate the estimated dispatch date. For example, entering "3" means the dispatch date will be three days after an order is accepted.
-
Estimated Delivery Days: Specify the number of days after order acceptance to calculate the estimated delivery date. For example, entering "7" means the delivery date will be seven days after an order is accepted.
-
-
Save and Activate the Channel
-
After entering the required information, review your configuration and click "Save" in the bottom-right corner.
-
Once saved, activate the channel by toggling the "Is Active" button at the top of the screen.
-
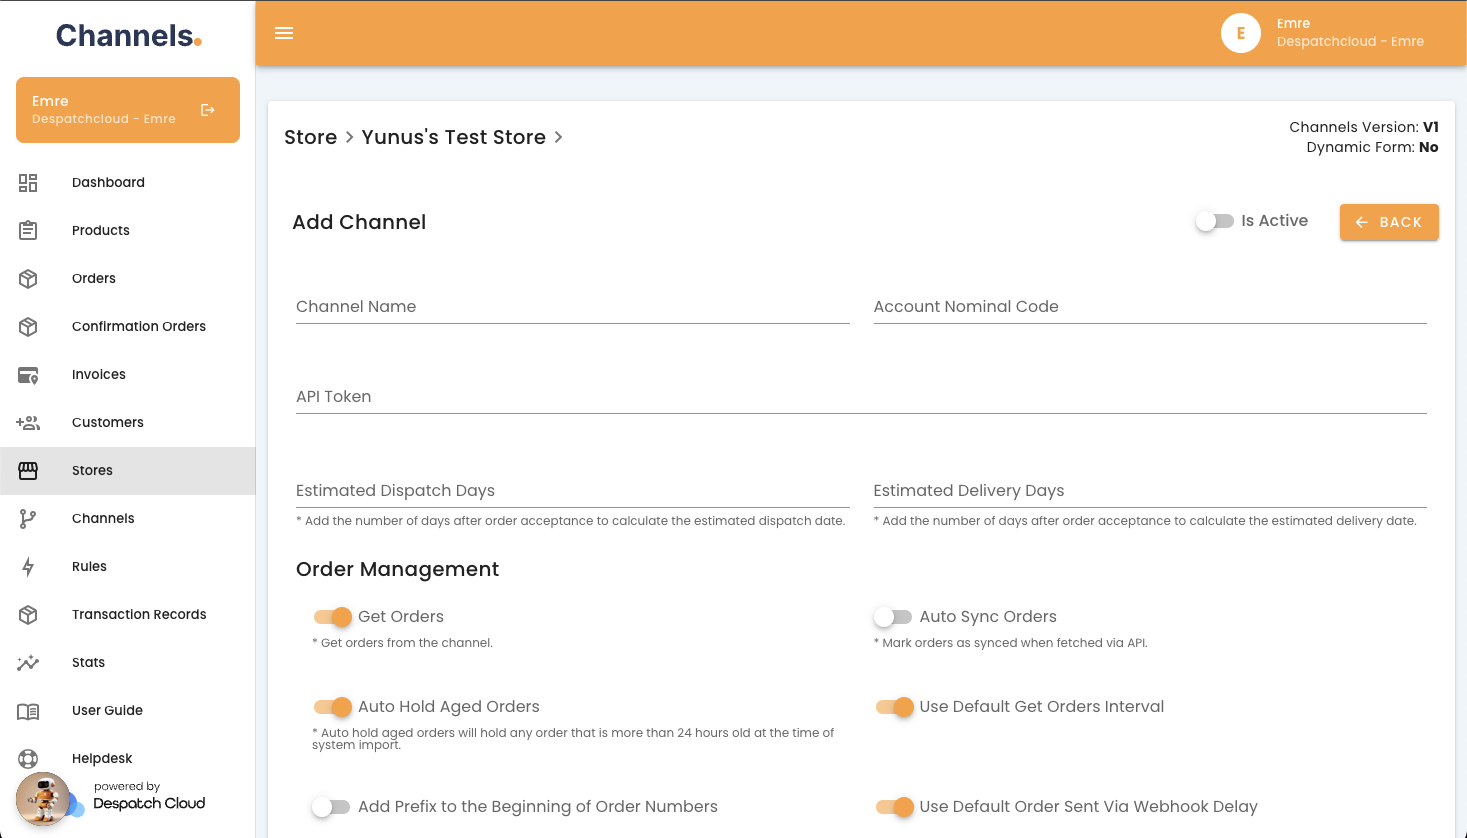
SFTP Sales Channel
1. Overview
The SFTP (Secure File Transfer Protocol) channel lets you exchange data by dropping CSV files on a secure server. It’s ideal if you prefer file-based workflows instead of APIs.
2. Features
- Four File Types: Orders, Products, Inventory, Fulfilments
- Automatic Processing: Files are processed on a schedule
- Secure Transfer: All data moves over SFTP
- Column Mapping: You can map your own column names
- File Tracking: Processed files go into a
processed/folder and get a timestamp suffix - Error Handling: Errors are logged for you to review under channel transactions
3. Setup
3.1 Basic Configuration
You will need to supply these details when you add the SFTP channel in your system settings:
- Host (e.g.
sftp.example.com) - Port (usually
22) - Username
- Password
- Base path (optional; defaults to
/)
3.2 Directory Structure
When you connect, the system creates these folders automatically under your base path:
/
├── orders/
│   └── processed/
├── products/
│   └── processed/
├── inventory/
└── fulfilments/
4. File Guidelines
- Maximum lines: 5,000 per file
- Format: CSV (headers in first row)
- Filenames: Any name is fine—just drop into the correct folder (orders, products, inventory, fulfilments)
- Processing order: Oldest modified file first
Orders files with multiple items
- Repeat all order-level columns on each row
- Fill in only the
item_prefixed columns with that item’s data - Example: a 2-item order becomes 2 rows identical except for
item_columns - Import grouping: The system will automatically group rows by
order_id.
Fulfilments files with multiple items
- Repeat all non-
item_columns on each row - Use the
item_prefixed columns for each fulfilled item’s data - Example: a 2-item shipment becomes 2 rows identical except for
item_columns
5. File Format Requirements
5.1 Orders
Required columns:
order_id
order_date
customer_name
customer_email
shipping_address_name
shipping_address_company_name
shipping_address_line_one
shipping_address_line_two
shipping_address_city
shipping_address_country_iso_code
shipping_address_zip
shipping_address_phone
billing_address_name
billing_address_company_name
billing_address_line_one
billing_address_line_two
billing_address_city
billing_address_country_iso_code
billing_address_zip
billing_address_phone
item_price_currency
item_discount_currency
item_discount_tax_currency
5.2 Products
Required columns:
product_id
product_alt_id
sku
5.3 Inventory
Required columns:
product_id
product_alt_id
sku
quantity
5.4 Fulfilments
Required columns:
order_id
tracking_number
courier
item_id
item_product_sku
item_quantity
6. Sync Intervals
By default, the system checks for new files at these intervals. You can change them per channel if you need to.
| File Type | Interval |
|---|---|
| Orders | 180 seconds (3 min) |
| Products | 43 200 seconds (12 h) |
| Inventory | 300 seconds (5 min) |
| Fulfilments | 300 seconds (5 min) |
7. Best Practices
- File Naming
- Use clear names (e.g.
orders_20250508.csv) - Include a timestamp
- Avoid special characters
- Use clear names (e.g.
- Processing
- Wait until the file is fully uploaded
- Check the
processed/folder to confirm success - Review channel logs for any errors
- Security
- Use strong, unique passwords
- Rotate credentials regularly
- Restrict SFTP access to only the needed folders
- Performance
- Keep files under a few hundred megabytes each
- Don’t drop dozens of files at once
- Stick to the recommended sync intervals
8. Example File Structure
Orders CSV
order_id,order_date,customer_name,customer_email,shipping_address_name,shipping_address_company_name,shipping_address_line_one,shipping_address_line_two,shipping_address_city,shipping_address_country_iso_code,shipping_address_zip,shipping_address_phone,item_id,item_product_sku,item_quantity
ORD123,2024-03-20 10:00:00,John Doe,john@example.com,John Doe,ACME Inc,123 Main St,Apt 4B,New York,US,10001,+1234567890,ITEMA,SKU123,1
ORD123,2024-03-20 10:00:00,John Doe,john@example.com,John Doe,ACME Inc,123 Main St,Apt 4B,New York,US,10001,+1234567890,ITEMB,SKU456,2
Fulfilments CSV
order_id,tracking_number,courier,item_id,item_product_sku,item_quantity
ORD123,TRK123456,USPS,ITEMA,SKU123,1
ORD123,TRK123456,USPS,ITEMB,SKU456,2
9. Troubleshooting
- Connection Errors
- Check host, port, username and password
- Ensure the base path exists
- File Processing Errors
- Verify CSV format, headers and max line count
- Check file and folder permissions
- Look in the channel logs for error messages
- Sync Problems
- Confirm the channel is set to “active”
- Review any rate-limit messages in your logs
10. Support
If you still have questions or run into issues:
- Review the channel logs in your dashboard.
- Double-check your CSV headers, folder layout, and line count.
- Contact our support team with the exact error message and a screenshot of your folder structure.