Rules
Set up custom rules and automate actions.
Rules
Overview
The Rules Engine is a new feature in Channels that allows you to set up custom rules and automate actions based on specific events and conditions. This documentation provides a detailed guide on how to use the Rules Engine, covering all sections and functionalities.
Sections of the Rules Engine
Rule Info
In this section, you will enter the details of your rule.
- Rule Name: Enter a descriptive name for your rule. This helps you easily identify and manage multiple rules.
Triggers
Triggers are events that will cause the rule to execute. You can set multiple triggers for a single rule. Each trigger type and event can be used for different scenarios:
-
Type: Select the type of entity that will trigger the rule.
- Order: Triggered by events related to orders.
- Order Item: Triggered by events related to individual items within an order.
- Fulfilment: Triggered by events related to the fulfilment process.
- Product: Triggered by events related to products.
- Channel Product: Triggered by events related to products on sales channels.
- Plugin Product: Triggered by events related to products managed through plugins.
- Invoice: Triggered by events related to invoices.
-
Event: Choose the event that will trigger the rule.
- Created: Triggered when a new entity (order, product, etc.) is created.
- Updated: Triggered when an existing entity is updated.
- Deleted: Triggered when an entity is deleted.
- Quantity Updated: This event triggers when the product quantity is updated, whether through inventory adjustments, sales, returns, or manual updates.
- API Quantity Updated: Triggered when the quantity of a product is updated via API.
- Total Quantity Updated: Triggered when the total quantity of a product is updated.
Conditions
Conditions specify criteria that must be met for the rule to be executed. You can set multiple conditions for a single rule.
If no conditions are set, the rule will run every time a trigger is activated.
-
Condition Type: Select the type of entity the condition will apply to.
- Product: Conditions related to products.
- Channel Product: Conditions related to products on sales channels.
- Plugin Product: Conditions related to products managed through plugins.
-
Condition Data:
-
API Quantity: The quantity of the product updated via API. Useful for tracking changes made through API integrations.
-
API Sync Status: The status of the product's synchronization via API. Important for ensuring data consistency.
-
API Synced At: The date and time the product was last synced via API. This is useful for monitoring the timeliness of updates.
-
Auto Sync Stock: Indicates whether the product's stock is automatically synchronized. This helps automate inventory management.
-
Channel: The sales channel where the product is listed. Essential for managing multi-channel sales.
-
Channel Courier Custom Name: A custom name for the courier service. Allows for personalized courier tracking.
-
Channel Courier Name: The name of the courier service used. Useful for logistics and shipping management.
-
Channel Product SKU: The SKU of the product on the sales channel. Important for channel-specific inventory management.
-
Channel Sync Status: The status of the product's synchronization with the sales channel. Ensures that product data is up-to-date across channels.
-
Channel Synched At: The date and time the product was last synced with the sales channel. Useful for tracking synchronization activities.
-
Confirmation Order: Indicates if the order is confirmed. Important for order processing and tracking.
-
Coupon Code: The code of any coupon applied to the order. This is useful for discount tracking and marketing analysis.
-
Coupon Total: The total discount amount from coupons. Useful for financial tracking and promotional analysis.
-
Coupon Total Exc Tax: The total discount amount from coupons excluding tax. Important for accurate financial reporting.
-
Created At: The date and time when the product was created. Useful for tracking product lifecycle.
-
Currency: The currency of the product's price. Important for financial reporting and international transactions.
-
Customer Comment: Any comments made by the customer. Useful for understanding customer feedback or special requests.
-
Decrease Quantity: The amount by which the product quantity is decreased. Important for inventory management.
-
Delivery Note: Notes related to the delivery of the order. Useful for special delivery instructions.
-
Description: The description of the product. Important for product information and marketing.
-
Discount Tax Currency: The currency of the discount tax. Crucial for international transactions.
-
Discount Total: The total discount applied to the invoice. Useful for monitoring discount strategies.
-
Discount Total Exc Tax: The total discount amount excluding tax. Useful for financial tracking and reporting.
-
Discount Unit: The unit of the discount applied. Important for tracking discount strategies.
-
Due Date: The due date for the invoice payment. Crucial for financial planning and payment reminders.
-
Fulfilment Date: The date when the order was fulfilled. Important for order processing and tracking.
-
Gift Note: Any notes related to gifts. Useful for personalized customer experiences.
-
Image URL: The URL of the product's image. Important for product listings and marketing.
-
Increase Decrease Stock Updated At: The date and time when the stock increase or decrease was last updated. This is useful for tracking inventory changes.
-
Increase Quantity: The amount by which the product quantity is increased. Important for inventory management.
-
Invoice Address City: The city in the billing address. Useful for location-specific rules.
-
Invoice Address Company Name: The company name in the billing address. This is useful for B2B transactions and account management.
-
Invoice Address Country: The country in the billing address. Essential for international shipping and tax rules.
-
Invoice Address Country ISO Code: The ISO code of the country in the billing address. Standardizes country data for processing.
-
Invoice Address Line 1: This is the first line of the billing address. It is useful for verifying and formatting address data.
-
Invoice Address Line 2: The second line of the billing address. Additional address details.
-
Invoice Address Line 3: The third line of the billing address. Further address information.
-
Invoice Address Phone: The phone number in the billing address. It can be used for contact validation or notifications.
-
Invoice Address Postcode: The postal code in the billing address. Important for shipping calculations and address validation.
-
Invoice Address State: The state or region in the billing address. It is important for regional tax calculations and shipping rules.
-
Invoice Customer Email: The email address of the customer on the invoice.
-
Invoice Customer Name: The name of the customer on the invoice. It can be used to personalize rules or target specific customers.
-
Invoice Date: The date the invoice was generated. This date is useful for triggering rules based on billing cycles or financial reporting periods.
-
Invoice Number: The unique number assigned to the invoice. Used for tracking and referencing transactions.
-
Is Tax Inclusive: Indicates if the total amount includes tax. Important for accurate financial calculations.
-
Item Quantity: The quantity of an item in the order. Important for stock control and order processing.
-
Item SKU: The SKU of an item in the order. Useful for inventory and product management.
-
Last Send Quantity: The last quantity sent for the product. Important for tracking inventory levels.
-
Late Shipment: Indicates if the shipment is late. Useful for managing delivery performance and customer satisfaction.
-
Late Shipment Notified At: The date and time when the late shipment was notified. Important for tracking notifications.
-
Low Stock Buffer: The quantity buffer to indicate low stock. Helps to maintain sufficient inventory levels.
-
Matched At: The date and time the product was matched with another entity. Useful for tracking data-matching activities.
-
Matched SKU: The product's SKU that has been matched with another. Important for product synchronization.
-
Master Product ID: The ID of the master product. Useful for product management and inventory control.
-
Notes: Any additional notes on the invoice. Useful for internal comments or special instructions.
-
Notify Customer: Indicates whether the customer should be notified. It can be used to automate customer communications.
-
Order Date: The date when the order was placed. Important for order processing and tracking.
-
Payment Currency: The currency used for the payment. Important for international transactions and financial reporting.
-
Payment Method: The method used for payment. Essential for payment processing and reporting.
-
Payment Ref: The reference number for the payment. Useful for tracking and reconciling payments.
-
Plugin: The plugin associated with the invoice. Helps to manage and track transactions through specific plugins.
-
Plugin Is Active: Indicates whether the plugin managing the product is active. Important for plugin management.
-
Plugin Provider: The provider of the plugin managing the product. Useful for tracking plugin performance.
-
Plugin Quantity: The quantity of the product managed by the plugin. Important for inventory management.
-
Plugin Quantity Synced At: The date and time when the plugin quantity was last synced. This is useful for tracking synchronization activities.
-
Plugin Remote ID: The remote ID of the product in the plugin. Useful for integration tracking.
-
Plugin Sync Status: The status of the product's synchronization with the plugin. Ensures data consistency.
-
Plugin Synced At: The date and time the product was last synced with the plugin. This is useful for monitoring synchronization activities.
-
Price: The price of the product. Crucial for financial calculations and pricing strategies.
-
Price Currency: The currency of the product price. Important for financial reporting and international transactions.
-
Price Exc Tax: The price excluding tax. Useful for financial calculations and reporting.
-
Primary Reference ID: The primary reference ID for the transaction. Useful for tracking and referencing orders.
-
Product Nominal Code: A nominal code associated with the product. Important for accounting purposes.
-
Quantity: The quantity of the product. Crucial for inventory management.
-
Refunded Quantity: The quantity of the product that has been refunded. This is useful for tracking returns and inventory adjustments.
-
Remote Alt ID: The alternate remote ID of the product. Useful for integration tracking.
-
Remote Alt SKU: The alternate remote SKU of the product. Important for synchronization and matching.
-
Remote ID: The remote ID of the product. Useful for integration tracking.
-
Remote Quantity: The quantity of the product in a remote system. Important for tracking external inventory.
-
Remote Quantity Updated At: The date and time when the remote quantity was last updated. This is useful for monitoring inventory changes.
-
Remote SKU: The remote SKU of the product. Important for synchronization and matching.
-
Send Via Webhook: Indicates if the information should be sent via webhook. Important for real-time data integration.
-
Shipping Account Code: The account code used for shipping charges. Useful for accounting and cost tracking.
-
Shipping Address City: The city of the shipping address. Useful for location-specific delivery.
-
Shipping Address Company Name: The company name on the shipping address. Important for B2B deliveries.
-
Shipping Address Country ISO Code: The ISO code of the country in the shipping address. Standardizes country data for processing.
-
Shipping Address Customer Email: The customer's email at the shipping address. Important for delivery notifications.
-
Shipping Address Customer Name: The customer's name at the shipping address. Useful for personalized delivery.
-
Shipping Address Line 1: The first line of the shipping address. Important for accurate delivery.
-
Shipping Address Line 2: The second line of the shipping address. Additional address details.
-
Shipping Address Line 3: The third line of the shipping address. Further address information.
-
Shipping Address Phone: The phone number at the shipping address. Useful for delivery contact.
-
Shipping Address Postcode: The postal code of the shipping address. Important for shipping calculations.
-
Shipping Address State: The state or region of the shipping address. Important for regional shipping rules.
-
Shipping Method: The method used for shipping. Important for managing delivery options and costs.
-
Shipping Tax Type: The tax type applied to shipping charges. Important for tax compliance.
-
Shipping Total: The total shipping cost on the invoice. Useful for monitoring and controlling shipping expenses.
-
Shipping Tracking Code: The tracking code for the shipment. Essential for tracking and notifying customers.
-
SKU: The stock-keeping unit identifier for the product. Crucial for inventory management.
-
Store: The specific store associated with the product. Important for multi-store management.
-
Subtotal: The subtotal amount before taxes and discounts. Useful for financial calculations and reporting.
-
Subtotal Exc Tax: The subtotal amount excluding tax. Important for financial calculations.
-
System Note: Internal system notes. Useful for internal tracking and communication.
-
Tax Currency: The currency used for tax calculations. Important for international transactions.
-
Tax Rate: The applicable tax rate. Crucial for accurate tax calculations.
-
Tax Total: The total tax amount on the invoice. Crucial for tax reporting and compliance.
-
Tax Type: The tax type associated with the product. Important for tax calculations and compliance.
-
Title: The title of the product. Important for product listings and marketing.
-
Total: The final total amount after all adjustments. Important for invoicing and payment processing.
-
Tracking URL: The URL for tracking the shipment. Useful for providing customers with tracking information.
-
Type: The type or category of the product. Useful for categorization and management.
-
Updated At: The date and time when the product was last updated. Important for tracking product changes.
-
Use Low Stock Buffer: Indicates whether a low stock buffer is used. This buffer helps maintain sufficient inventory levels.
-
VAT ID: The VAT identification number. Essential for tax reporting and compliance in VAT-registered businesses.
-
VAT Type: The type of VAT applied. Important for tax calculations and compliance.
-
Webhook Sync Status: The status of the product's synchronization via webhook. Important for real-time data integration.
-
Webhook Synced At: The date and time when the product was last synced via webhook. This is useful for monitoring synchronization activities.
-
-
Operator: Choose the operator for the condition.
- Is: The field value matches the specified value.
- Is not: The field value does not match the specified value.
- Contains: The field value contains the specified value.
- Does not contain: The field value does not contain the specified value.
- Starts with: The field value starts with the specified value.
- Ends with: The field value ends with the specified value.
- Is empty: The field is empty.
- Is not Empty: The field is not empty.
- Greater Than: The field value is greater than the specified value.
- Greater than or equal: The field value is greater than or equal to the specified value.
- Less than: The field value is less than the specified value.
- Less than or equal: The field value is less than or equal to the specified value.
-
Condition Value: Enter the value for the condition. For date-related conditions, a date picker will be available. For other conditions, this will be an input text box. Additionally, it has these two selectable options for some conditions and operators:
- Yes: Indicates that the condition is true or applicable.
- No: Indicates that the condition is false or not applicable.
Actions
Actions are tasks performed when the rule runs. You can specify multiple actions for each rule.
-
Action Type: Select the type of entity the action will apply to.
- Product: Actions related to products.
- Channel Product: Actions related to products on sales channels.
- Plugin Product: Actions related to products managed through plugins.
-
Action: Choose the action to be performed.
- Send Notification: Sends a notification when the rule is triggered.
- Set API Sync Status: Sets the synchronization status of the product via API.
- Set Channel Sync Status: Sets the synchronization status of the product with the sales channel.
- Set Plugin Sync Status: Sets the synchronization status of the product with the plugin.
- Set Webhook Sync Status: Sets the synchronization status of the product via webhook.
-
Action Value: Enter the details for the action.
- Notification Type (Email):
- Recipient Email: The email address to send the notification to.
- Subject: The subject of the email notification.
- Message: The message content of the email notification.
- New Sync Status:
- Default: Sets the status to default.
- Pending: Sets the status to pending.
- In Progress: Sets the status to in progress.
- Synced: Sets the status to synced.
- Failed: Sets the status to failed.
- Excluded: Sets the status to excluded.
- Null: Clears the status.
- Notification Type (Email):
Creating a New Rule
To create a new rule, follow these steps:
Your rule is now saved and created! For details on each field, refer to the explanations in the above section.

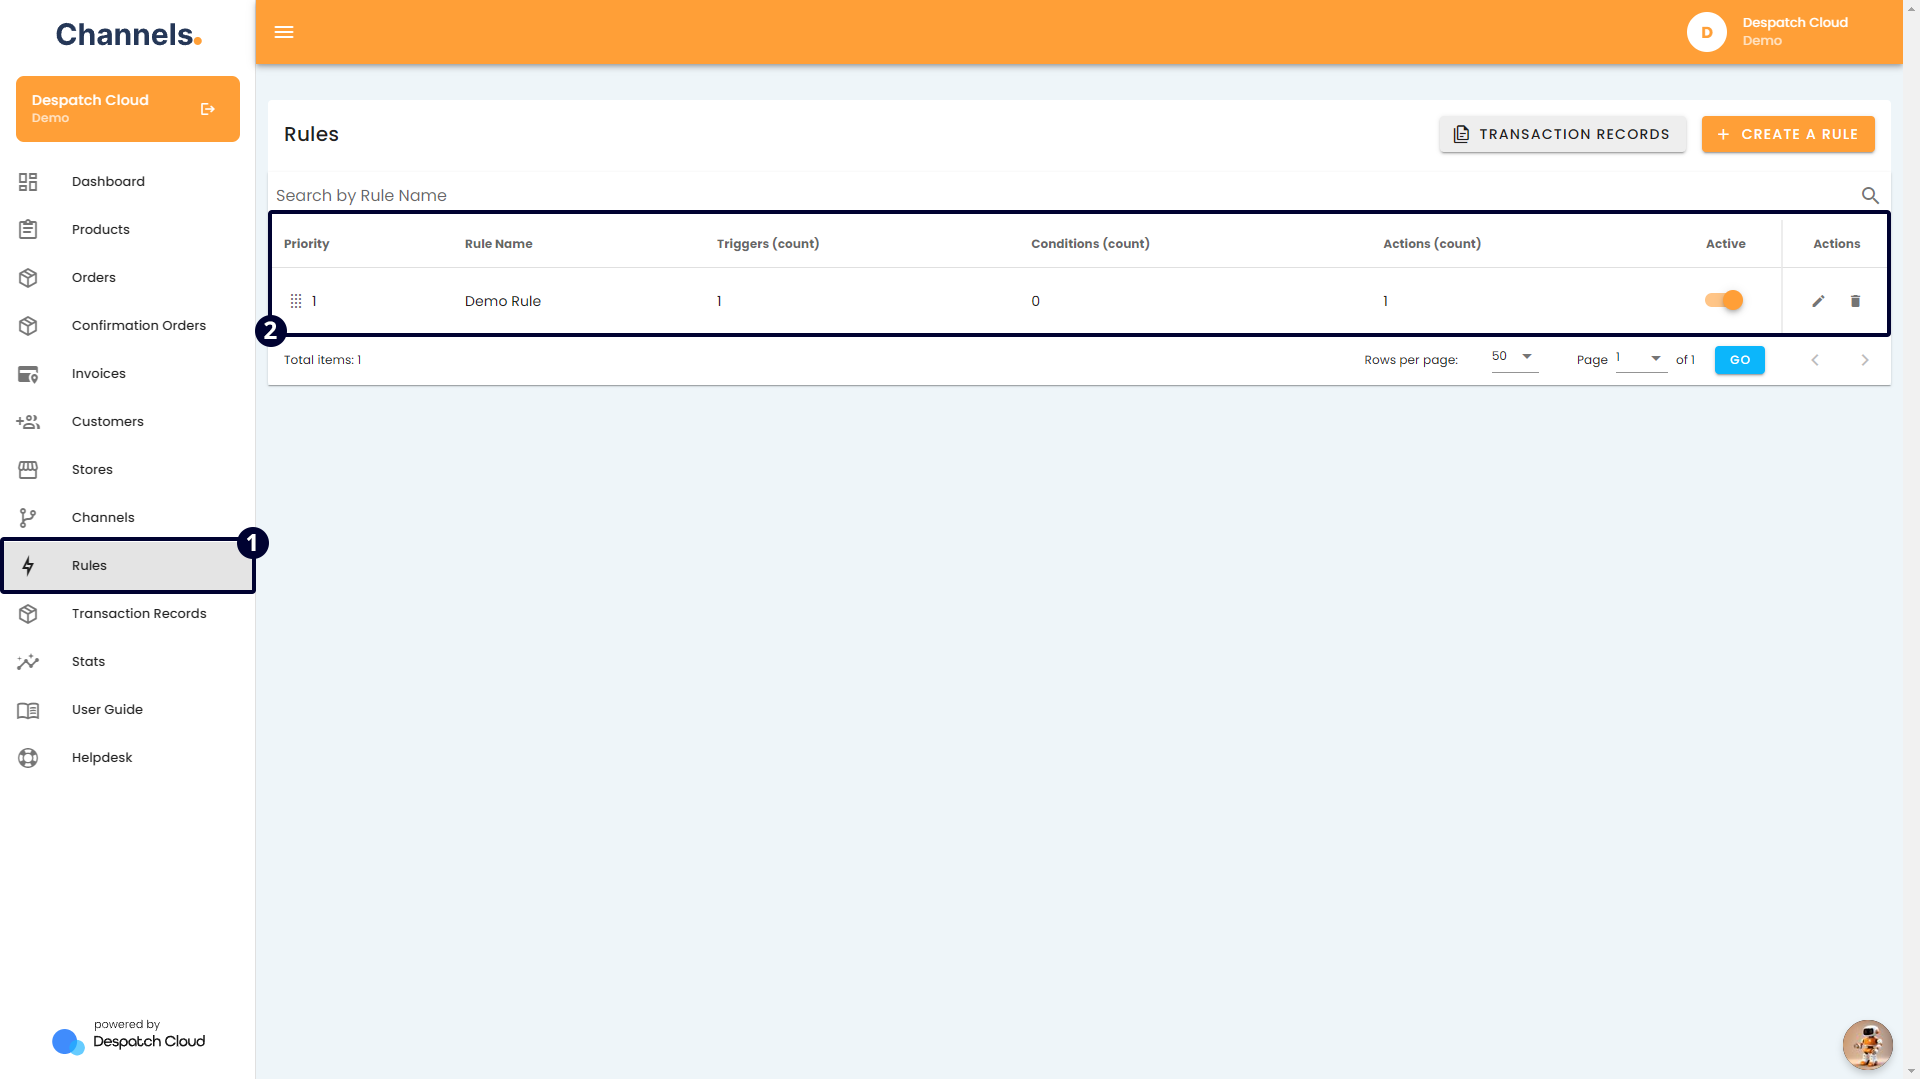
Editing Existing Rules
To learn how to make changes to your rules, follow the explanations and instructions below:
- Access the Rules Page: Ensure you are on the rules page by clicking the "Rules" button from the left-hand menu.
- Page Details:
- Priority: Use the dragging button here to select and sort the rules. The higher they are listed on this page, the more priority they will have, meaning higher rules will be run earlier than others.
- Rule Name: This section displays the names of the rules.
- Triggers (count): This section shows the number of triggers set within the rules.
- Conditions (count): This section shows the number of conditions set within the rules.
- Actions (count): This section shows the number of actions within the rules.
- Active: Use this switch button to turn rules on or off. They will be active and run in the system if they are on. If they are off, they will not be in use.
- Actions: This section holds a set of buttons that will help you edit and delete the rules.
- Pen Icon: Use this button to return to the page where you created your rule and make changes.
- Trash Bin Icon: Use this button to delete your rule.
Example Rule Setups
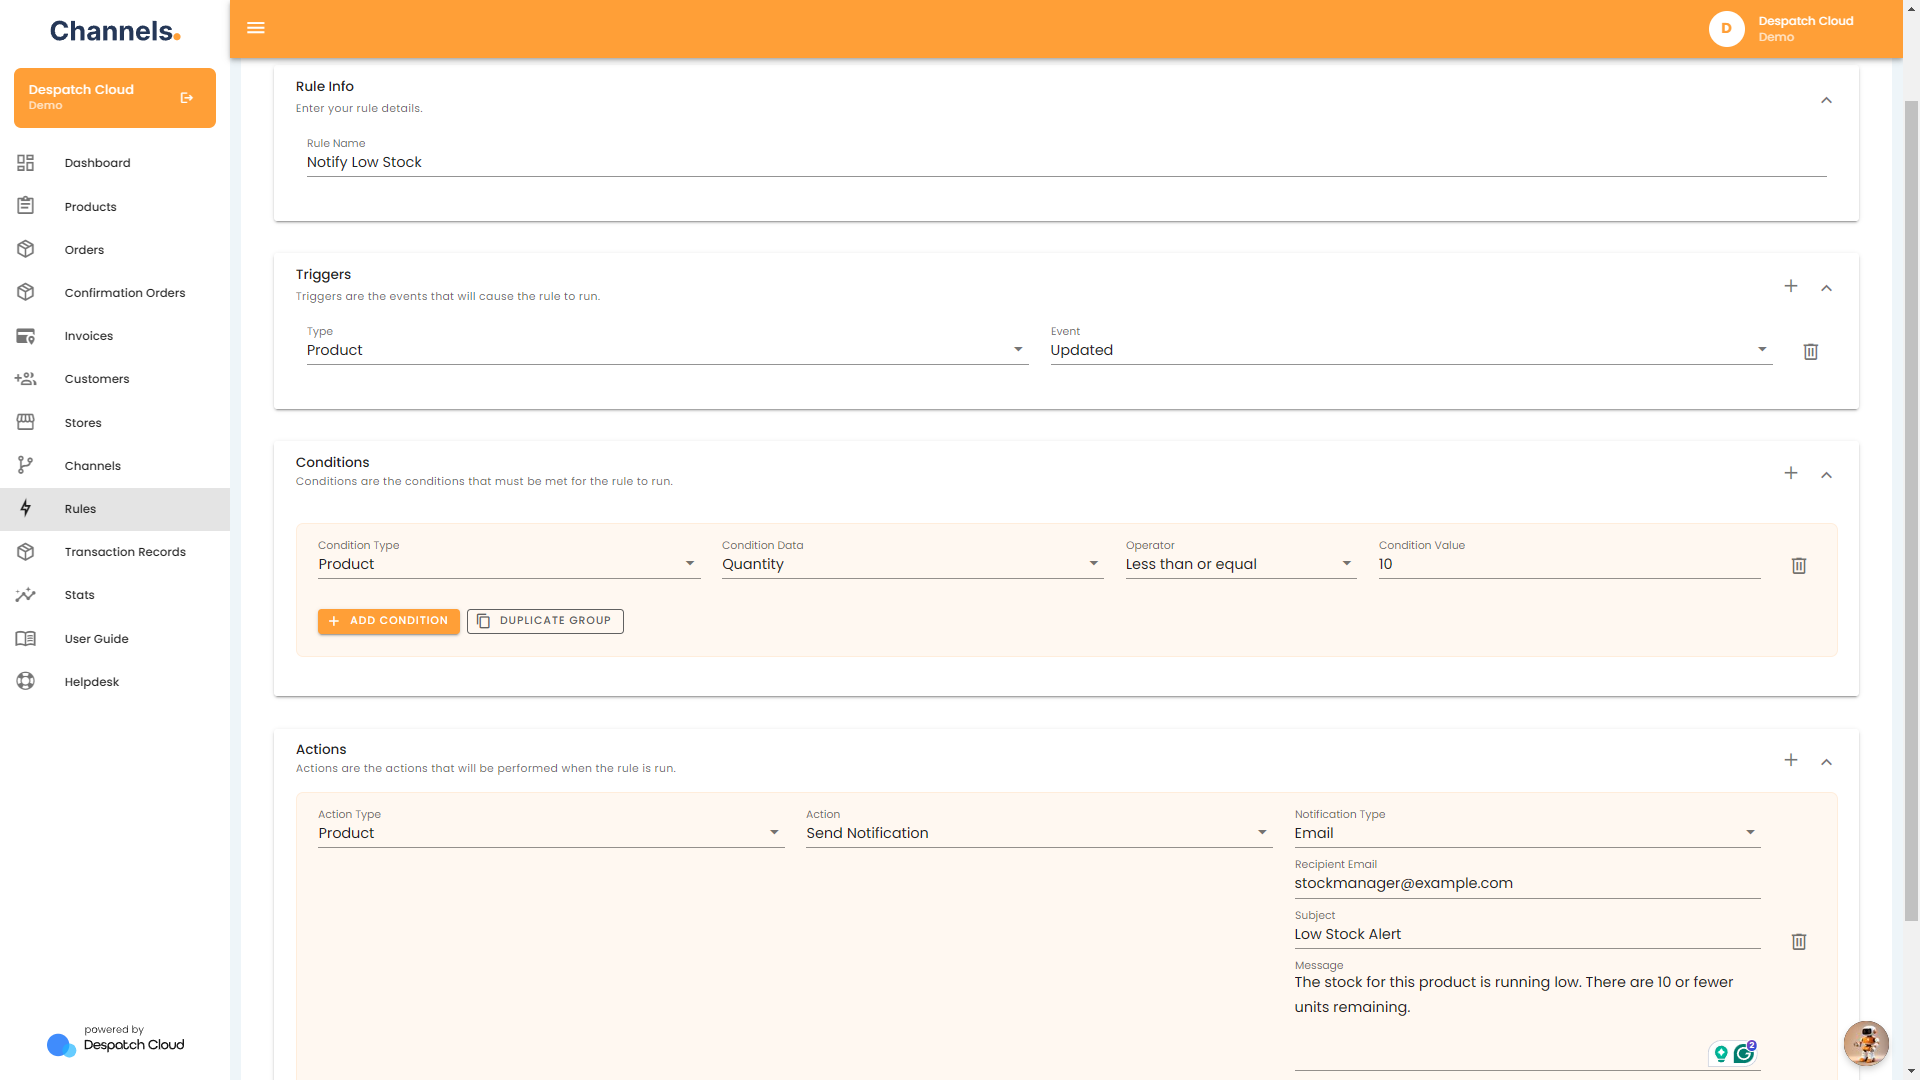
Notify Low Stock
Here is an example of setting up a rule for notifying low product stock.
-
Rule Info
- Rule Name: Notify Low Stock
- Triggers
- Type: Product
- Event: Updated
- Conditions
- Condition Type: Product
- Condition Data: Quantity
- Operator: Less than or equal
- Condition Value: 10
- Actions
- Action Type: Product
- Action: Send Notification
- Action Value:
- Notification Type: Email
- Recipient Email: stockmanager@example.com
- Subject: Low Stock Alert
- Message: The stock for this product is running low. 10 or fewer units are remaining.
This rule will notify the stock manager when the quantity of any product hits or goes below 10.
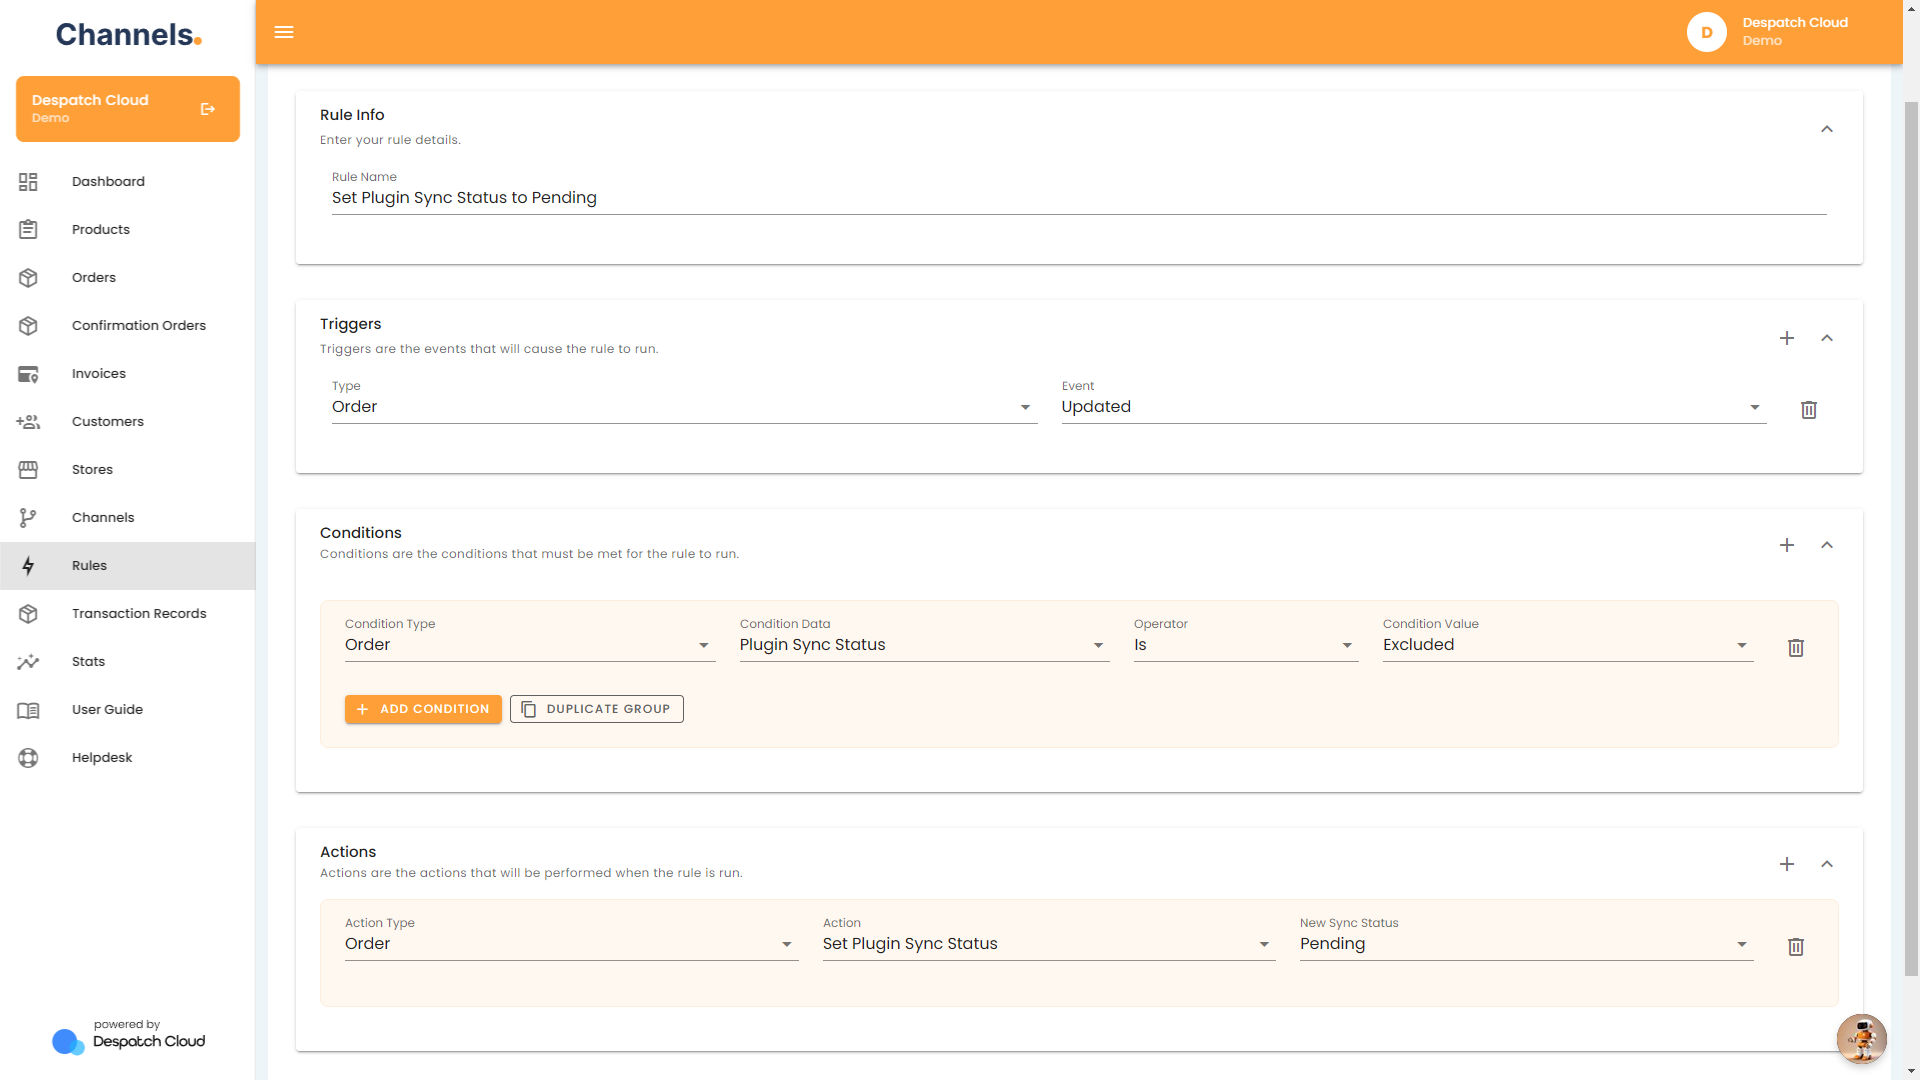
Set Plugin Sync Status
This example is designed to automatically update an order's sync status to "Pending" whenever it is updated and meets specific conditions. This can be particularly useful for managing orders that need to be reviewed or processed further before being sent to a plugin.
An order can only be sent to one plugin at a time successfully. If you set more than one plugin, the rule will fail. To send an order to multiple plugins, set them up separately. Additionally, for this rule to work, you must toggle on the "Exclude Unfulfillable Orders" option in all plugin settings. To learn more about how to set up Plugins, please visit this page.
Follow the steps below to recreate this rule:
-
Rule Info
- Rule Name: Set Plugin Sync Status to Pending
- Triggers
- Type: Order
- Event: Updated
- Conditions
- Condition Type: Order
- Condition Data: Plugin Sync Status
- Operator: Is
- Condition Value: Excluded
- Actions
- Action Type: Order
- Action: Set Plugin Sync Status
- New Sync Status: Pending
Your rule is now created and configured to update the Plugin Sync Status to "Pending" when an order, currently marked as "Excluded", is updated. This helps ensure orders that need further processing are appropriately flagged.