Plugin Setup Guides
Documents about obtaining access credentials for plugins and adding them to your Channels account.
Plugin Features
Overview
This document details what you can accomplish after installing a plugin in your store. Please note that not all features are available for every plugin. You will learn about configuring plugin rules and understanding and processing orders.
Adding a Plugin Rule

Excluding Single Item Orders by Order Item SKUs
To omit orders with single items based on order item SKUs, adhere to the steps below and designate the fields as directed below.
The instructions describe fields lacking specific input requirements, whereas fields that involve selection from dropdown lists present their options directly without additional explanation.
- Rule Name: Provide a description outlining the purpose of this rule.
- Condition: Line Item SKU
- Operator: Exists
- Condition Value: Input the items' SKUs. Include the Kit, Bundle, and Group Item SKUs if you want to exclude them. If multiple SKUs are entered, separate them with commas.
- Action: Update Order Sync Status
- Action Value: Excluded

Excluding Orders by Total Item Quantities
To exclude orders based on total order item quantities, adhere to the instructions below and configure the fields as directed below.
The instructions describe fields lacking specific input requirements, whereas fields that involve selection from dropdown lists present their options directly without additional explanation.
- Rule Name: Specify a description clarifying the purpose of this rule.
- Condition: Total Order Item Quantity
- Operator: Choose the desired operator. For instance, if you intend to exclude orders with a total quantity surpassing 10, select the "Greater than" operator.
- Condition Value: Enter the total quantity for excluding orders. In the provided example, input 10.
- Action: Update Order Sync Status
- Action Value: Excluded

Tagging Orders by Order Item SKU
To tag orders based on order item SKUs, follow the instructions below and configure the fields as specified below.
The instructions describe fields lacking specific input requirements, whereas fields that involve selection from dropdown lists present their options directly without additional explanation.
- Rule Name: Provide a description outlining the purpose of this rule.
- Condition: Line Item SKU
- Operator: Exists
- Condition Value: Enter the Kit, Bundle, and Group Item names to include them. Separate the SKUs with commas if you intend to add more than one.
- Action: Add Tag
- Action Value: Enter the keyword to be used as a tag for your orders in this field.

Tagging All Orders Received from a Channel
To tag all orders received from a channel, follow the instructions below and configure the fields accordingly.
The instructions describe fields lacking specific input requirements, whereas fields that involve selection from dropdown lists present their options directly without additional explanation.
- Rule Name: Provide a description explaining the purpose of this rule.
- Condition: Channel Name
- Operator: Equals
- Condition Value: Select the channel from the dropdown list.
- Action: Add Tag
- Action Value: Enter the keyword you want to use as a tag for your orders in this field.

Understanding Order States
Plugin Sync Status
- In Progress: Currently implementing plugin order rules.
- Pending: The order is in the queue for plugin transmission; stock control is applied to order items.
- Excluded: The order hasn't been sent to the plugin, either due to plugin rules or insufficient stock.
- Failed: An error occurred while attempting to send the order to the plugin.
- Synced: The order has been successfully transmitted to the plugin.
Order Sync Status
- In Progress: Ongoing application of plugin order rules.
- Pending: The order is queued for plugin transmission; stock control is applied to order items.
- Excluded: The order is not sent to the plugin due to plugin rules or insufficient stock.
- Failed: An error was encountered while attempting to send the order to the plugin.
- Synced: The order has been successfully transmitted to the plugin.
- Updated: The order update was received from the channel and successfully applied.
Resending Excluded Orders
Follow the below steps to resend the excluded orders:

Checking the Product Stock Quantities
For a comprehensive view of product stock quantities, proceed as follows:
- Access the "Products" page by selecting "Products" from the left-side menu.
- Choose the specific store for which you wish to review product quantities.
- Observe the product quantities from the plugin under "Plugin Quantities," noting the synchronisation time under "Plugin Quantity Synced At." The "Quantity" field represents the sum of quantities received from the plugin and the Despatch Cloud WMS system.

Sending Excluded Orders to Another System Using Webhooks
Ensure a webhook is created exclusively for the "order.excluded" event to direct excluded orders to your intended system. Other webhooks may send order data to the plugin and the alternate system.
Upon specifying all details, save and create the webhook using the "Save" button.

DHL
Obtaining the API keys from DHL
You can acquire the credentials needed to set up your plugin by contacting your DHL account manager.
Installing the DHL Plugin
To add the DHL Plugin to your Channels account, kindly adhere to the following steps:
- Access your account and go to the left side of the screen. Click the "Stores" button.
- To edit an existing store, click the edit button on the right side. If you need to create a new store, click "+ ADD" above, name it, and use the edit button to make changes.
- Go to the Plugins section and Click "+ ADD" to begin the installation.
- A window will appear in the centre of the screen. Choose "DHL" from the list of available channels.
- Provide the required information:
- Plugin Name: Input a suitable name in the designated field. Select a meaningful name to you, possibly aligning with your store's name, for clarity in future order references.
- Use Store Name Instead of Account Name: Specify whether the store name should be used in place of the account name in transactions or communications facilitated by the plugin.
- Account Number: Enter the unique account number assigned to you by the service provider. This number is used to identify your account in transactions and queries.
- Server URL: Input the URL of the service-provided server where Channels will send requests or retrieve data.
- Authorization URL: Enter the URL used to initiate the authorization process with the service provider, where credentials are verified to grant access.
- Client ID: Input the unique identifier assigned to your application or integration by the service provider, which is used in the authentication process.
- Client Secret: Enter the confidential key provided by the service provider. You will use this alongside the Client ID to authenticate access to the API.
- Scopes: Specify the scope of access your application requests from the service provider, defining what resources or operations are permitted.
- Subscription Key: Input the key obtained from the service provider. This key is often required to access subscription-based APIs or services and verify your subscription level or entitlements.
- Once all fields are populated, finalise by selecting "Save" at the bottom right.
- Activate the connection from the top of the screen using the "Is Active" button.
Congratulations! You've successfully set up DHL on Channels. Please visit this page to learn more about utilising DHL to the fullest.

Mintsoft
Installing the Mintsoft Plugin
To add the Mintsoft Plugin to your Channels account, kindly adhere to the following steps:
- Access your account and go to the left side of the screen. Click the "Stores" button.
- To edit an existing store, click the edit button on the right side. If you need to create a new store, click "+ ADD" above, name it, and use the edit button to make changes.
- Go to the Plugins section and Click "+ ADD" to begin the installation.
- A window will appear in the centre of the screen. Choose "Mintsoft" from the list of available channels.
- Provide the required information:
- Plugin Name: Input a suitable name in the designated field. Select a meaningful name to you, possibly aligning with your store's name, for clarity in future order references.
- Username: Please enter your Mintsoft account username.
- Password: Please enter your Mintsoft account password.
- Warehouse (Get Stock Level & Push Order): This option allows the plugin to retrieve real-time stock levels and send new orders for fulfilment from the specified warehouse.
- Client ID (Push Order): This ID associates orders pushed from your store with your specific client account in Mintsoft, ensuring they are correctly attributed and processed.
- Courier Services (Push Order): This specifies which courier services should be used when pushing orders from your store to the warehouse. It ensures the correct delivery method is applied based on your shipping configurations. This must correspond to the courier services set up in your Mintsoft account to avoid mismatches and delivery issues.
- Stock Management:
- Add Products to Whistl:
- Activate this function to synchronise your store products with Whistl. Enabling it creates your store products within the Mintsoft system.
- For example, suppose you intend to retrieve products from a sales channel like TikTok and transfer the product data to Whistl. In that case, you must initially activate the product download option from the sales channel. Subsequently, enable the "Add Products to Whistl" option to ensure the products are first added to Channels. At this point, the system transmits the product data to Whistl. Follow these steps precisely to ensure the products are generated in Whistl.
- Download Products: This feature can fetch product information from the Whistl plugin and generate corresponding Store products. It also retrieves product quantities from Whistl every 3 minutes, updating the plugin quantities accordingly.
- Auto Sync Stock: This functionality ensures that stock levels across all channels under the store linked to this plugin are regularly updated with quantities received from the Whistl plugin every 3 minutes.
- Add Products to Whistl:
- Order Management:
- Exclude Unfulfillable Orders: Enabling this feature excludes orders destined for Mintsoft based on stock availability. When activated, it evaluates the stock levels of products within an order. If any product within bundles, kits, or grouped products requires more stock, Mintsoft withholds the order from being processed. This functionality also prevents accepting orders not present in Mintsoft or those lacking sufficient stock. For Bundle, Group, or Kit products, the system disassembles them into individual products, assessing stock levels per product. If any single product lacks adequate stock, the entire order is held back from being despatched to Mintsoft.
- Deduct Stock via Orders: Adjusts the Mintsoft stock levels dynamically as orders are processed.
- Once all fields are populated, finalise by selecting "Save" at the bottom right.
- Activate the connection from the top of the screen using the "Is Active" button.
Congratulations! You've successfully set up Mintsoft on Channels. Please visit this page to learn more about utilising Mintsoft to the fullest.

MNP
Obtaining the API keys from MNP
You can acquire the credentials needed to set up your plugin by contacting your account manager on MNP.
Installing the MNP Plugin
To add the MNP Plugin to your Channels account, kindly adhere to the following steps:
- Access your account and go to the left side of the screen. Click the "Stores" button.
- To edit an existing store, click the edit button on the right side. If you need to create a new store, click "+ ADD" above, name it, and use the edit button to make changes.
- Go to the Plugins section and Click "+ ADD" to begin the installation.
- A window will appear in the centre of the screen. Choose "MNP" from the list of available channels.
- Provide the required information:
- Plugin Name: Input a suitable name in the designated field. Select a meaningful name to you, possibly aligning with your store's name, for clarity in future order references.
- Client Code: This is a unique identifier provided to you by the MNP platform upon registration or during the setup process. It is used to identify your specific account or client profile within their system.
- Customer Alias: Input the alias or nickname for your customer profile on the MNP platform.
- Site ID: Input the identifier that is specific to the site or platform instance you are integrating with MNP.
- Campaign Code: Input the campaign code used to track campaigns within the MNP system.
- API Key: Input the API key acquired from the MNP platform.
- Stock Management:
- Add Products to MNP:
- Activate this function to synchronise your store products with MNP. Enabling it creates your store products within the MNP system.
- For example, suppose you intend to retrieve products from a sales channel like TikTok and transfer the product data to MNP. In that case, you must initially activate the product download option from the sales channel. Subsequently, enable the "Add Products to MNP" option to ensure the products are first added to Channels. At this point, the system transmits the product data to MNP. Follow these steps precisely to ensure the products are generated in MNP.
- Download Products: This feature can fetch product information from the MNP plugin and generate corresponding Store products. It also retrieves product quantities from MNP every 3 minutes, updating the plugin quantities accordingly.
- Auto Sync Stock: This functionality ensures that stock levels across all channels under the store linked to this plugin are regularly updated with quantities received from the MNP plugin every 3 minutes.
- Add Products to MNP:
- Once all fields are populated, finalise by selecting "Save" at the bottom right.
- Activate the connection from the top of the screen using the "Is Active" button.
Congratulations! You've successfully set up MNP on Channels. Please visit this page to learn more about utilising MNP to the fullest.

Peoplevox
Obtaining the API keys from Peoplevox
You can acquire the credentials needed to set up your plugin by contacting your account manager on Peoplevox.
Installing the Peoplevox Plugin
To add the Peoplevox Plugin to your Channels account, kindly adhere to the following steps:
- Access your account and go to the left side of the screen. Click the "Stores" button.
- To edit an existing store, click the edit button on the right side. If you need to create a new store, click "+ ADD" above, name it, and use the edit button to make changes.
- Go to the Plugins section and Click "+ ADD" to begin the installation.
- A window will appear in the centre of the screen. Choose "Peoplevox" from the list of available channels.
- Provide the required information:
- Plugin Name: Input a suitable name in the designated field. Select a meaningful name to you, possibly aligning with your store's name, for clarity in future order references.
- URL: Enter the URL provided by Peoplevox for the API or web service you'll be connecting to.
- Client ID: Enter the unique identifier assigned to your account by Peoplevox.
- Username: Enter the identifier you use to log into your Peoplevox account.
- Password: Enter the password that works in tandem with your Username to authenticate access to Peoplevox's API or web services.
- Stock Management:
- Add Products to Peoplevox:
- Activate this function to synchronise your store products with Peoplevox. Enabling it creates your store products within the Peoplevox system.
- For example, suppose you intend to retrieve products from a sales channel like TikTok and transfer the product data to Peoplevox. In that case, you must initially activate the product download option from the sales channel. Subsequently, enable the "Add Products to Peoplevox" option to ensure the products are first added to Channels. At this point, the system transmits the product data to Peoplevox. Follow these steps precisely to ensure the products are generated in Peoplevox.
- Download Products: This feature can fetch product information from the Peoplevox plugin and generate corresponding Store products. It also retrieves product quantities from Peoplevox every 3 minutes, updating the plugin quantities accordingly.
- Auto Sync Stock: This functionality ensures that stock levels across all channels under the store linked to this plugin are regularly updated with quantities received from the Peoplevox plugin every 3 minutes.
- Add Products to Peoplevox:
- Once all fields are populated, finalise by selecting "Save" at the bottom right.
- Activate the connection from the top of the screen using the "Is Active" button.
Congratulations! You've successfully set up Peoplevox on Channels. Please visit this page to learn more about utilising Peoplevox to the fullest.

Returns API
Overview
Returns offers a comprehensive returns and exchanges solution through our specialised returns suite. With an intuitive dashboard and management software, processing exchanges becomes precise and efficient. The Returns portal empowers customers by providing detailed tracking and management capabilities for all returns, enhancing visibility and refining stock management. Additionally, our one-click returns feature enables customers to generate return labels promptly.
This documentation will provide step-by-step guidance on acquiring the API key from your Returns store and integrating it with your Channels store. The Returns API is available for use for each sales channel incorporated within your Channels store.
Obtaining the API Key from Returns API
To retrieve your API key from Returns, adhere to the subsequent steps:
- Sign in to your account via this link.
- Navigate to "Accounts", located on the left-hand panel.
- Select "View Account" from the displayed list, which corresponds to the account you intend to link with Channels.
- Access the "Settings" option at the top right corner of your screen.
- Proceed to the "API Key" tab.
- From the page, locate and copy the API key displayed in the "API Key" section, which will be highlighted for your convenience.

Installing the Returns API Plugin on Channels
To integrate the Returns API with your Channels store, please follow these steps:
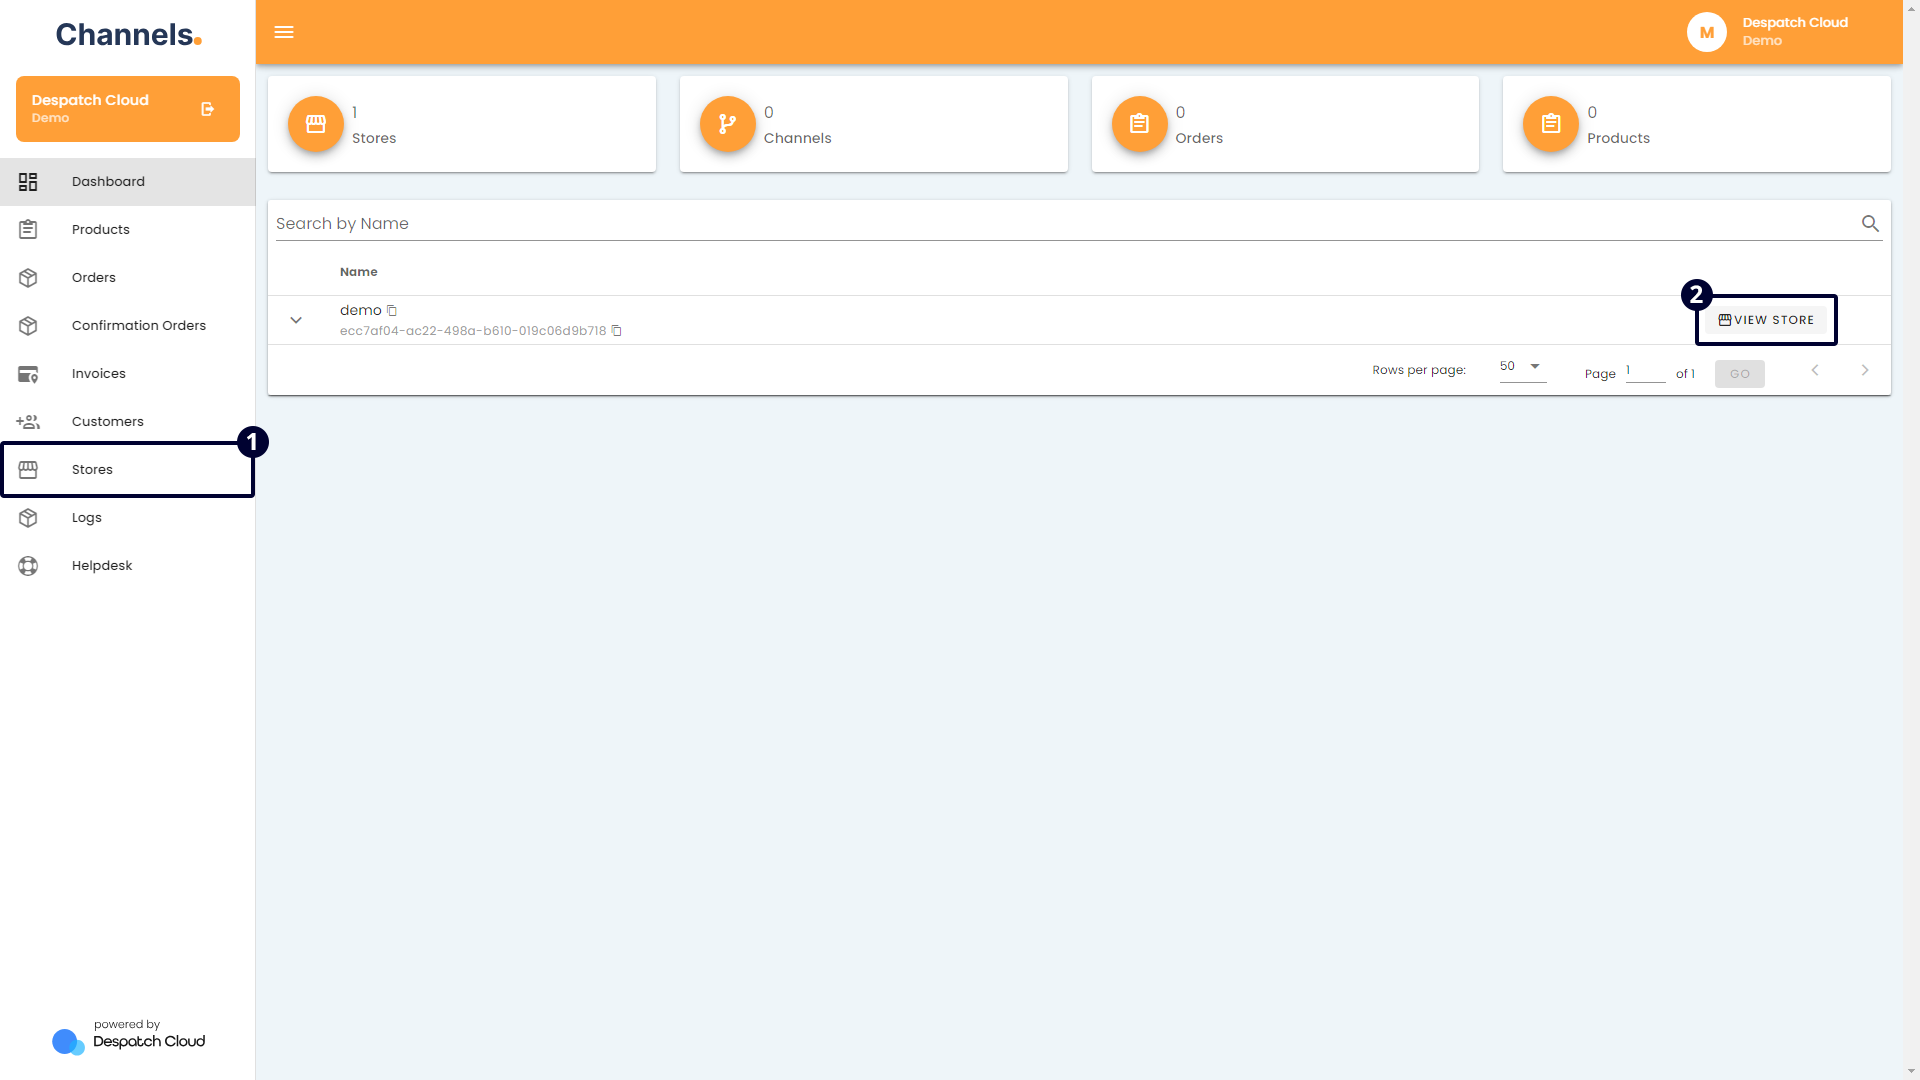
- Access your account and go to the left side of the screen. Click the "Stores" button.
- If you already have a store, click "View Store" on the right side of the screen to access it directly.
- Or, click the "Stores" button from the left-hand side of the screen to edit an existing store and click the edit button on the right side. If you need to create a new store, click "+ ADD" above, name it, and use the edit button to make changes.
- Click the "Plugins" tab.
- Click "+ ADD" in the Plugins section to begin the installation.
- A window will appear in the centre of the screen. Choose "ShipBob" from the available channels list.
- Provide the required information:
- Plugin Name: Input a suitable name in the designated field. It's advisable to select a name that's meaningful to you, possibly aligning with your store's name, for clarity in future order references.
- API Key: Input the API key acquired from the Returns platform.
- Once all fields are populated, finalise by selecting "Save" at the bottom right.
- Activate the connection from the top of the screen using the "Is Active" button.
Congratulations! You've successfully set up Returns API on Channels. Please visit this page to learn more about utilising Returns API to the fullest.

ShipBob
Overview
This document explores the installation and utilisation of the ShipBob plugin. ShipBob is a logistics and fulfilment solution crafted to improve and simplify business order fulfilment procedures. It supports effective inventory management, order processing, and shipping, assisting companies in effortlessly delivering products to customers. The platform enables businesses to optimise their supply chain operations, ensuring the punctual and precise fulfilment of orders.
Acquiring Shipbob Access Credentials
To acquire the token from ShipBob, proceed through the following steps:
- Visit the ShipBob portal using the provided URL and log in to your account: https://web.shipbob.com/
- Navigate to the "Integrations" option on the left-hand menu and select the "API Tokens" button.
- Select the "Generate New Token" option, and provide a name for the token and a descriptive explanation. These can be arbitrary, but it is advisable to choose something informative. For instance, you may designate the token name as "Channels Plugin" to facilitate later identification of its purpose.
- Copy and securely store the generated token, as you must paste it on the Channels setup page.
Installing the ShipBob Plugin
To integrate the ShipBob with your Channels store, please follow these steps:
- Access your account and go to the left side of the screen. Click the "Stores" button.
- If you already have a store, click "View Store" on the right side of the screen to access it directly.
- Or, click the "Stores" button from the left-hand side of the screen to edit an existing store and click the edit button on the right side. If you need to create a new store, click "+ ADD" above, name it, and use the edit button to make changes.
- Click the "Plugins" tab.
- Click "+ ADD" in the Plugins section to begin the installation.
- A window will appear in the centre of the screen. Choose "ShipBob" from the available channels list.
- Provide the required information:
- Add ShipBob Plugin:
- Plugin Name: Input a suitable name in the designated field. Select a meaningful name to you, possibly aligning with your store's name, for clarity in future order references.
- API Token: Input the API key acquired from the ShipBob platform.
- ShipBob Channel Management:
- Push Order Channel: Designate a ShipBob channel to redirect your orders.
- Order Management:
- Exclude Unfulfillable Orders: Enabling this feature excludes orders destined for ShipBob based on stock availability. When activated, it evaluates the stock levels of products within an order. If any product within bundles, kits, or grouped products requires more stock, ShipBob withholds the order from being processed. This functionality also prevents accepting orders not present in ShipBob or those lacking sufficient stock. For Bundle, Group, or Kit products, the system disassembles them into individual products, assessing stock levels per product. If any single product lacks adequate stock, the entire order is held back from being dispatched to ShipBob.
- Deduct Stock via Orders: Adjusts the ShipBob stock levels dynamically as orders are processed.
- Stock Management:
- Add Products to ShipBob:
- Activate this function to synchronise your store products with ShipBob. Enabling it creates your store products within the ShipBob system.
- For example, suppose you intend to retrieve products from a sales channel like TikTok and transfer the product data to ShipBob. In that case, you must initially activate the product download option from the sales channel. Subsequently, enable the "Add Products to ShipBob" option to ensure the products are first added to Channels. At this point, the system transmits the product data to ShipBob. Follow these steps precisely to ensure the products are generated in ShipBob.
- Download Products: Use this feature to fetch product information from the ShipBob plugin and generate corresponding Store products. It also retrieves product quantities from ShipBob every 3 minutes, updating the plugin quantities accordingly.
- Auto Sync Stock: This functionality ensures that stock levels across all channels under the store linked to this plugin are regularly updated with quantities received from the ShipBob plugin every 3 minutes.
- Add Products to ShipBob:
- Add ShipBob Plugin:
- Once all fields are populated, finalise by selecting "Save" at the bottom right.
- Activate the connection from the top of the screen using the "Is Active" button.
Congratulations! You've successfully set up ShipBob on Channels. Please visit this page to learn more about utilising ShipBob to the fullest.
Caution: After creating and saving the plugin, please allow 3 to 5 minutes for activation and data transfer to commence during the first use. Once the initial setup is complete, it is advisable to enable additional settings, such as "Push Order Channel."

VirtualStock
Installing the VirtualStock Plugin
To add the VirtualStock Plugin to your Channels account, kindly adhere to the following steps:
- Access your account and go to the left side of the screen. Click the "Stores" button.
- To edit an existing store, click the edit button on the right side. If you need to create a new store, click "+ ADD" above, name it, and use the edit button to make changes.
- Go to the Plugins section and Click "+ ADD" to begin the installation.
- A window will appear in the centre of the screen. Choose "VirtualStock" from the list of available channels.
- Provide the required information:
- Plugin Name: Input a suitable name in the designated field. Select a meaningful name to you, possibly aligning with your store's name, for clarity in future order references.
- Username: Enter the username provided by VirtualStock or your account administrator.
- Password: Enter the password associated with the provided username.
- FTP Username: This is used to authenticate your connection to the FTP server, facilitating data exchange between your store and VirtualStock.
- FTP Password: The password associated with the FTP username. Ensures secure access to the FTP server. This, combined with the FTP username, allows your store to send and receive data files securely.
- Supplier for Orders: A dropdown menu where you select the supplier to whom orders will be sent. Specifies which supplier will fulfil orders placed through your store. This ensures that orders are routed to the correct supplier for processing.
- Supplier for Products: A dropdown menu where you select the supplier providing the product information. Identifies the source supplier for the products listed in your store. This is essential for maintaining accurate product information and inventory levels.
- Order Management:
- Deduct Stock via Orders: Adjusts the VirtualStock stock levels dynamically as orders are processed.
- Stock Management:
- Add Products to VirtualStock:
- Activate this function to synchronise your store products with VirtualStock. Enabling it creates your store products within the VirtualStocksystem.
- For example, suppose you intend to retrieve products from a sales channel like TikTok and transfer the product data to VirtualStock. In that case, you must initially activate the product download option from the sales channel. Subsequently, enable the "Add Products to VirtualStock" option to ensure the products are first added to Channels. At this point, the system transmits the product data to VirtualStock. Follow these steps precisely to ensure the products are generated in VirtualStock.
- Download Products: This feature can fetch product information from the VirtualStock plugin and generate corresponding Store products. It also retrieves product quantities from VirtualStock every 3 minutes, updating the plugin quantities accordingly.
- Auto Sync Stock: This functionality ensures that stock levels across all channels under the store linked to this plugin are regularly updated with quantities received from the VirtualStock plugin every 3 minutes.
- Add Products to VirtualStock:
- Once all fields are populated, finalise by selecting "Save" at the bottom right.
- Activate the connection from the top of the screen using the "Is Active" button.
Congratulations! You've successfully set up VirtualStock on Channels. Please visit this page to learn more about using VirtualStock to its fullest extent.
Whistl
Obtaining the API keys from Whistl
Contact your account manager on Whistl to acquire the credentials needed to set up your plugin.
Installing the Whistl Plugin
To add the Whistl Plugin to your Channels account, kindly adhere to the following steps:
- Access your account and go to the left side of the screen. Click the "Stores" button.
- To edit an existing store, click the edit button on the right side. If you need to create a new store, click "+ ADD" above, name it, and use the edit button to make changes.
- Go to the Plugins section and Click "+ ADD" to begin the installation.
- A window will appear in the centre of the screen. Choose "Whistl" from the list of available channels.
- Provide the required information:
- Plugin Name: Input a suitable name in the designated field. Select a meaningful name to you, possibly aligning with your store's name, for clarity in future order references.
- Service URL: Enter the endpoint URL provided by Whistl for the API or web service you'll be connecting to.
- Client ID: Enter the unique identifier assigned to your account by Whistl.
- Client Secret: Enter the confidential key provided by Whistl. This key and the Client ID authenticate and secure communication between your system and their services.
- Order Management:
- Exclude Unfulfillable Orders: Enabling this feature excludes orders destined for Whistl based on stock availability. When activated, it evaluates the stock levels of products within an order. If any product within bundles, kits, or grouped products requires more stock, Whistl withholds the order from being processed. This functionality also prevents accepting orders not present in Whistl or those lacking sufficient stock. For Bundle, Group, or Kit products, the system disassembles them into individual products, assessing stock levels per product. If any single product lacks adequate stock, the entire order is held back from being dispatched to Whistl.
- Deduct Stock via Orders: Adjusts the Whistl stock levels dynamically as orders are processed.
- Stock Management:
- Add Products to Whistl:
- Activate this function to synchronise your store products with Whistl. Enabling it creates your store products within the Whistl system.
- For example, suppose you intend to retrieve products from a sales channel like TikTok and transfer the product data to Whistl. In that case, you must initially activate the product download option from the sales channel. Subsequently, enable the "Add Products to Whistl" option to ensure the products are first added to Channels. At this point, the system transmits the product data to Whistl. Follow these steps precisely to ensure the products are generated in Whistl.
- Download Products: This feature can fetch product information from the Whistl plugin and generate corresponding Store products. It also retrieves product quantities from Whistl every 3 minutes, updating the plugin quantities accordingly.
- Auto Sync Stock: This functionality ensures that stock levels across all channels under the store linked to this plugin are regularly updated with quantities received from the Whistl plugin every 3 minutes.
- Add Products to Whistl:
- Once all fields are populated, finalise by selecting "Save" at the bottom right.
- Activate the connection from the top of the screen using the "Is Active" button.
Congratulations! You've successfully set up Whistl on Channels. Please visit this page to learn more about utilising Whistl to the fullest.

Winit
Obtaining the API keys from Winit
Contact your account manager on Winit to acquire the credentials needed to set up your plugin.
Installing the Winit Plugin
To add the Winit Plugin to your Channels account, kindly adhere to the following steps:
- Access your account and go to the left side of the screen. Click the "Stores" button.
- To edit an existing store, click the edit button on the right side. If you need to create a new store, click "+ ADD" above, name it, and use the edit button to make changes.
- Go to the Plugins section and Click "+ ADD" to begin the installation.
- A window will appear in the centre of the screen. Choose "Winit" from the list of available channels.
- Provide the required information:
- Plugin Name: Input a suitable name in the designated field. Select a meaningful name to you, possibly aligning with your store's name, for clarity in future order references.
- App Key: Enter the unique key obtained from the service provider. This key will be used to authenticate your application's requests to their app.
- Authorization Code: Input the code received from the service provider after initial authorization. This code is used to gain access to the API for a limited period or specific purposes.
- Product Export Country Code: Enter the international country code for the origin country from which products are exported, as defined by the service provider.
- Product Import Country Code: Input the international country code for the destination country to which products are imported, as the service provider specifies.
- Push Order Warehouse: Enter the identifier for the warehouse from which orders should be dispatched, as provided by the logistics or inventory management service.
- Push Order Deliver Way: Input the delivery method to be used for orders, as specified by the logistics service. This method could range from standard to express delivery.
- Stock Management:
- Add Products to Winit:
- Activate this function to synchronise your store products with Winit. Enabling it creates your store products within the Wintit system.
- For example, suppose you intend to retrieve products from a sales channel like TikTok and transfer the product data to Winit. In that case, you must initially activate the product download option from the sales channel. Subsequently, enable the "Add Products to Winit" option to ensure the products are first added to Channels. At this point, the system transmits the product data to Winit. Follow these steps precisely to ensure the products are generated in Winit.
- Download Products: Use this feature to fetch product information from the Winit plugin and generate corresponding Store products. It also retrieves product quantities from Winit every 3 minutes, updating the plugin quantities accordingly.
- Auto Sync Stock: This functionality ensures that stock levels across all channels under the store linked to this plugin are regularly updated with quantities received from the Winit plugin every 3 minutes.
- Add Products to Winit:
- Once all fields are populated, finalise by selecting "Save" at the bottom right.
- Activate the connection from the top of the screen using the "Is Active" button.
Congratulations! You've successfully set up Winit on Channels. Please visit this page to learn more about utilising Winit to the fullest.
