Getting Started
Explore how Channels works, what values Channels offer and how you can get started with Channels
What Neuro Offers
Overview
With Channels, you can easily integrate your sales channels and manage all your e-commerce processes in one place. In this document, we'll talk about what other functionalities Channel provides to its users.
Functionalities
- Get Orders and Confirm Fulfillment
Once your application is integrated, Channels will automatically download orders from all configured eCommerce platforms and marketplaces and submit these to your application via a simple Webhook in a unified JSON format regardless of the channel.
You can ship these orders via your current workflow and pass the fulfilment information back to Channels to confirm fulfilment on the channel. You can easily download and fulfil orders on over 65 of the leading marketplaces and eCommerce platforms, with more coming each quarter. Take a look at our channel integration setup guides, plugin setup guides and webhook documentation for more information.
- Get Products and Synchronize Stock Across All Sales Channels
You can download channel products and update channel stock levels via a unified JSON format regardless of the channel - and better yet, with our Smart Stock Control features, Channels takes care of all stock control tasks for you, making it even easier for you to integrate with your existing system. Take a look at our Products page for more information.
- Smart Stock Control
This allows developers to have a higher level of abstraction and ensures that Channels deals with multichannel stock control logic seamlessly and automatically adjusts channel stock levels without any back-office input. You can set up smart stock control by turning on "Download Products", "Add To Main Products" and "Auto Sync Stock" under "Stock Management". You can find more information about additional channel settings here.
Alternatively, if you're using hosted pages, you can set an input customization to include the aforementioned settings. You can find out more about how to do that here.
- Kit Mapping
Kitting, also known as product grouping, is when you sell a items alone but also as as part of a larger kit or group. In this case, Channels supports kit mapping and has support for variable kit item quantities. By using this feature, Channels can allow you to expand the existing functionality of your current back-office system with support for kitting without any costly development. Take a look at our Products page documentation for more information.
- Order Filtering
Channels supports advanced order filtering, allowing you to ensure you only receive orders that are relevant to your requirements. As standard, we only import orders that are ready for despatch and have the flexibility to filter orders by country and SKU. You can import orders that are not paid or that are not ready for despatch by enabling the relevant settings on a channel-by-channel basis. You can find more information about additional channel settings here.
- Channel Grouping
Channels supports channel grouping, allowing one account to be used for multiple brands and/or companies, making this an ideal solution for fulfilment providers. With our channel grouping functionality, it is easy to maintain segregation between channels and also set up specific filtering rules per group. This can be done through creating new stores for each of your brands. Take a look at our Stores page documentation for more information.
- Accounting Channel Integrations
Channels brings unified access to accounting packages, making it simple for you to expand the existing functionality of your current back-office system with support for accounting integration into Xero, Sage and eLogo. Take a look at our Accounting Channel setup guides for more information.
How Neuro Works
Overview
This document is written to give you insights into how Despatch Cloud's industry-leading channel integration software's order, Inventory, and Product syncing features work in the background.
Channels Flow
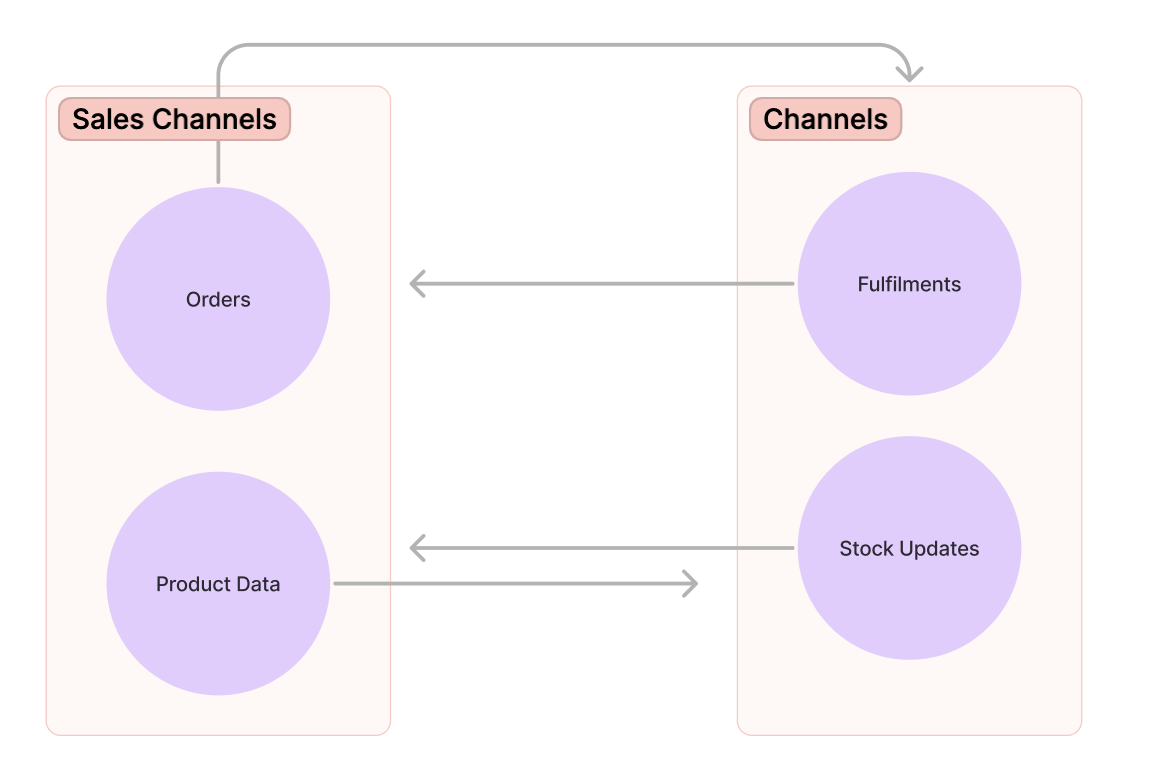
Channels imports orders and product data from integrated sales channels. It also sends any fulfillment data and stock updates that might have occurred back to the sales channel that the orders were imported from. This allows you to seamlessly manage all your products from one place, ensuring that the stock levels of a product you're selling on different marketplaces to always be synchronized, preventing problems like overselling.
Order Flow

The flowchart above shows the entire lifecycle of an order that is imported into Channels from a sales channel. First, the order gets created and processed by the sales channel in question. Afterwards, the sales channel sends the order to Channels, where it gets processed by us. Orders and order updates are imported every 3 minutes, and by default, we only import paid and unfulfilled orders (if you'd like to import other types of orders as well, you can set that up on a channel-by-channel basis). Afterwards, Channels will update the products stock levels according to how many of the item was in the order and send the information to the sales channel.
Order Fulfillment Flow

The flowchart above shows the entire lifecycle of fulfillment actions on Channels. First, an Order Fulfillment is created through an API call and gets processed in Channels. Afterwards, Channels takes the fulfillment information for the order and sends it to the sales channel. After the sales channel receives it and sends back a success response, it marks the fulfillment status of the order as "Synced".
Plugin Flow:
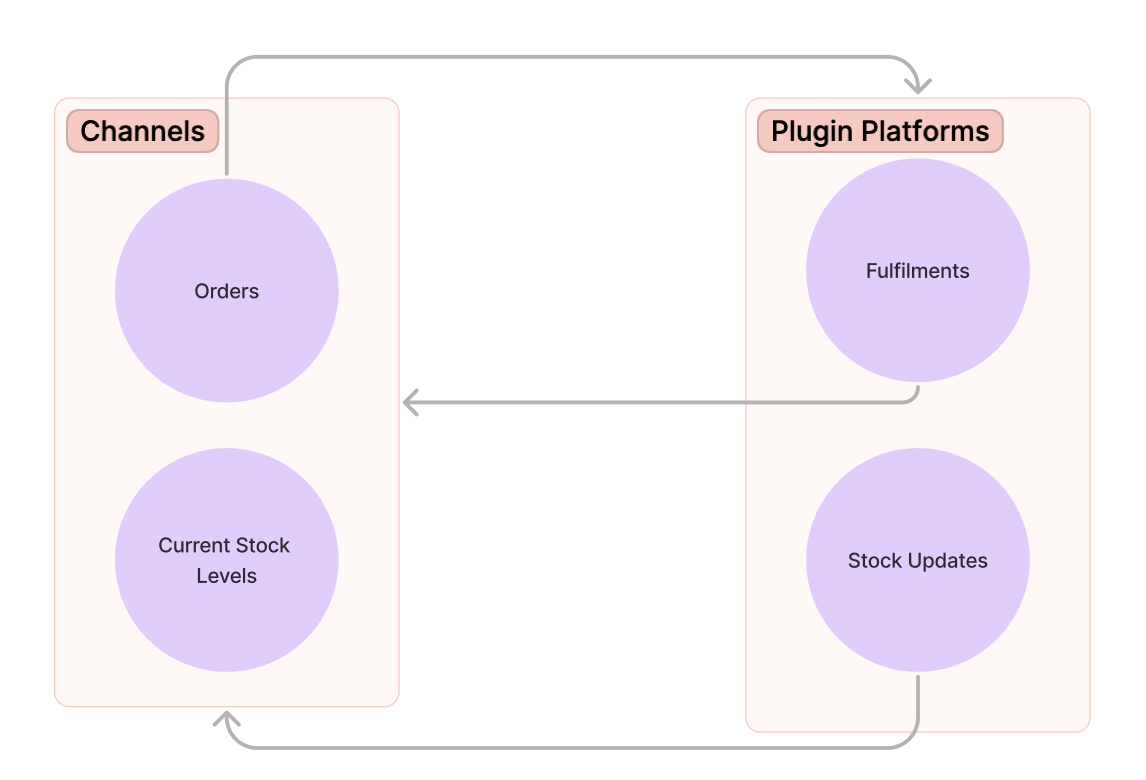
Channels allows you to integrate plugins, like fulfillment centers, to control order fulfillments and stock updates. Channels takes the orders it receives from your sales channels and sends them to any plugins you might have added to your store. The plugin then takes the order and creates fulfillment data for it, updates the products stock, and sends this information to Channels. Channels takes the fulfillment information and the updated stock levels and sends them back to the sales channels.
Plugin Order Flow

The flowchart above shows the lifecycle of orders that get processed and fulfilled through plugins. First, an order is created in a sales channel. Afterwards, said order is sent to Channels, where it's directly sent to the plugin. The order gets processed and fulfilled by the plugin platform, and product stock levels are dropped according to the items in the order. Next, the plugin sends the updated stock levels and fulfillment information back to Channels, and Channels sends this data back to the sales channel.
Plugin Fulfillment Flow

The flowchart above shows the entire lifecycle of an order fulfilled by a plugin. First, the fulfillment data is created on the plugin platform when they finish fulfilling the order. The plugin platform sends this data over to Channels, which then creates a fulfillment and sends it over to the sales channel where the order originated from. After the sales channel receives this fulfillment, its status is set as synced.
Webhook Flow
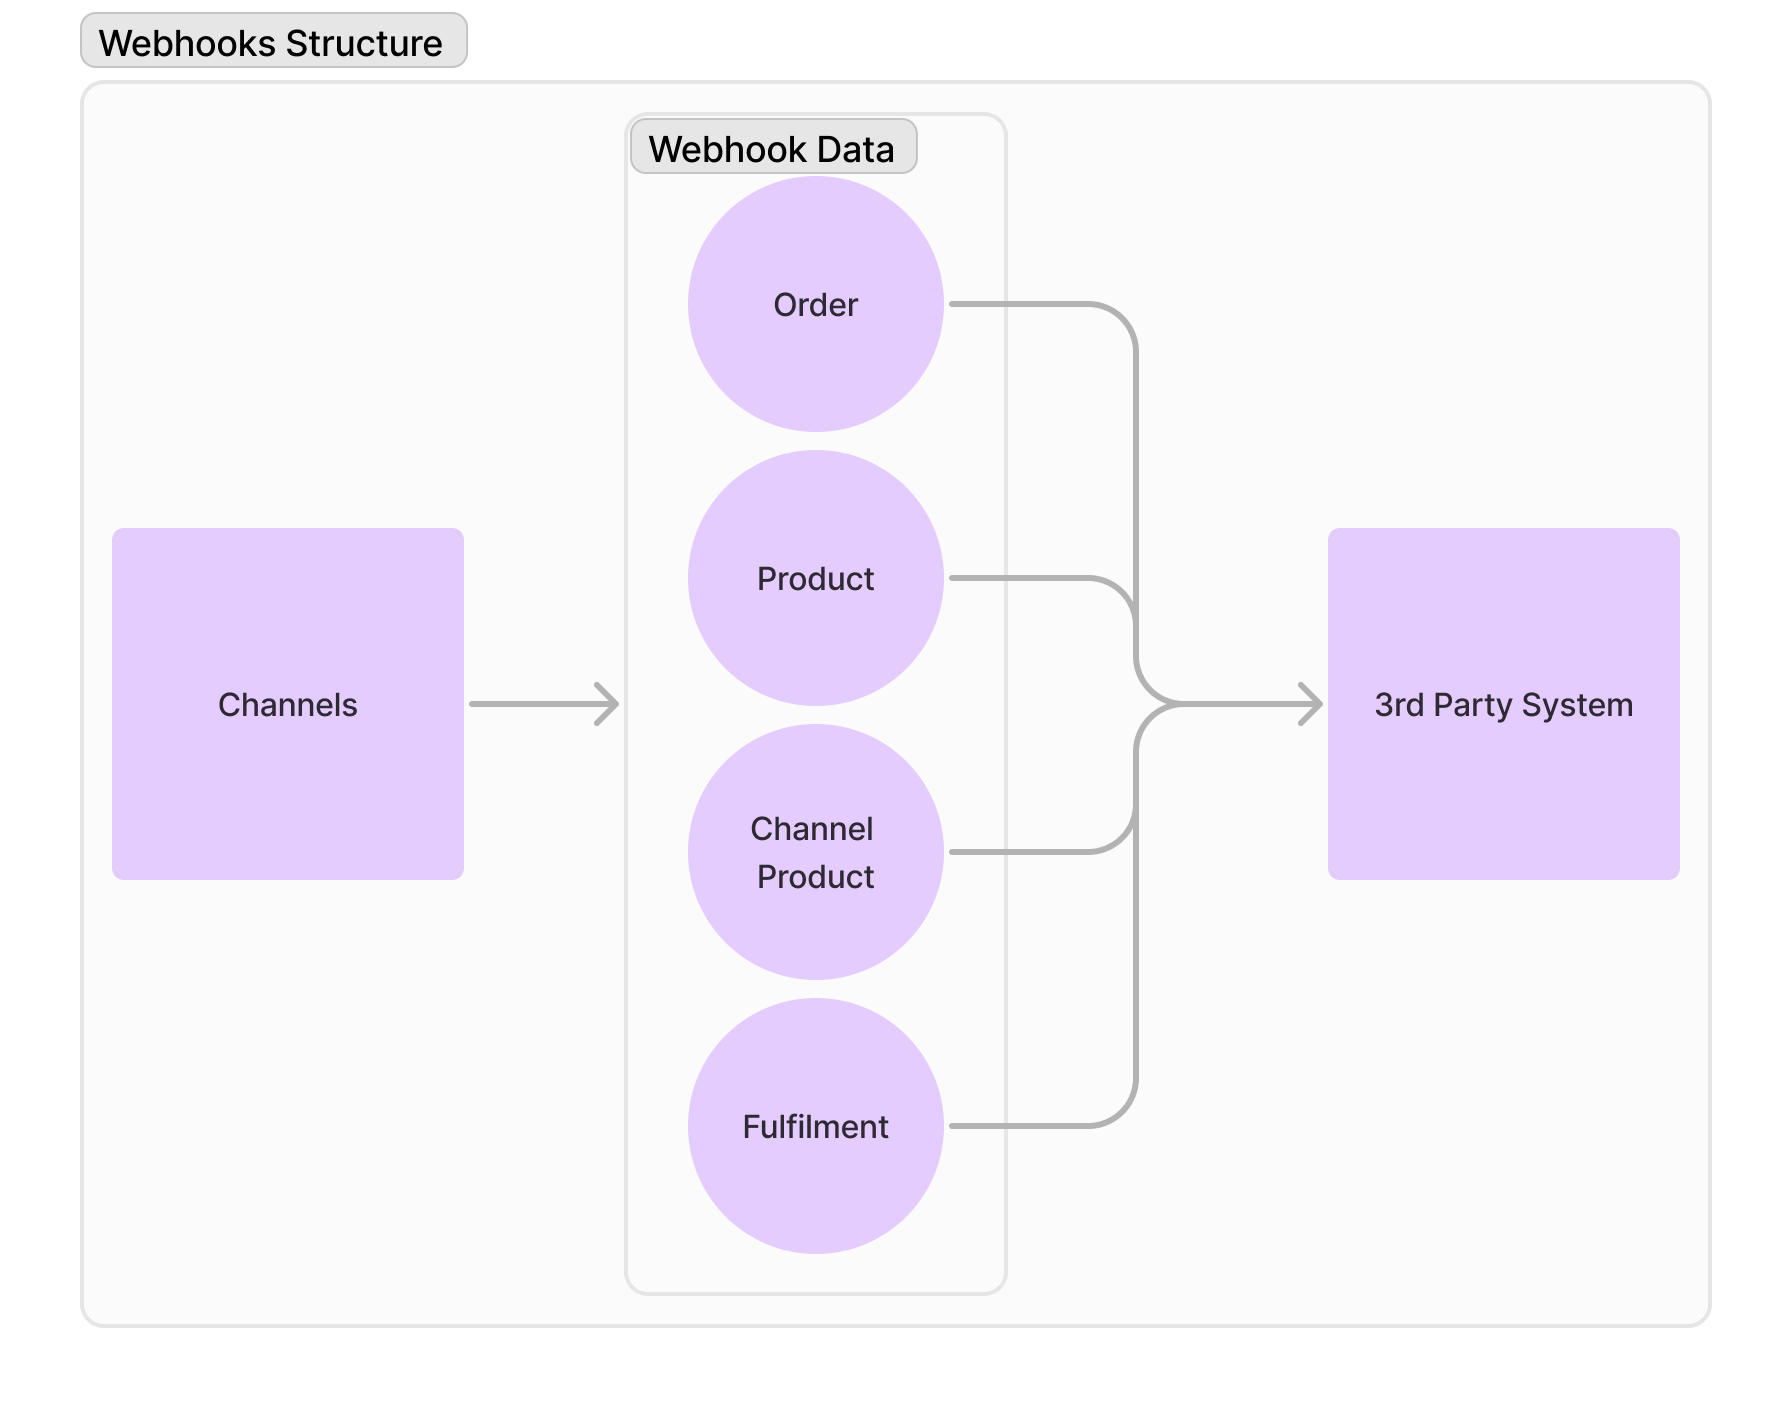
The flowchart above shows what kind of information Channels sends to sales channels and 3rd party systems through its webhook capabilities. Channels keeps Order, Product, Channel Product and fulfillment information and sends it over through webhook when events are triggered.
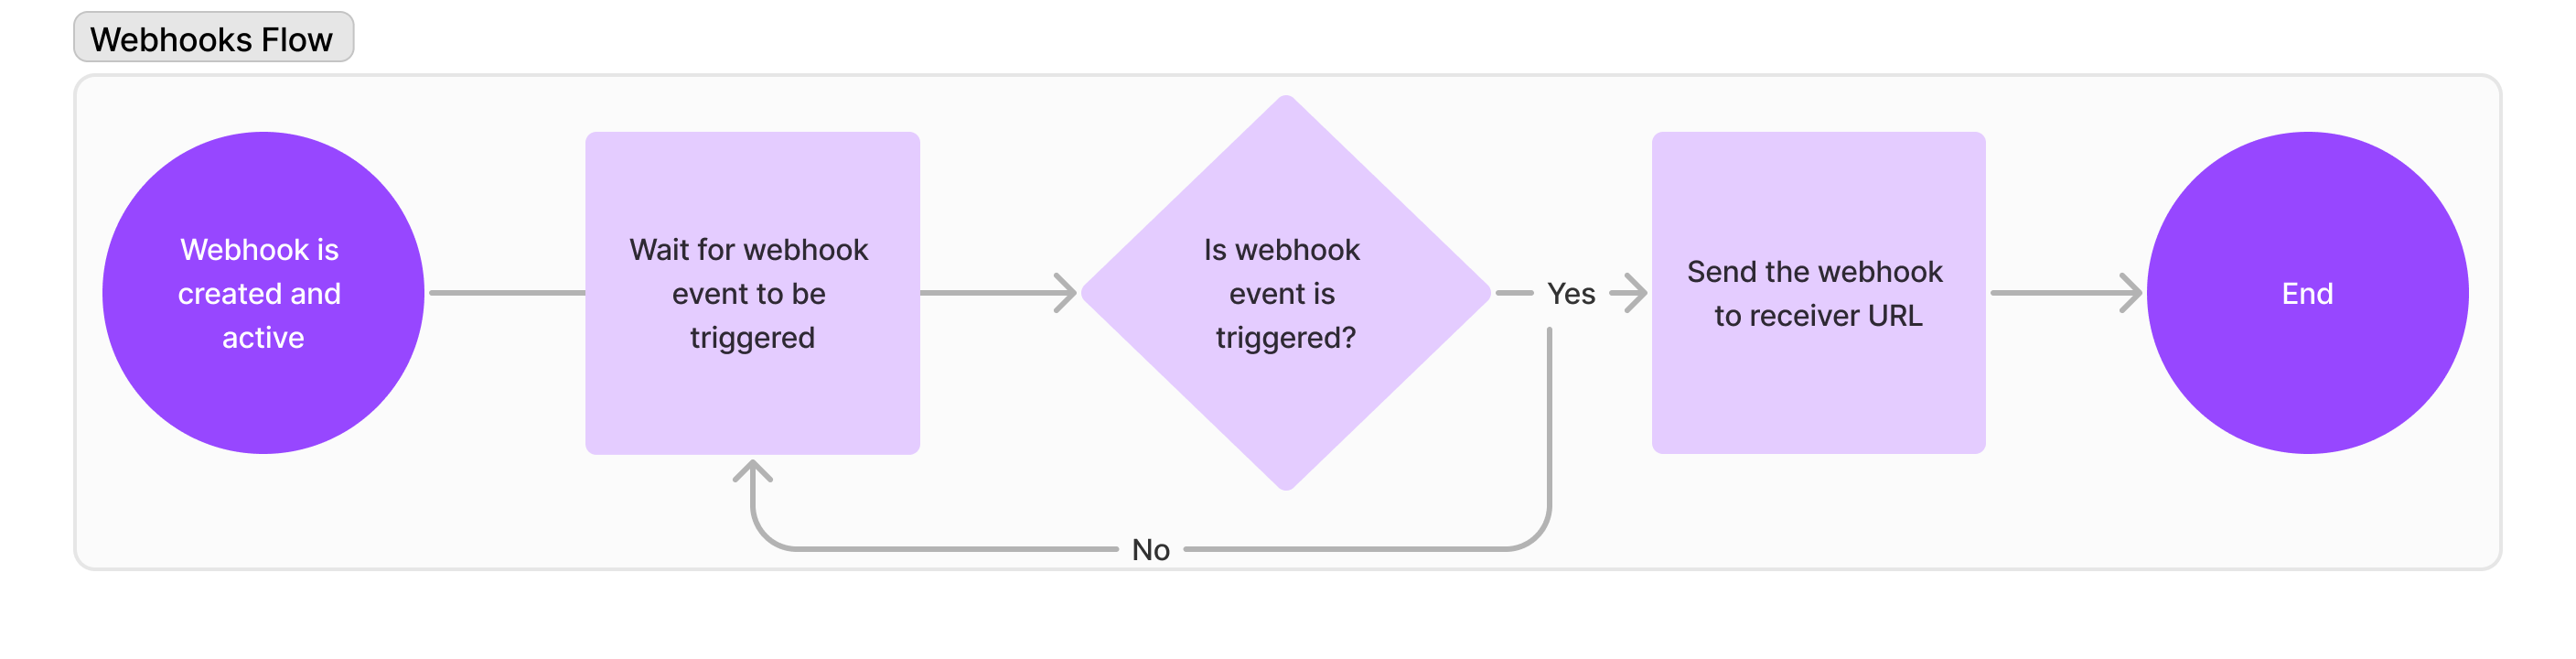
The flowchart above shows how webhooks transmit data to and from Channels. First off, a customer creates a webhook for one of their stores. The webhook transmits data that Channels has regarding stock updates, order updates, product updates and any other changes that might happen to your account. For a webhook to transmit this data to a sales channel or a 3rd party, it must be triggered. The triggers Channels accepts are "Created", "Updated", "Excluded" and "On Hold". These can be tweaked in the webhook settings page. Any time a product or order goes through one of the states above, a webhook is triggered. When the webhook is triggered, it sends data to the receiver URL. These receiver URLs can be warehouse management systems, order management systems, and any other 3rd party platform you're using, including Despatch Cloud's suite of products like Orders, Shipping and Fulfilment.
Product Data Flow
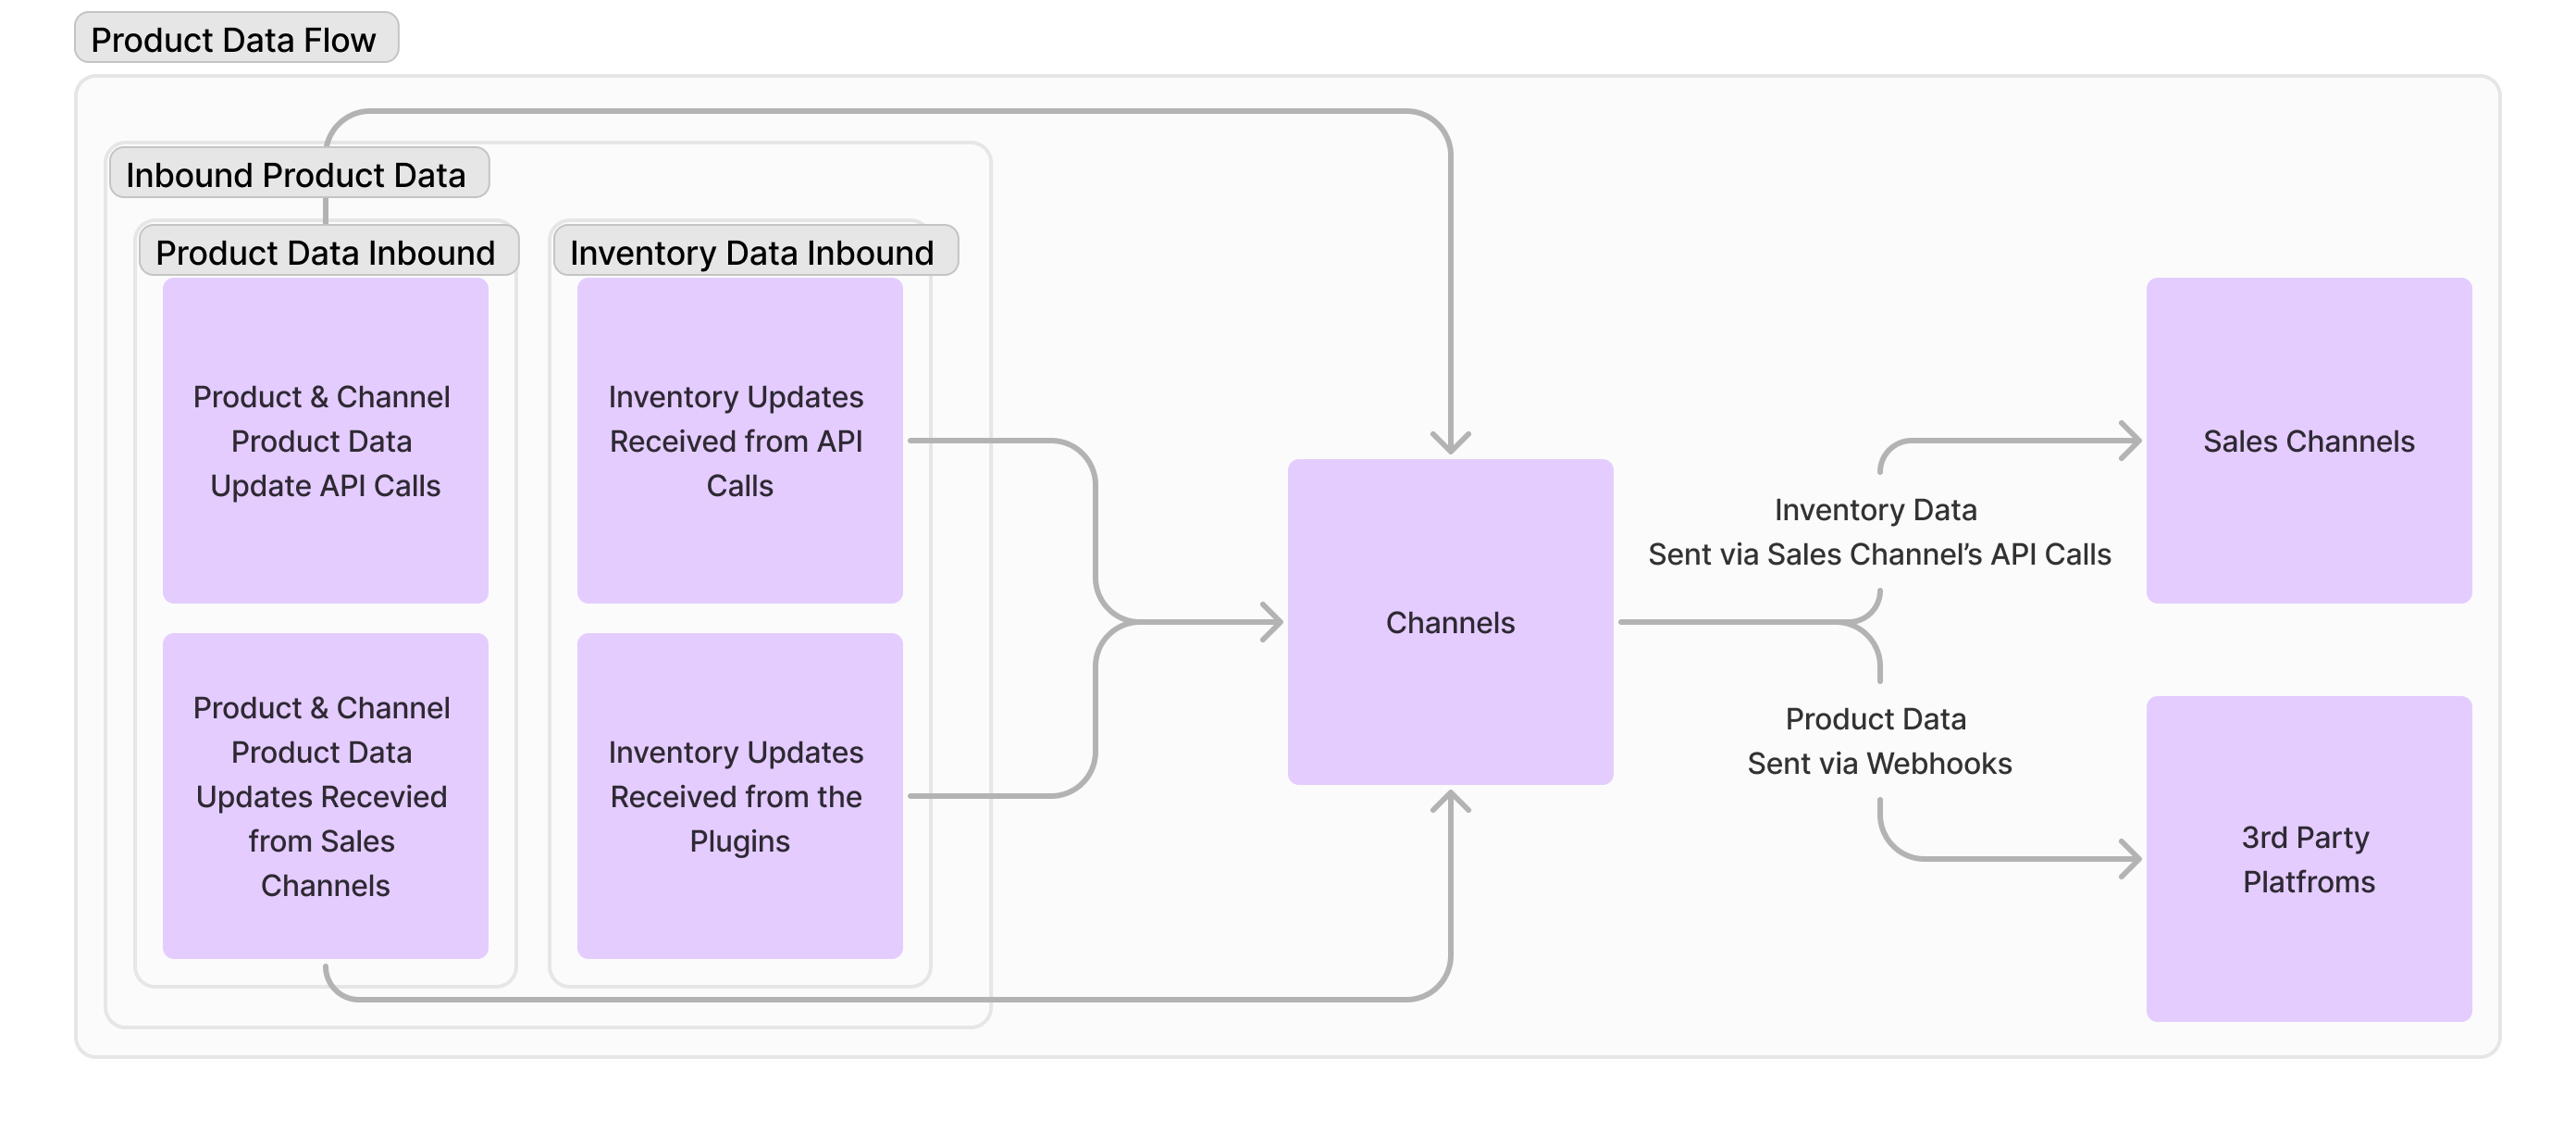
Channels keeps 2 different sets of information - inbound products and inbound inventory. Inbound Products are also seperated into two different categories: Product data and Channel Product data. For Product Data, we keep the products SKU, and for Channel Product data, we keep the products SKU, image, price, dimensions, weight and customs info. This information is delivered to Channels via API calls and Sales Channels and sent back when any updates occur. Inbound Inventory data is imported from API calls and Plugins. API quantity and Plugin quantity are kept seperate, but a total quantity number is sent to the sales channels or the 3rd party platforms whenever updates occur.
Getting Started
Overview
Hello, and welcome to Channels, Despatch Cloud's industry leading integration solution.
With Channels, you can easily integrate your company with different sales channels, accounting programs and plugins, allowing you to manage all your orders from many different sources in one place. Whether you're selling a single brand or multiple brands on different platforms, our solutions have you covered.
Use Cases
Let's talk about some hypothetical scenarios and how you can take advantage of Channels to support your business.
- Your business is selling one brand on multiple sales platforms
With Channels, you can easily integrate your business to over 60 sales channels across different countries, allowing you to easily manage all your operations on a single platform. All you need to do is setup your store and sales channels once and watch as your products, orders and customers are automatically imported. You can setup your store and channels through API, or you can do it through our user UI:
What you need to do:
- Login to your account and setup a store for your business. You can find instructions on how to create and edit stores here.
- Next, you need to setup the sales platforms you're selling on as a sales channel in your account. You can find a list of channels we support here and setup guides for sales channel in this page.
- Additionally, you can sync product stock levels to your sales channels. This allows you to synchronize all stock data for your products across all sales platfroms you're using, and removes the risk of over-selling. You can do this on a channel by channel basis, turning on "Download Products", "Add To Main Products" and "Auto Sync Stock" under "Stock Management. You can find more information about additional channel settings here.
- Next up, you'll need to create fulfillment data through an API call. After the fulfillment data is created, we'll take it and sync it through with the sales channels you have integrated into your store. You can find more information about creating fulfillment through API here.
- Finally, you can setup a plugin or webhook for your store. If you're working with a fulfillment center and would like for some or all of your products to be fulfilled through them, you can setup a plugin or webhook to do so. You can also specify which orders are sent to which plugins through plugin rules. You can find instructions on how to setup plugins here and how to setup webhooks here.
- Your business is selling multiple brands on multiple platforms.
Channels allows you to manage multiple stores - i.e. multiple brands - all in one place, each with their own sales channels, plugins and webhooks, thus making it easier for companies that sell different products through different brands, on multiple marketplaces. You can create separate stores for separate brands to manage data, orders and all other aspects seperately from each other, all in one place. All you need to do is setup your stores and sales channels once and watch as your products, orders and customers are automatically imported.
What you need to do:
- Login to your account and setup a store for each of your brands. You can find instructions on how to create and edit stores here.
- Next, you need to setup the sales platforms you're selling your brands on as a sales channel for each of your stores. You can find a list of channels we support here and setup guides for sales channel in this page.
- Additionally, you can sync product stock levels to your sales channels. This allows you to synchronize all stock data for your products across all sales platfroms you're using, and removes the risk of over-selling. You can do this on a channel by channel basis, turning on "Download Products", "Add To Main Products" and "Auto Sync Stock" under "Stock Management. You can find more information about additional channel settings here.
- Next up, you'll need to create fulfillment data through an API call. After the fulfillment data is created, we'll take it and sync it through with the sales channels you have integrated into your store. You can find more information about creating fulfillment through API here.
- Finally, you can setup plugins or webhooks for your stores. If you're working with a fulfillment center and would like for some or all of your products to be fulfilled through them, you can setup a plugin or webhook to do so. You can also specify which orders are sent to which plugins through plugin rules. You can find instructions on how to setup plugins here and how to setup webhooks here.
- You're a fulfillment center or a courier looking to automatically get your customers' orders from their sales channels.
Channels also allows you to rapidly and automatically integrate with any customers sales channels through the use of API and hosted pages. Through our API solutions you can easily create new stores with a simple API call, send over a hosted page link and let your customers integrate themselves into our system. You can change the formatting, colors, logo and available channels on the hosted page so that the only thing your customers see is what you allow them. You can setup your stores and channels through API, or you can do it through our user UI:
What you need to do:
- You first need to integrate your own system to Despatch Cloud through our API solutions. You can find our API documentation here and you can also get in touch with us to book a call with our technical team for more support.
- Afterwards, you can set it so that a new Post request to create a store is sent whenever a new user is added to your system. You can find the Post request in question here.
- Next, you can setup different create Post requests for each of the sales channels you're interested in using. This allows you to rapidly integrate your customers through the information you receive from them. This can be useful if you're using only a few sales channels, but would take a lot of resource to setup seperate API calls multiple channels. Each sales channel has a different Post call, which you can find on our API documentations page here.
- Alternatively, you can choose to utilize our Hosted Pages solution. Hosted Pages allow you to create a single use page through an API call which lets your customers integrate themselves to Channels using our API connections and their API credentials. You can change the formatting, colors, fonts, logos and the sales channels displayed on the created hosted page, which means your customers will only see what you allow them to see. You can find the Post request for creating Hosted Pages here, and you can read through our Hosted Pages documentation for more information.
- Additionally, you can sync product stock levels to your sales channels. This allows you to synchronize all stock data for your products across all sales platfroms you're using, and removes the risk of over-selling. If you're using API calls to setup sales channels, you can edit the request you're sending to enable "Stock Management", "Download Products", "Add To Main Products" and "Auto Sync Stock". Alternatively, if you're using hosted pages, you can set an input customization to include the aforementioned settings. You can find out more about how to do that here.
- Next up, you'll need to create fulfillment data through an API call. After the fulfillment data is created, we'll take it and sync it through with the sales channels you have integrated into your store. You can find more information about creating fulfillment through API here.
- Finally, you can add plugins and webhooks as needed to each of your customers' stores using an API call. Each plugin utilizes a different Post request, which you can find here.
Neuro API Documentation
Overview
This document outlines the essential first actions to take upon accessing your Channels account for the first time. We'll guide you through creating an API token, setting up Postman, and more.
What You Can Do With Channels API
- Create New Stores
Stores are used to group different sales channels for different use cases. For example, you can use Channels to manage your e-commerce operations for multiple brands that are selling on multiple sales channels by taking advantage of our store functions capabilities. You can find more information about what you can do with Stores here and how to integrate our API solutions into your system here.
- Integrate With Different Sales Channels
You can set up different Post requests for each of the sales channels you're interested in using. This allows you to rapidly integrate your customers through the information you receive from them. This can be useful if you're using only a few sales channels, but it would take a lot of resources to set up separate API calls for multiple channels. Each sales channel has a different Post call, which you can find on our API documentation page here.
- Synchronize Product Stock Levels Across All Sales Channels
You can sync product stock levels to your sales channels. This allows you to synchronize all stock data for your products across all sales platforms you're using and removes the risk of over-selling. If you're using API calls to setup sales channels, you can edit the request you're sending to enable "Stock Management", "Download Products", "Add To Main Products" and "Auto Sync Stock". Alternatively, you can customise input to include the aforementioned settings if you're using hosted pages. You can find out more about how to do that here.
- You can create fulfilment data
You can use Channel API to create fulfilment data through an API call. After creating the fulfilment data, we'll sync it with the sales channels you have integrated into your system. You can find more information about creating fulfilment through API here.
- Add Plugins or Webhooks
You can add plugins and webhooks as needed to each of your customers' stores using an API call. Each plugin utilizes a different Post request, which you can find here.
- Create Invoices
Using an API call, you can also use Channels API's capabilities to automate your invoice creation process. This allows you to speed up your operations and focus on what really matters. You can find more information about creating invoices through our API services here.
Installing Postman
To install Postman, visit the official Postman website at Postman Downloads. Once there, you'll find the download button to choose the version compatible with your operating system—whether it's Windows, macOS, or Linux. After downloading the installation file, locate it in your designated download directory and install it by following the on-screen instructions.
If you haven't already done so, please create a Postman account to access its full features and services. You can quickly sign up for an account by visiting the Postman signup page at Postman Account Signup. Once you've installed Postman and created an account, you can efficiently utilise Channels API.
Setting Up Postman
To access the documentation for the Channels API, visit this page and save it to your Postman account.
- Click the "Run in Postman" button in the screen's top right corner.
- Choose the second option and select "Postman for Windows/Linux/Mac OS."
- Pick your workplace for importing the collection and confirm your selection.
- Upon completion, you'll find the Channels API calls and examples in your Postman account.
- You must get your API key from Channels UI under Profile > Settings to use our API.
Getting Started
Click here to see the detailed Channel API documentation.